
Body Care
Organize Your Garage in One Morning (DIY)
Jun
Note: This copy-ready article is written for web publishing and is based on practical garage organization guidance from reputable U.S. home improvement, safety, organizing, and DIY sources.
Introduction: Your Garage Is Not a Household Black Hole
If your garage currently looks like a lawn mower, a holiday wreath, three soccer balls, and a mystery box labeled “misc” got into a dramatic argument, you are not alone. The garage is often the most forgiving room in the house because it has a door. Close it, walk away, and suddenly the problem becomes Future You’s emotional support clutter.
Good news: you do not need a professional organizer, a three-day weekend, or a color-coded spreadsheet worthy of NASA. You can organize your garage in one morning with a focused DIY plan, a few basic supplies, and a firm rule: no wandering into nostalgia just because you found a badminton racket from 2009.
This guide shows you how to declutter, sort, clean, and set up practical garage storage in about four hours. The goal is not to create a showroom garage where every screwdriver has a velvet-lined home. The goal is better: a functional garage where tools are visible, seasonal items are labeled, sports gear is contained, and you can actually park a car without performing advanced geometry.
The One-Morning Garage Organization Plan
A successful garage organization project starts with a time limit. Without one, you may spend two hours deciding whether one rusty hinge has “future potential.” Spoiler: it probably does not.
For a true one-morning garage makeover, divide the work into four simple phases:
- Hour 1: Empty and sort the main clutter zones.
- Hour 2: Declutter, donate, recycle, and create categories.
- Hour 3: Clean the floor, shelves, and work surfaces.
- Hour 4: Install quick storage fixes and put everything back by zone.
This approach works because it avoids the classic garage mistake: buying storage before deciding what deserves storage. More bins do not fix clutter. They just give clutter matching outfits.
Before You Start: Gather Your DIY Garage Organization Supplies
You do not need fancy gear to organize a garage fast, but having supplies ready prevents the dreaded mid-project hardware store detour. That detour somehow always includes a snack, a new drill bit, and forgetting why you went.
Basic Supplies
- Heavy-duty trash bags
- Cardboard box or bin for donations
- Clear storage bins with lids
- Painter’s tape and a marker
- Broom, dustpan, shop vacuum, or leaf blower
- Microfiber cloths or old towels
- Utility hooks, wall hooks, or garage rail hooks
- Pegboard hooks or small baskets if you already have pegboard
- Labels or masking tape for quick labeling
- Gloves for dusty, sharp, or mystery-textured objects
Optional but Helpful
- Freestanding metal shelving
- Wall-mounted track system
- Overhead storage rack for seasonal items
- Magnetic tool strip
- Small parts organizer for screws, nails, washers, and hardware
- Rolling cart for car-care products, gardening tools, or DIY supplies
If you are working with a tight budget, start with hooks, labels, and clear bins. These three items solve a surprising number of garage organization problems without requiring a full storage-system makeover.
Step 1: Pull Everything OutBut Be Strategic
The fastest way to organize a garage is to see what you actually own. However, that does not mean dragging every single item onto the driveway like you are hosting a yard sale for raccoons. For a one-morning project, focus on the most chaotic sections first: the floor, entryway, workbench, and any shelves where items have started forming geological layers.
Create four temporary zones in your driveway or garage entrance:
- Keep: Items you use, need, or truly value.
- Donate: Useful items in good condition that someone else can use.
- Trash: Broken, expired, moldy, unsafe, or unusable items.
- Relocate: Things that belong inside the house, shed, attic, or another room.
Be honest. If the item has not been used in years and your only defense is “just in case,” ask what case you are preparing for. If it involves one specific bolt from a coffee table you no longer own, let it go with dignity.
Step 2: Declutter Before You Store
Decluttering is the secret sauce of garage organization. Shelves, hooks, and bins are useful only after you reduce the volume. Otherwise, you are simply giving prime real estate to things that should have left the family years ago.
What to Remove Immediately
Start with obvious space thieves:
- Broken tools you will not repair
- Empty boxes saved “for later”
- Old paint that has separated, dried, or frozen
- Duplicate garden tools
- Sports gear your family has outgrown
- Random cords that match no device in this century
- Expired pesticides, cleaners, pool chemicals, or automotive fluids
- Damaged holiday decorations
- Old furniture waiting for a makeover that never arrives
A good rule: if it is unsafe, unusable, or unloved, it does not get a VIP spot in your garage.
Handle Hazardous Items Carefully
Garages often collect household hazardous waste such as paint, motor oil, pesticides, batteries, solvents, and strong cleaners. Do not pour these down drains, toss them casually into the trash, or store them forever beside the beach chairs. Check your city or county rules for household hazardous waste drop-off events or collection centers.
Keep chemicals upright, sealed, labeled, and away from children, pets, heat, and direct sunlight. Store flammable products according to label instructions. Propane tanks should not be stored inside an attached garage. If you find mystery containers with no label, treat them with caution and contact your local waste authority for disposal guidance.
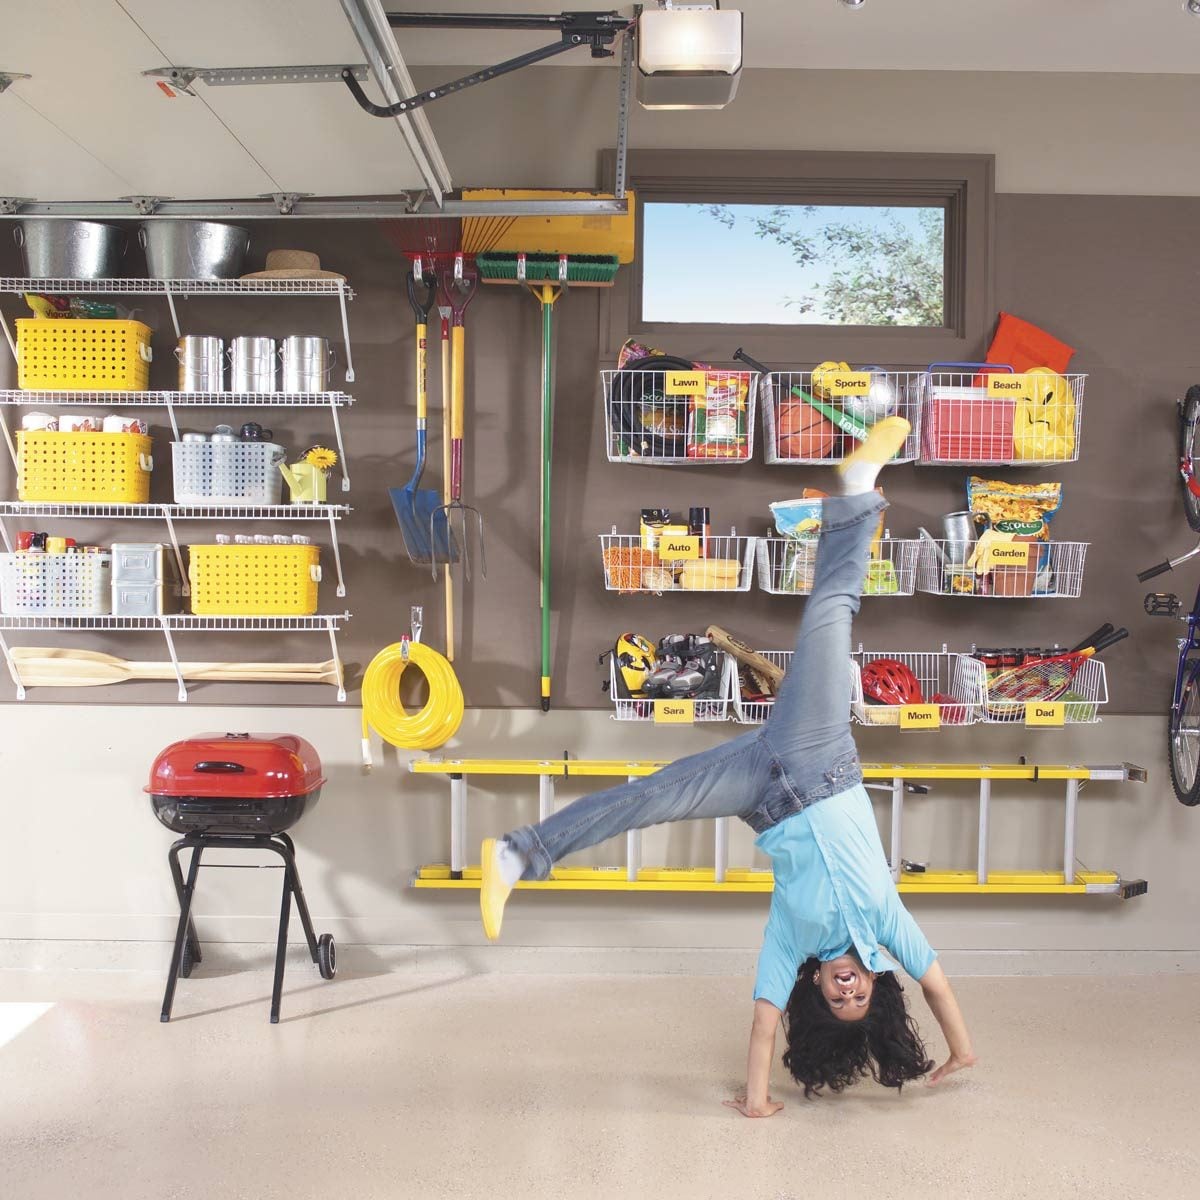
Step 3: Create Garage Zones That Match Real Life
The best garage organization ideas are not complicated. They are based on one simple principle: store items where you use them. A garage organized by real-life habits stays clean longer than one organized by fantasy habits.
Common Garage Zones
- Tool zone: Hand tools, power tools, hardware, extension cords, safety gear
- Lawn and garden zone: Rakes, shovels, fertilizer, gloves, pots, hoses
- Sports zone: Balls, helmets, bikes, scooters, rackets, camping gear
- Auto zone: Car wash supplies, tire gauge, jumper cables, fluids, detailing cloths
- Seasonal zone: Holiday decor, snow gear, beach gear, fans, coolers
- Household overflow zone: Bulk paper goods, tools for repairs, storage bins
- Drop zone: Everyday items like backpacks, umbrellas, dog leashes, and reusable bags
Put frequently used items near the door or at eye level. Put seasonal and rarely used items higher up or farther back. Heavy items should stay low so nobody has to perform a risky overhead lift with a bin full of ceramic pumpkins.
Step 4: Use Vertical Storage Like a DIY Genius
The floor is the most valuable space in your garage. Once the floor disappears, the garage becomes a maze. The quickest way to reclaim it is vertical storage: walls, shelves, hooks, pegboards, tracks, and overhead systems.
Wall Hooks for Bulky Tools
Wall hooks are ideal for ladders, rakes, brooms, shovels, folding chairs, and extension cords. They are inexpensive, easy to install, and instantly reduce floor clutter. For heavier items, always anchor hooks into studs or use hardware rated for the weight.
Pegboard for Small Tools
Pegboard is a garage classic because it keeps small tools visible. Use it for screwdrivers, pliers, wrenches, tape measures, paintbrushes, and small baskets. For extra order, outline tools with a marker so every item has a clear home. It may look intense, but it works. Also, it makes you feel like a person who definitely knows where the 10 mm socket went.
Track Systems for Flexible Storage
Wall-mounted rail or track systems are excellent for garages because hooks and baskets can move as your storage needs change. Use tracks for bikes, garden tools, cords, sports equipment, and cleaning supplies. They are especially useful for families because the garage can evolve as kids grow and hobbies change.
Overhead Storage for Seasonal Items
Ceiling-mounted storage racks can be a smart solution for lightweight seasonal items such as camping gear, holiday decorations, pool toys, and empty coolers. Keep overhead bins clearly labeled and avoid storing anything you need every week. Also check that racks do not interfere with the garage door opener, tracks, lights, or vehicle clearance.
Step 5: Choose Bins That Actually Help
Clear bins are a garage organizer’s best friend because they let you see what is inside without opening five containers and saying increasingly dramatic things. Choose bins that stack securely and fit your shelves. Matching bins are not required, but uniform sizes make stacking easier and reduce visual chaos.
Bin Rules for a Better Garage
- Use clear bins for seasonal decor, camping supplies, and sports gear.
- Use lidded bins to protect items from dust, pests, and moisture.
- Label at least two sides so the label is visible from different angles.
- Avoid cardboard for long-term garage storage because it can attract pests and absorb moisture.
- Keep bins category-specific; do not create a “random stuff” bin unless you enjoy future treasure hunts.
For small hardware, use a divided organizer or clear jars. Sort screws, nails, wall anchors, washers, picture hooks, and bolts by type. If you cannot identify a piece of hardware and it has no obvious purpose, it may be clutter wearing a tiny metal costume.
Step 6: Set Up a Simple DIY Workbench Area
A garage workbench does not need to be huge. In fact, a smaller workbench is easier to keep clear. The key is to create a dedicated surface for repairs, small projects, and tool use.
If you already have a bench, clear it completely. Keep only daily-use tools, a small parts tray, safety glasses, a tape measure, and current project supplies. Store everything else on pegboard, shelves, or in drawers.
If you do not have a workbench, create a quick version with a sturdy table, a wall-mounted folding bench, or low cabinets topped with plywood. Add a power strip nearby if safe and practical. Keep cords wrapped and hung, not tangled in a drawer like spaghetti with electrical ambition.
Step 7: Clean Before You Put Things Back
Once clutter is out, take advantage of the rare moment when you can see the garage floor. Sweep or vacuum dirt, leaves, cobwebs, and the mysterious grit that appears even when no one knows why.
Wipe shelves, clean corners, and remove anything that could attract pests. If you find signs of water leaks, insects, rodents, or mold, address those before storing items again. Organization is not just about looking tidy; it also protects your belongings and makes the garage safer.
Step 8: Put Everything Back by Frequency of Use
Now comes the satisfying part: returning items to their new homes. Use this simple placement rule:
- Daily or weekly use: Store at eye level or near the door.
- Monthly use: Store on shelves or wall systems.
- Seasonal use: Store high, overhead, or toward the back.
- Heavy items: Store low.
- Dangerous items: Store locked, high, or according to safety instructions.
For example, garden gloves and pruning shears should be near the lawn tools, not buried in a holiday bin. Bike helmets should live near bikes. Car wash supplies should be grouped in one caddy or bin. The easier it is to return an item, the more likely your household will actually do it.
Fast Garage Organization Ideas for Common Problem Areas
Problem: Sports Gear Everywhere
Use a tall mesh bin, rolling cart, or open basket for balls and helmets. Install hooks for rackets, scooters, and folding chairs. Give each sport its own bin or shelf. If your family plays multiple sports, label zones by activity so soccer does not invade baseball like a tiny athletic empire.
Problem: Tools Disappear
Use pegboard, a rolling tool chest, or a wall-mounted cabinet. Keep the most-used tools visible. Store power tools with batteries and chargers nearby, but avoid overcrowding cords. Add a small “return tray” for tools that need to be put away later.
Problem: Holiday Decorations Take Over
Use clear, lidded bins sorted by holiday. Label each bin with the holiday and contents, such as “Halloweenporch decor” or “Christmastree ornaments.” Store seasonal bins overhead or on upper shelves. Keep delicate items in climate-controlled spaces if heat, cold, or humidity could damage them.
Problem: Lawn Tools Lean Against Every Wall
Install a wall rail, heavy-duty hooks, or a garden tool rack. Group long-handled tools together: rakes, shovels, brooms, and hoes. Keep sharp tools with blades facing inward or protected. Hang hoses neatly on a hose hanger or large hook.
Problem: The Entry Door Is a Disaster
Create a garage drop zone with hooks, a shoe tray, and a small shelf. This is perfect for umbrellas, reusable shopping bags, dog leashes, backpacks, and outdoor shoes. A good drop zone keeps everyday clutter from migrating into the kitchen like it pays rent there.
Garage Safety Tips You Should Not Skip
A clean garage is nice. A safe garage is better. While organizing, check for hazards that can cause injuries, fires, or damage.
- Anchor tall shelving units to the wall if they could tip.
- Do not overload shelves beyond their rated capacity.
- Keep sharp tools out of children’s reach.
- Store chemicals in original containers when possible.
- Keep flammable products away from heat sources.
- Do not block electrical panels, water heaters, exits, or garage door tracks.
- Store heavy bins on lower shelves.
- Keep walkways clear to prevent trips and falls.
Also, avoid storing food, paper keepsakes, photos, and delicate fabrics in the garage unless the space is climate-controlled. Temperature swings, moisture, and pests can turn sentimental storage into heartbreak with mouse footprints.
The 15-Minute Garage Maintenance Routine
After your one-morning DIY garage organization project, the real win is keeping it that way. Fortunately, maintenance is easier than the initial cleanup.
Once a week or twice a month, do a quick reset:
- Return tools to pegboard or drawers.
- Put sports gear back into bins.
- Break down recycling.
- Throw away obvious trash.
- Sweep the high-traffic area.
- Move donations to your car so they actually leave the house.
Set a “one in, one out” rule for bulky items. If a new cooler, bike, or shelving unit enters the garage, something else should be donated, recycled, relocated, or discarded. Garages do not magically expand, despite what every enthusiastic weekend shopper believes.
DIY Garage Organization Example: A Four-Hour Makeover
Imagine a two-car garage that currently holds one car, four bikes, lawn tools, paint cans, holiday bins, camping equipment, a workbench, and a suspicious number of extension cords. Here is how a one-morning plan might look.
8:00–9:00: Sort the Floor
Pull loose items into the driveway. Group bikes together, put garden tools in one pile, place sports gear in another, and move trash directly into bags. Anything that belongs inside the house goes into a relocation bin.
9:00–10:00: Declutter and Decide
Donate outgrown helmets, duplicate tools, unused planters, and the cooler with the broken handle. Set aside old paint and chemicals for proper disposal. Break down empty boxes. Keep only what serves your current life.
10:00–11:00: Clean and Install Quick Storage
Sweep the floor. Wipe shelves. Add hooks for bikes and long-handled tools. Attach a small pegboard near the workbench. Place clear bins on shelves and label them by category.
11:00–12:00: Put Everything Back
Place bikes on hooks or in one bike zone. Store garden tools on wall racks. Put camping gear in labeled bins on upper shelves. Keep car supplies in one caddy. Move donations into the trunk immediately. Admire the floor. It has been through a lot.
Common Garage Organization Mistakes to Avoid
Mistake 1: Buying Storage First
Storage should fit your belongings, not the other way around. Declutter first, measure second, buy third.
Mistake 2: Using the Floor as a Shelf
When items live on the floor, they spread. Use hooks, shelves, racks, and bins to keep the floor as clear as possible.
Mistake 3: Storing Everything in Opaque Bins
Opaque bins look tidy but can hide chaos. If you use them, label them clearly. Clear bins are usually better for fast identification.
Mistake 4: Making Categories Too Broad
A bin labeled “garage stuff” is not a system. Use specific labels such as “bike repair,” “sprinkler parts,” “camp kitchen,” or “Christmas lights.”
Mistake 5: Ignoring Maintenance
Even the best garage storage system needs a reset. Schedule quick cleanups before clutter has time to form a committee.
Conclusion: One Morning Can Change the Whole Garage
Organizing your garage in one morning is completely realistic when you keep the project focused. You are not renovating the space, installing custom cabinets, or auditioning for a home makeover show. You are removing what does not belong, grouping what remains, cleaning what is visible, and creating simple homes for the items you actually use.
The best DIY garage organization system is the one your household can maintain. Use clear bins, visible labels, vertical storage, wall hooks, pegboard, and zones that match daily routines. Keep heavy items low, seasonal items high, and hazardous materials handled responsibly. Most of all, resist the temptation to turn the garage back into a waiting room for undecided objects.
By lunchtime, you can have a garage that feels cleaner, safer, and easier to use. You may even find enough space to park the car. Imagine that: a garage doing garage things. Revolutionary.
Real-Life Experience: What Actually Works When You Organize a Garage in One Morning
The first time I tried to organize a garage in one morning, I made the classic rookie mistake: I started with the workbench. This seemed logical because it was the messiest area. Unfortunately, workbenches are emotional traps. Every little object feels important when it is sitting beside a hammer. Within twenty minutes, I was holding a bracket from an unknown piece of furniture and wondering whether it might someday save me from a home repair emergency. That is when I learned the golden rule: start with the floor, not the tiny stuff.
Clearing the floor gives you immediate momentum. It also creates room to sort larger categories. Bikes go together. Yard tools go together. Sports gear goes together. Once those big groups are visible, the garage stops feeling like one giant problem and starts looking like several small problems wearing dusty shoes.
Another lesson: labels matter more than beautiful containers. Matching bins look great, but a clearly labeled bin is what keeps the system alive three months later. A bin labeled “Outdoor Extension Cords” is useful. A bin labeled “Stuff” is a cry for help. The same goes for shelves. If one shelf is for camping gear, do not let it slowly become camping gear plus paint rollers plus an inflatable flamingo. That is how the garage wins.
I have also learned that wall hooks are the fastest upgrade with the biggest visual payoff. Hanging a ladder, rake, broom, or folding chair instantly makes the garage look cleaner because tall, awkward items stop leaning against everything like bored teenagers. Pegboard is another favorite, especially near a workbench. The trick is not to overload it. Keep everyday hand tools visible and move rarely used tools into drawers or bins.
The most surprisingly effective habit is the donation box. Keep one sturdy box or bin near the garage entrance. When you find something useful but unnecessary, drop it in. When the box is full, put it in the car. Not “someday.” Not “after one more item.” Put it in the car and let it leave your life like a tiny parade of reclaimed square footage.
One-morning garage organization is not about perfection. Real garages still hold muddy shoes, half-used bags of soil, bike pumps, and seasonal decorations that somehow multiply in the dark. The win is creating a system that can recover quickly. When every category has a home, cleanup takes minutes instead of an entire Saturday.
The best moment comes at the end, when you sweep the floor and realize the garage feels bigger even though you did not add a single square foot. That is the magic of removing clutter and using vertical space. The garage becomes less of a storage cave and more of a useful part of the home. And if you can open the car door without bumping into a rake, congratulations: you have reached elite DIY adulthood.
