
Skincare
DOLLAR STORE DECORATIVE RAG BALLS!
Jun
Some home decor projects begin with a designer mood board, a color palette, and a cup of fancy coffee. This one begins with a dollar store ball, a pile of fabric scraps, and the bold belief that your living room bowl deserves better than collecting keys, receipts, and that one mystery battery nobody wants to throw away.
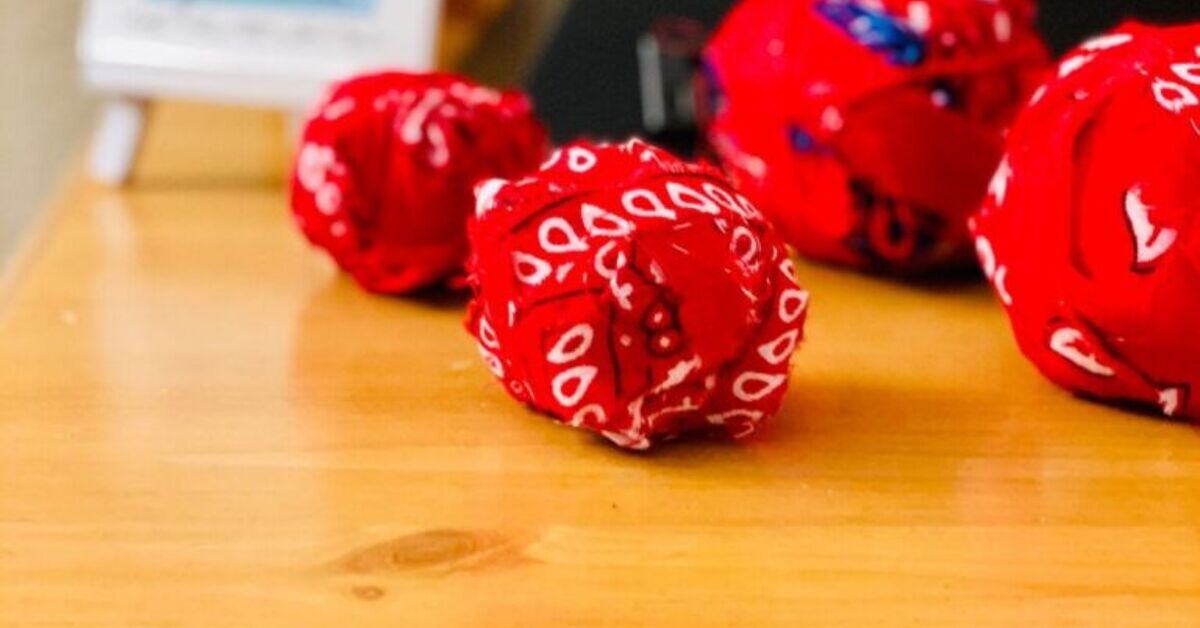
Dollar store decorative rag balls are exactly what they sound like: simple decorative balls wrapped with fabric strips, ribbon, twine, muslin, burlap, old shirts, seasonal prints, or whatever textile treasure you have hiding in a drawer. They can be used as bowl fillers, tray accents, shelf decor, holiday ornaments, farmhouse decorations, or quick table centerpiece pieces. The best part? They look charmingly handmade without requiring sewing skills, expensive tools, or a craft room the size of a small bakery.
This DIY project is budget-friendly, beginner-friendly, and deeply forgiving. If your fabric strip goes sideways, congratulations: you have created “rustic texture.” If your glue blob shows, rotate the ball. If your colors clash, call it eclectic. Decorative rag balls are one of those rare crafts where imperfection actually improves the look. They bring softness, texture, and personality into a room, and they do it for the price of a coffee you probably finished too quickly.
What Are Dollar Store Decorative Rag Balls?
Decorative rag balls are lightweight balls covered with torn or cut fabric strips. The base can be a foam ball, plastic baseball, wiffle ball, paper mache ball, or even a tightly crumpled paper ball wrapped with tape. Dollar stores often carry seasonal foam balls, plastic sports balls, craft foam shapes, ribbon, cotton fabric pieces, burlap ribbon, twine, faux greenery, and small decorative accents that work beautifully for this project.
These fabric-wrapped balls are commonly used as decorative bowl fillers. You can place them in a dough bowl, glass vase, ceramic dish, tiered tray, basket, mantel display, coffee table tray, entryway console, or bookcase. They are small enough to tuck into empty spaces but noticeable enough to add color and warmth. In other words, they are the throw pillows of the bowl world. Unnecessary? Maybe. Adorable? Absolutely.
Why This Dollar Store Craft Works So Well
The magic of DIY rag balls is texture. Modern rooms often have many hard surfaces: wood tables, metal lamps, glass vases, ceramic bowls, painted shelves, and smooth countertops. Adding fabric creates visual softness. A bowl of rag balls can make a space feel layered, cozy, and intentionally styled instead of “I put this bowl here and hoped for the best.”
Another reason this craft works is scale. Small accents help connect larger pieces in a room. If your sofa has blue pillows, your curtains have a beige pattern, and your rug has a little rust color, you can make rag balls using fabric strips in those shades. Suddenly the room looks pulled together, as if you planned it all along. Your secret is safe.
This project is also practical for upcycling. Old button-down shirts, worn-out pillowcases, leftover quilt fabric, stained tablecloth edges, denim scraps, and seasonal fabric remnants can become charming home decor. Instead of tossing small textile scraps, you turn them into something useful and display-worthy.
Supplies You Need
You can make decorative rag balls with only a few supplies. Most are easy to find at a dollar store, craft store, thrift shop, or already in your home.
Basic Supplies
- Foam balls, plastic baseballs, wiffle balls, or paper mache balls
- Fabric scraps, old shirts, muslin, burlap, denim, cotton prints, or seasonal fabric
- Scissors or rotary cutter
- Hot glue gun or strong craft glue
- Straight pins, floral pins, or small dabs of glue for securing ends
- Ribbon, twine, lace, raffia, or jute cord for extra detail
- A bowl, tray, basket, or vase for styling
Optional Extras
- Tea or coffee for staining fabric to create an aged look
- Cinnamon for primitive farmhouse styling
- Small faux leaves, berries, or mini flowers for seasonal decor
- Wood beads, buttons, or charms for added personality
- Clear craft sealer if the balls will be handled often
For a no-sew version, use hot glue. For a low-glue version, use pins and tuck the fabric ends under overlapping strips. For a kid-friendly version, choose craft glue and larger fabric strips, though younger crafters should have adult help with scissors and hot glue.
How to Make Dollar Store Decorative Rag Balls
This is the basic method. Once you understand it, you can customize the size, color, fabric, and finish to match any room or season.
Step 1: Choose Your Base
Start with a lightweight ball. Foam balls are the easiest because pins slide into them, but plastic balls also work well with hot glue. Wiffle balls are great if you want a larger decorative piece without much weight. Plastic baseballs from the toy aisle can create sturdy bowl fillers, especially for farmhouse, patriotic, or seasonal displays.
For a fuller arrangement, use several sizes. A bowl filled with identical balls can look a bit too perfect, like it is waiting for inspection. Mixing small, medium, and large balls makes the display feel more relaxed and natural.
Step 2: Pick Your Fabric
Choose fabric that matches the mood of your room. Cotton prints are easy to wrap and come in endless colors. Muslin gives a soft vintage feel. Burlap creates rustic texture. Denim looks casual and sturdy. Plaid, ticking stripe, buffalo check, and grain-sack-style fabric are perfect for farmhouse decor. Floral fabric adds cottage charm. Velvet scraps can look surprisingly luxurious, assuming your glue gun behaves itself.
Try to use two or three coordinating fabrics rather than one pattern alone. For example, pair cream muslin with tan ticking stripe and faded blue denim. Or use black-and-white check with solid white cotton and a narrow jute wrap. The goal is contrast without chaos.
Step 3: Tear or Cut Fabric Strips
Cut or tear your fabric into strips. For small balls, use strips around 1/2 inch wide. For medium or large balls, 1 inch wide usually works well. Torn fabric creates soft, frayed edges, which is perfect for primitive, cottage, farmhouse, or shabby chic decor. Cut fabric creates cleaner lines and works better for modern or polished styles.
Do not worry if the strips are uneven. A little variation makes the finished rag ball more interesting. This is not a wedding dress. It is a decorative ball that will live in a bowl and mind its own business.
Step 4: Secure the First Strip
Add a tiny dot of hot glue to the ball and press one end of the fabric strip into place. If using foam, you can secure the strip with a straight pin. Hold it for a few seconds until it grabs. Start wrapping the fabric around the ball, changing direction as you go. Think of winding yarn into a ball: over, around, across, diagonal, repeat.
The trick is to avoid wrapping in the same direction every time. If you only wrap around the middle, your rag ball will look like it is wearing a tiny fabric belt. Cute, but not the assignment.
Step 5: Keep Wrapping and Layering
Continue wrapping until the base is completely covered. Add a small dot of glue every few wraps if needed. Overlap the fabric slightly so no foam or plastic shows through. If one strip ends, glue it down on the underside or under an overlapping section, then begin the next strip.
For a more collected look, switch fabrics as you wrap. Use one print for a few turns, then another, then a neutral strip. This creates a layered, handmade appearance that looks much more expensive than it is.
Step 6: Hide the Final End
When the ball is covered, tuck the last fabric end under a previous strip and secure it with glue. Press gently until it stays in place. If you see a glue string, remove it before it becomes part of the design. Hot glue strings are the spiderwebs of the craft world: they appear from nowhere and somehow end up on your sleeve.
Step 7: Add Finishing Touches
You can leave the rag balls simple or dress them up. Wrap a thin jute cord around a few balls for farmhouse style. Add a narrow ribbon for holiday decor. Tie on a small charm for a gift bowl. Attach faux leaves for fall, mini berries for Christmas, lace for cottage decor, or tiny fabric bows for a sweet handmade look.
Color Ideas for Every Season
One of the best things about dollar store decorative rag balls is how easily they change with the seasons. You can make a neutral set for everyday decor and a few themed sets for holidays.
Everyday Farmhouse
Use cream, tan, gray, black-and-white check, ticking stripe, burlap, and faded denim. Display them in a wooden dough bowl, galvanized tray, or white ceramic bowl.
Spring Cottage
Choose soft florals, pale green, blush pink, light blue, muslin, and lace. Add faux lavender or small greenery pieces around the bowl for a fresh spring look.
Summer Coastal
Use navy, white, sand beige, chambray, rope, and striped cotton. Place the rag balls in a glass bowl with shells or driftwood for a beachy centerpiece.
Fall Harvest
Pick rust, mustard, olive, brown plaid, cream flannel, and burlap. Style them with mini pumpkins, faux leaves, pinecones, or dried orange slices.
Christmas Cozy
Use red plaid, green ticking stripe, cream muslin, velvet ribbon, and jute. Place them in a basket with ornaments, bells, cinnamon sticks, or faux evergreen sprigs.
Where to Display Decorative Rag Balls
Decorative rag balls are small, but they can make a room feel more finished. Use them anywhere you need texture, color, or a little handmade charm.
- Coffee table tray: Add three to five rag balls beside a candle, small plant, and stack of books.
- Dough bowl centerpiece: Fill a long wooden bowl with rag balls, greenery, and seasonal accents.
- Entryway table: Place them in a shallow dish near a lamp or framed photo.
- Bookshelf: Tuck one or two into empty shelf spaces to soften hard lines.
- Tiered tray: Use small rag balls as filler between mugs, signs, jars, and mini plants.
- Holiday tree: Add twine loops and use them as handmade ornaments.
- Guest room: Put a few in a small basket for a cozy, welcoming touch.
Design Tips for a High-End Look
The difference between “cute craft” and “boutique decor” often comes down to restraint. Choose a focused color palette. Mix textures, but do not use every ribbon in the drawer at once. Let some balls be plain and others detailed. Use odd numbers when styling, such as three, five, seven, or nine. Odd-numbered groupings tend to look more natural and less staged.
Also, think about the container. A beautiful bowl can elevate even the simplest rag balls. Wood bowls create warmth. White ceramic bowls feel clean and classic. Glass vases show off the colors. Baskets add casual texture. Metal trays work well for farmhouse or industrial spaces.
If your rag balls look too new, lightly age the fabric before wrapping. Tea staining, coffee staining, or using washed fabric can create a softer, more vintage appearance. For primitive decor, some crafters use a light mixture of coffee and cinnamon to darken the fabric and add an old-fashioned look. Let the fabric dry fully before displaying.
Common Mistakes to Avoid
Using Too Much Glue
A tiny dot is enough. Too much glue creates hard lumps and visible shiny spots. Use glue only where needed to secure the strip.
Choosing Fabric That Is Too Thick
Heavy upholstery fabric can be difficult to wrap around small balls. Save thick fabric for larger bases or cut it into narrower strips.
Forgetting to Vary the Direction
Wrap diagonally, vertically, and horizontally. Changing direction helps cover the ball evenly and creates a more natural rag-ball look.
Making Every Ball Identical
A little variation makes the display feel handmade and collected. Mix sizes, patterns, and textures while staying within one color family.
Budget Breakdown
This project is wonderfully inexpensive. A pack of foam or plastic balls, a few fabric remnants, and basic glue can create enough decorative pieces for a bowl, tray, or seasonal display. If you already have fabric scraps, the cost drops even more. Old shirts, worn tea towels, leftover quilting cotton, and thrifted linens all work beautifully.
For the most budget-friendly version, use paper or plastic balls as the base, fabric from old clothing, and small amounts of craft glue. For a slightly more polished version, buy coordinating fabric fat quarters, ribbon, and jute. Either way, the finished decor can look far more expensive than the supply list suggests.
Creative Variations to Try
No-Sew Ornament Rag Balls
Attach a loop of twine or ribbon before securing the final fabric strip. These make charming Christmas tree ornaments, gift toppers, or handmade party favors.
Primitive Farmhouse Rag Balls
Use muslin, homespun plaid, ticking stripe, and coffee-stained fabric. Display them in a wooden bowl with spools, small books, or dried botanicals.
Boho Fabric Balls
Use gauze, linen, macrame cord, muted earth tones, and wood beads. Place them in a woven basket or terracotta bowl.
Patriotic Rag Balls
Use red, white, and blue fabric strips for Memorial Day, Fourth of July, or summer porch decor. Mix stars, stripes, denim, and cream muslin for a classic Americana style.
Kids’ Room Rag Balls
Choose bright cotton prints, gingham, polka dots, or fabric that matches the room theme. Keep them for display only if small pieces or pins are used.
How to Store and Refresh Them
Store decorative rag balls in a labeled box or zippered bag so they do not collect dust between seasons. Keep them dry, especially if you used tea-stained or coffee-stained fabric. If they become dusty, use a soft brush, lint roller, or low-suction vacuum attachment.
To refresh old rag balls, add a new strip of fabric over the existing one, tie on a different ribbon, or group them with new seasonal accents. A neutral set can work all year if you change the styling around it. In spring, add faux greenery. In fall, add pinecones. At Christmas, add bells or evergreen sprigs. Your rag balls will not complain. They are emotionally stable decor.
Personal Experience: What I Learned Making Dollar Store Decorative Rag Balls
The first time I made dollar store decorative rag balls, I was convinced the project would take ten minutes. This was adorable optimism. The first ball took closer to thirty minutes because I spent twenty of those minutes deciding whether the fabric looked “casual farmhouse” or “laundry accident.” Once I stopped overthinking it, the process became surprisingly relaxing. Wrap, glue, rotate, repeat. It is the craft version of deep breathing, except with more glue strings.
One thing I learned quickly is that fabric choice matters more than perfection. Thin cotton wraps smoothly and gives a clean look. Muslin frays beautifully and instantly creates a soft vintage feel. Burlap looks great, but it can shed like a nervous golden retriever, so I use it sparingly. Denim is wonderful for casual decor, especially when paired with cream or ticking stripe. My favorite combination is faded blue fabric, natural muslin, and a little jute. It looks relaxed, warm, and expensive enough that nobody needs to know the base came from the toy aisle.
I also discovered that smaller strips are easier to control. Wide strips cover faster, but they can bunch around the curves. Narrow strips take more time, yet they create a tighter, more layered look. For small foam balls, I prefer strips about half an inch wide. For larger plastic balls, one-inch strips work well. The best method is to make a test ball first. That test ball may not be perfect, but it will teach you what your fabric wants to do. Fabric has opinions. Some fabrics cooperate. Others behave like they have a personal grudge against round objects.
Another helpful lesson is to make more rag balls than you think you need. Three can look nice in a tiny dish, but a dough bowl usually needs a generous amount to feel full. I like making a batch of seven to twelve in mixed sizes. The variety makes the display look collected instead of overly coordinated. When everything is the same size and fabric, the bowl can look flat. When the balls vary slightly, the arrangement feels more natural and styled.
My biggest mistake was using too much hot glue. I thought more glue meant more security. In reality, more glue meant bumps, shiny patches, and one memorable moment when I glued a fabric strip to my finger with the confidence of a professional and the grace of a raccoon in a pantry. A tiny dot is usually enough. The fabric overlaps itself, so it does not need to be glued every inch.
The most satisfying part of this project is styling the finished pieces. A simple bowl of rag balls can make a coffee table feel finished without looking fussy. On a bookshelf, one fabric ball can soften a stack of books or fill an awkward gap. In a tiered tray, small rag balls add color without taking over the whole display. During the holidays, I like adding twine loops and using a few as ornaments. They make a tree feel handmade and cozy, especially mixed with wood beads, bells, and simple ribbon.
Dollar store decorative rag balls are also a great project for using sentimental fabric. A piece of an old shirt, baby blanket, table runner, or worn quilt scrap can become a small decorative keepsake. That gives the project more meaning than buying a bag of generic bowl fillers. It becomes decor with a story, and that is the best kind.
Conclusion
Dollar store decorative rag balls prove that beautiful home decor does not have to be expensive, complicated, or painfully serious. With a few inexpensive supplies, fabric scraps, and a little patience, you can create charming bowl fillers, tray accents, ornaments, and seasonal decorations that fit your home perfectly. This project is flexible enough for farmhouse, cottage, rustic, boho, coastal, patriotic, and holiday styles. It is also one of the easiest ways to upcycle leftover fabric and give your decor a handmade touch.
The real beauty of DIY rag balls is that they are imperfect by design. Frayed edges, uneven wraps, mixed prints, and tiny quirks make each piece feel warm and personal. Whether you display them in a wooden dough bowl, glass vase, ceramic dish, or tiered tray, these little fabric-covered accents add texture, color, and personality. And if someone asks where you bought them, you can smile mysteriously and say, “Oh, I made those.” That is decorator code for: please admire my genius and ignore the glue strings.
Note: This article is written as original web-publishing content and synthesized from real U.S. DIY, home decor, dollar-store craft, fabric scrap, and decorative bowl filler guidance without copying source text.
