
Hair Care
Side by Side Tiles
Jun
Side by side tiles may sound like the world’s simplest design idea: put one tile next to another and call it a day. But in real homes, that tiny decision can become the difference between a kitchen backsplash that looks thoughtfully designed and one that looks like it lost an argument with a measuring tape.
Whether you are comparing two tile colors, mixing tile sizes, creating a border, planning a bathroom wall, designing a kitchen backsplash, or laying floor tile in a side-by-side pattern, the concept matters. Tiles do not live alone. They sit next to grout, trim, cabinets, countertops, tubs, vanities, thresholds, and, occasionally, a golden retriever who believes fresh mortar is a lifestyle choice.
This guide explores how side by side tiles work in interior design and installation: how to pair them, where to use them, what mistakes to avoid, and how to make the finished surface look intentional rather than accidental. We will cover design principles, material choices, grout strategy, layout patterns, transitions, practical examples, and real-world experience from tile projects that prove one thing clearly: tile is small, but it has opinions.
What Are Side by Side Tiles?
Side by side tiles are tiles placed directly adjacent to one another in a layout, either as a repeated pattern or as a deliberate contrast between two or more tile styles. The phrase can refer to a simple grid layout, a two-color checkerboard, a mixed-material backsplash, a border detail, a shower wall transition, or even two tile samples compared next to each other before installation.
In design terms, side by side tiles are about relationship. A white ceramic subway tile looks crisp beside light gray grout. The same tile beside charcoal grout suddenly becomes graphic and bold. A matte porcelain floor tile feels calm next to a glossy wall tile. A handmade zellige tile placed next to machine-cut porcelain creates texture, variation, and a very polite little design debate.
Why Side by Side Tile Design Matters
Tile is one of the most permanent visual choices in a room. Paint can be changed over a weekend. Pillows can be swapped whenever your mood changes or a seasonal sale whispers your name. Tile, however, usually involves mortar, grout, tools, labor, dust, and at least one person saying, “Are we sure about this?”
That is why side by side tile planning matters. The way tiles sit next to each other affects:
- The perceived size of a room
- The style of a kitchen or bathroom
- The amount of maintenance required
- The visibility of grout lines
- The difficulty and cost of installation
- The long-term durability of the surface
A successful side by side tile layout balances beauty and buildability. The best designs do not only look good in a showroom photo; they also survive steam, splashes, foot traffic, cleaning products, pets, children, and the occasional dropped shampoo bottle.
Popular Side by Side Tile Layouts
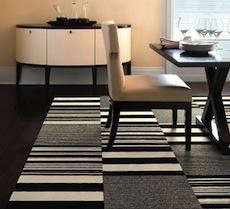
1. Straight Stack Tile Layout
The straight stack layout places tiles directly above and beside each other, creating clean vertical and horizontal grout lines. This is one of the most modern ways to arrange side by side tiles. It works especially well with rectangular subway tiles, square ceramic tiles, and large-format porcelain tiles.
A straight stack backsplash can make a kitchen feel crisp and architectural. In a bathroom, vertically stacked tiles can visually lift the ceiling height. The look is simple, but it requires precision. Crooked grout lines have nowhere to hide in a stacked pattern. Like a white shirt at a spaghetti dinner, it demands discipline.
2. Running Bond or Brick Pattern
The running bond pattern offsets each tile row, typically by half or one-third of the tile length. This classic layout is common for subway tile backsplashes and bathroom walls. It feels familiar, timeless, and relaxed.
However, long rectangular tiles can create lippage issues if installed with a 50% offset, especially when the tile has slight bowing. Many manufacturers recommend a one-third offset for longer tiles because it reduces the chance that the highest point of one tile sits next to the lowest point of another. Translation: your floor should not feel like a tiny ceramic mountain range.
3. Checkerboard Side by Side Tiles
Checkerboard tile is the dramatic cousin of the basic grid. Traditionally made with black and white tiles, it can also work in softer combinations such as cream and taupe, sage and ivory, or charcoal and warm gray.
This layout is strong, graphic, and instantly recognizable. It works beautifully in entryways, laundry rooms, powder rooms, and vintage-inspired kitchens. For a more updated look, consider larger squares, muted colors, or a diagonal placement. The goal is classic charm, not “retro diner that only serves fries and existential decisions.”
4. Mixed Size Tile Layouts
Combining different tile sizes side by side can create movement and custom character. A floor might use large square tiles with smaller accent tiles inserted at the corners. A backsplash might combine field tile with a narrow liner or decorative border.
The trick is proportion. If the sizes relate mathematically, the pattern usually feels organized. For example, a 6-by-6 tile can pair neatly with a 3-by-6 tile because the dimensions align. Random sizes can work too, but they require a clear plan and a skilled installer. Otherwise, the floor may look less “European villa” and more “puzzle box with missing instructions.”
5. Side by Side Accent Tile
Accent tile is often used beside plain tile to create a focal point. In a shower, this might be a niche lined with mosaic tile beside larger wall tiles. In a kitchen, it might be a patterned tile section behind the range surrounded by simpler field tile.
Accent tile works best when it has a reason to exist. Use it to frame a feature, define a zone, or add rhythm. Avoid sprinkling accent tiles randomly across a wall unless your design goal is “confetti with grout.”
Choosing Tile Materials That Work Well Side by Side
Ceramic Tile
Ceramic tile is a popular choice for walls, backsplashes, and low-to-moderate traffic floors. It is available in countless colors, shapes, and finishes. Ceramic tile is often easier to cut than porcelain, which can make it friendly for DIY backsplash projects.
When placing ceramic tiles side by side, check for size consistency. Handmade or rustic ceramic tiles may have slight variations, which can be beautiful, but they usually need wider grout joints to look natural and install properly.
Porcelain Tile
Porcelain tile is dense, durable, and highly water resistant, making it excellent for bathrooms, kitchens, laundry rooms, mudrooms, and floors. Large-format porcelain tiles are popular because they create fewer grout lines and a sleek appearance.
Side by side porcelain tiles can look stunning, but the substrate must be flat. Large tiles are less forgiving of uneven surfaces. If the floor or wall is wavy, the tile will reveal it with the enthusiasm of a toddler pointing at a stain on your shirt.
Natural Stone Tile
Marble, slate, travertine, limestone, and granite offer natural beauty and variation. No two stone tiles are exactly alike, which can make side by side placement especially rich and organic.
Stone also requires more planning. It may need sealing, specific cleaners, careful installation, and a stronger substrate than ceramic or porcelain. When using stone beside ceramic or porcelain, consider thickness differences, maintenance needs, and edge transitions.
Glass Tile
Glass tile reflects light and can make a backsplash or shower wall feel bright and polished. It works well beside ceramic or stone when used as an accent.
Because glass can be translucent, adhesive coverage and color matter. Poor installation may show through the tile. Glass edges can also be tricky, so trim pieces or finished borders are important.
How Grout Changes the Look of Side by Side Tiles
Grout is not just filler. Grout is the quiet design director standing between every tile, deciding whether the finished surface looks calm, bold, rustic, modern, or slightly chaotic.
Matching Grout
Matching grout creates a seamless look. It reduces contrast and helps the tile surface appear larger and quieter. This is ideal for small bathrooms, minimalist kitchens, large-format tile floors, and spaces where the tile texture should be noticed more than the tile outline.
Contrasting Grout
Contrasting grout highlights each tile. White subway tile with dark grout is a classic example. This can look sharp and graphic, but it also makes every grout line visible. If the layout is not precise, contrasting grout will announce the problem loudly and without mercy.
Neutral Grout
Neutral grout, such as warm gray, beige, greige, or soft taupe, is often the most forgiving choice. It gives definition without becoming too busy and tends to hide everyday dust better than bright white grout.
Side by Side Tiles in Kitchens
The kitchen backsplash is one of the best places to use side by side tiles creatively. It is visible, functional, and easier to update than an entire floor. A backsplash protects the wall from water, grease, and cooking splatter while adding personality to the room.
For a timeless kitchen, try side by side subway tiles in a straight stack, running bond, vertical stack, or herringbone layout. For a warmer handmade feel, use slightly irregular ceramic tiles in off-white, cream, sage, blue, or terracotta. For a bolder look, pair a simple field tile with a patterned tile panel behind the stove.
One important rule: consider cleaning. Tiny mosaic tiles can look gorgeous, but more tile means more grout lines. Behind a stove, where oil and sauce like to perform aerial stunts, fewer grout joints can be easier to maintain. Large-format tile or slab-style backsplashes are popular for this reason.
Side by Side Tiles in Bathrooms
Bathrooms are tile’s natural habitat. Water, humidity, and daily use make tile a practical choice for floors, shower walls, tub surrounds, and vanity backsplashes.
Side by side tile combinations can help define zones. For example, use large matte porcelain tile on the bathroom floor, glossy ceramic tile on the shower wall, and a small mosaic tile on the shower floor for better grip. The materials can differ, but the color palette should connect them.
A smart bathroom tile combination might include warm white wall tile, soft gray floor tile, and a muted green accent tile inside the shower niche. This creates interest without making the room feel like a tile showroom had a very busy dream.
Side by Side Tiles on Floors
Floor tile must be chosen with durability, slip resistance, and layout in mind. Porcelain is often a strong choice for high-traffic areas. Natural stone can be beautiful but may need more care. Ceramic can work in many residential spaces, depending on the product rating and location.
When laying floor tiles side by side, the layout should be centered and balanced. Avoid tiny sliver cuts along walls whenever possible. A professional-looking floor usually starts with careful measurement, dry layout, and adjustment before mortar is mixed.
For open-plan spaces, side by side tile can also create visual zones. A patterned tile “rug” under a kitchen island or in an entryway can add character while keeping the durability of tile. This is a great option for homes where a fabric rug would immediately meet mud, crumbs, and betrayal.
How to Mix Two Tiles Side by Side Without Regret
Keep One Element Consistent
When mixing two tiles, keep at least one design element consistent: color, finish, shape, size, undertone, or style. A glossy white subway tile can pair well with a white marble mosaic because the color family connects them. A matte concrete-look porcelain tile can pair with a textured gray ceramic tile because the mood is similar.
Watch Tile Thickness
Two beautiful tiles can still be a bad match if one is much thicker than the other. Uneven tile thickness creates awkward transitions and may require extra setting material, trim, or planning. Always compare samples side by side before buying full quantities.
Use Trim and Edging
Where one tile ends and another begins, the edge matters. Bullnose tile, metal profiles, pencil liners, stone thresholds, and clean caulk joints can help transitions look finished. Without trim, exposed tile edges may look unfinished or chip over time.
Limit the Drama
If one tile is bold, let the other tile calm down. Patterned cement-look tile beside heavily veined marble beside high-contrast grout beside colorful cabinets may be too much. Even maximalism needs a referee.
Installation Tips for Better Side by Side Tile Results
Start With a Flat, Clean Surface
Tile needs a stable, flat, properly prepared surface. Walls should be clean and sound. Floors should be rigid enough to prevent movement. Wet areas require appropriate waterproofing. Skipping surface preparation is one of the fastest ways to create cracks, loose tiles, or grout failure.
Dry Lay Before Installing
Before applying mortar, lay tiles out with spacers. This helps you check pattern flow, color variation, cuts, and transitions. Dry laying is especially important with handmade tile, patterned tile, natural stone, and mixed-size layouts.
Blend Tiles From Multiple Boxes
Tile color and shade can vary slightly from box to box. Blending tiles from several boxes helps distribute variation naturally. This is especially important with stone, wood-look porcelain, handmade ceramic, and tiles designed to have tonal movement.
Choose the Right Grout Joint Width
Grout joint width depends on tile type, tile size variation, layout, and manufacturer guidance. Rectified tiles can often use narrower joints, while handmade or rustic tiles usually need wider joints. Large-format tiles and offset patterns may require more careful spacing to reduce lippage.
Respect Movement Joints
Tile expands and contracts with changes in temperature, moisture, and structural movement. Movement joints at perimeters, changes of plane, and appropriate field locations help prevent cracking and tenting. In corners and transitions, flexible sealant is often used instead of hard grout.
Common Mistakes With Side by Side Tiles
Mistake 1: Choosing Tiles Separately
A tile that looks perfect alone may look wrong beside another material. Always view tile samples next to countertops, cabinets, flooring, wall paint, plumbing finishes, and lighting. Side by side comparison is not optional; it is the design version of meeting the family before the wedding.
Mistake 2: Ignoring Undertones
White is not just white. Some whites are warm, some are cool, some are creamy, and some are so blue they look like they have been emotionally raised by fluorescent lighting. If two tiles have clashing undertones, the whole room can feel off.
Mistake 3: Using Too Many Patterns
Patterned tile is wonderful in the right amount. But if the floor, shower wall, niche, backsplash, and border all compete, the room loses focus. Use one star and let the other tiles play supporting roles.
Mistake 4: Forgetting Maintenance
Glossy dark tile may show water spots. White grout may stain. Textured tile may hold dirt. Natural stone may need sealing. Before choosing side by side tiles, ask how the materials will age in real life, not just how they look under showroom lights.
Mistake 5: Poor Layout Planning
Bad cuts can ruin expensive tile. Slivers near corners, misaligned patterns, awkward transitions, and off-center focal points are common layout mistakes. A good installer plans from the most visible areas first and hides less-than-perfect cuts where they are least noticeable.
Best Rooms for Side by Side Tile Designs
Kitchen Backsplashes
Use side by side tiles to create subtle rhythm, highlight a range wall, or add handcrafted texture. A simple tile can feel custom when laid in a vertical stack or paired with a contrasting border.
Bathroom Showers
Combine large wall tiles with mosaic shower floor tiles. Use side by side tile transitions to frame niches, benches, or feature walls. Keep the palette cohesive for a spa-like effect.
Entryways
An entryway is a great place for durable side by side floor tiles. Patterned tile, checkerboard tile, or a tile rug effect can make a strong first impression while handling mud and moisture.
Laundry Rooms
Laundry rooms can handle more personality than formal spaces. Side by side patterned tiles, colorful ceramic tiles, or playful floor designs can turn a chore zone into a cheerful space. The laundry may still not fold itself, but at least the floor can be cute.
Fireplace Surrounds
Tile around a fireplace can be both decorative and practical. Side by side tiles in a stacked, herringbone, or handmade layout can create a focal point without overwhelming the room.
Design Examples for Side by Side Tiles
Example 1: Modern White Kitchen
Use 2-by-8 glossy white ceramic tiles in a vertical straight stack with warm gray grout. Pair them with white oak cabinets and a quartz countertop. The side by side tile layout feels clean, but the vertical orientation gives it a fresher look than traditional subway tile.
Example 2: Vintage Entry Floor
Use 12-by-12 black and ivory porcelain tiles in a diagonal checkerboard pattern. Add a simple border tile around the room. This creates a timeless side by side tile floor that feels classic without looking like a costume.
Example 3: Calm Bathroom Shower
Use large-format soft beige porcelain tile on shower walls and small matte mosaic tile on the shower floor. Add a matching niche trim. The side by side tile combination is practical, warm, and easy to coordinate with brass, chrome, or matte black fixtures.
Example 4: Bold Laundry Room
Use patterned porcelain floor tile beside plain painted walls and simple cabinetry. Let the floor carry the personality. This is one of the safest ways to use a bold tile because it is contained, functional, and fun.
How to Choose Side by Side Tiles Like a Designer
Start with the room’s purpose. A shower needs water performance. A kitchen backsplash needs easy cleaning. A mudroom needs durability. A fireplace surround needs heat-appropriate materials. Once function is clear, move to style.
Next, choose a color palette. Most successful tile combinations include one dominant tile and one supporting tile. The dominant tile covers the largest area. The supporting tile adds texture, contrast, or detail.
Then compare finish. Matte tile feels soft and modern. Glossy tile reflects light and adds polish. Textured tile creates depth but may require more cleaning. Mixing finishes can be beautiful, especially when the colors are related.
Finally, view samples in the actual room. Morning light, evening light, under-cabinet lighting, and overhead bulbs can all change how tile appears. A tile that looks warm in a store may look cool at home. A sample board is cheaper than regret, and regret does not come with a return label.
of Real-World Experience With Side by Side Tiles
One of the biggest lessons from working with side by side tiles is that the “simple” choice is rarely simple once it reaches the wall or floor. On a sample board, two tiles may look like best friends. In a real kitchen, under warm cabinet lighting and next to a cool countertop, they may suddenly act like strangers forced to share an elevator.
A common experience is choosing a backsplash tile after falling in love with one piece. The single tile looks beautiful in the showroom. It has texture, shine, variation, and just enough handmade charm. Then it is installed side by side across 35 square feet, and the personality multiplies. Sometimes that is wonderful. Sometimes it is like inviting one charming guest to dinner and accidentally hosting a marching band.
That is why laying out multiple tiles before installation matters so much. When you place tiles side by side on the floor, you begin to see repeated tones, edge irregularities, pattern direction, and color variation. With handmade-look tiles, some pieces may be darker, lighter, more wavy, or more glossy. Those variations are part of the charm, but they need to be distributed. If all the darker tiles end up in one corner, the wall can look stained even when it is perfectly clean.
Another practical experience involves grout color. Many homeowners choose grout at the last minute, which is a little like choosing shoes after arriving at the wedding. Grout changes everything. A close-match grout can make imperfect tile spacing less noticeable. A dark contrasting grout can turn basic tile into a bold pattern, but it also highlights every cut, corner, and spacing decision. If the installer is excellent, contrast can be stunning. If not, contrast becomes a highlighter pen for mistakes.
Side by side tile transitions are another area where experience teaches humility. Two tiles may be the same advertised size but slightly different in actual dimensions. They may also have different thicknesses. This matters when they meet at a shower niche, floor border, backsplash panel, or doorway. A skilled installer can solve many of these issues with layout adjustments, trim, or setting material, but the best results come from planning before the first tile is set.
In bathrooms, side by side tiles often teach the importance of scale. A tiny powder room can handle a dramatic floor because the space is small and contained. But using a busy pattern on the floor, another pattern on the wall, and a third in the niche can feel overwhelming. In a shower, large wall tiles paired with smaller floor mosaics usually work well because each has a job: the big tile keeps the walls calm, while the smaller tile improves slope and grip on the floor.
In kitchens, the best side by side tile experiences usually come from restraint. A simple field tile with a beautiful glaze can be more satisfying long-term than a very trendy pattern. That does not mean boring. A vertical stack, handmade texture, warm grout, or subtle color variation can make the design feel special without shouting across the room.
The most useful advice is this: do not choose side by side tiles only from online photos. Order samples. Put them beside your cabinets, counters, floors, and paint. Look at them in daylight and at night. Spill a little water nearby. Imagine cleaning them. Imagine living with them after the trend has moved on to bother someone else. Good tile should not only photograph well; it should make sense on a Tuesday morning when you are making coffee and wondering why everyone in the house uses a different cup.
Conclusion
Side by side tiles are more than a basic installation method. They are a design language. Every tile pairing says something about style, function, rhythm, and care. A clean stacked layout can feel modern. A checkerboard floor can feel classic. A handmade backsplash can feel warm and personal. A mixed-material transition can feel custom when planned well and confusing when rushed.
The best tile projects begin before installation. Compare samples, study undertones, plan grout, consider maintenance, check thickness, and think about how each tile will look next to the materials around it. Tile rewards patience. It also punishes guesswork with tiny permanent rectangles.
If you want a surface that looks polished, durable, and genuinely yours, side by side tiles offer endless possibilities. Just remember: tiles may be small, but together they run the room.
Note: This publication-ready article is written in original American English and synthesized from current tile design, installation, maintenance, and home-improvement best practices. No external source links or citation markers are included so the content can be copied cleanly into a website editor.
