
Beauty Unlocked
3 Ways to Do a Kimura Submission in Jiu Jitsu
Aug
The Kimura submission is the Swiss Army knife of Brazilian jiu-jitsu. It can finish a match, control a determined opponent, create a sweep, open a guard pass, or lead to the back. It also gives grapplers an excellent excuse to talk about “angles” while sitting on the mat and drinking from an enormous water bottle.
Known in judo as gyaku ude-garami and in catch wrestling as a double wristlock, the Kimura is a bent-arm shoulder lock built around a figure-four grip. Although people often describe it as a shoulder submission, its leverage can also place stress on the elbow and surrounding tissues. It must therefore be practiced slowly, with control and a cooperative training partner.
What Is a Kimura Submission?
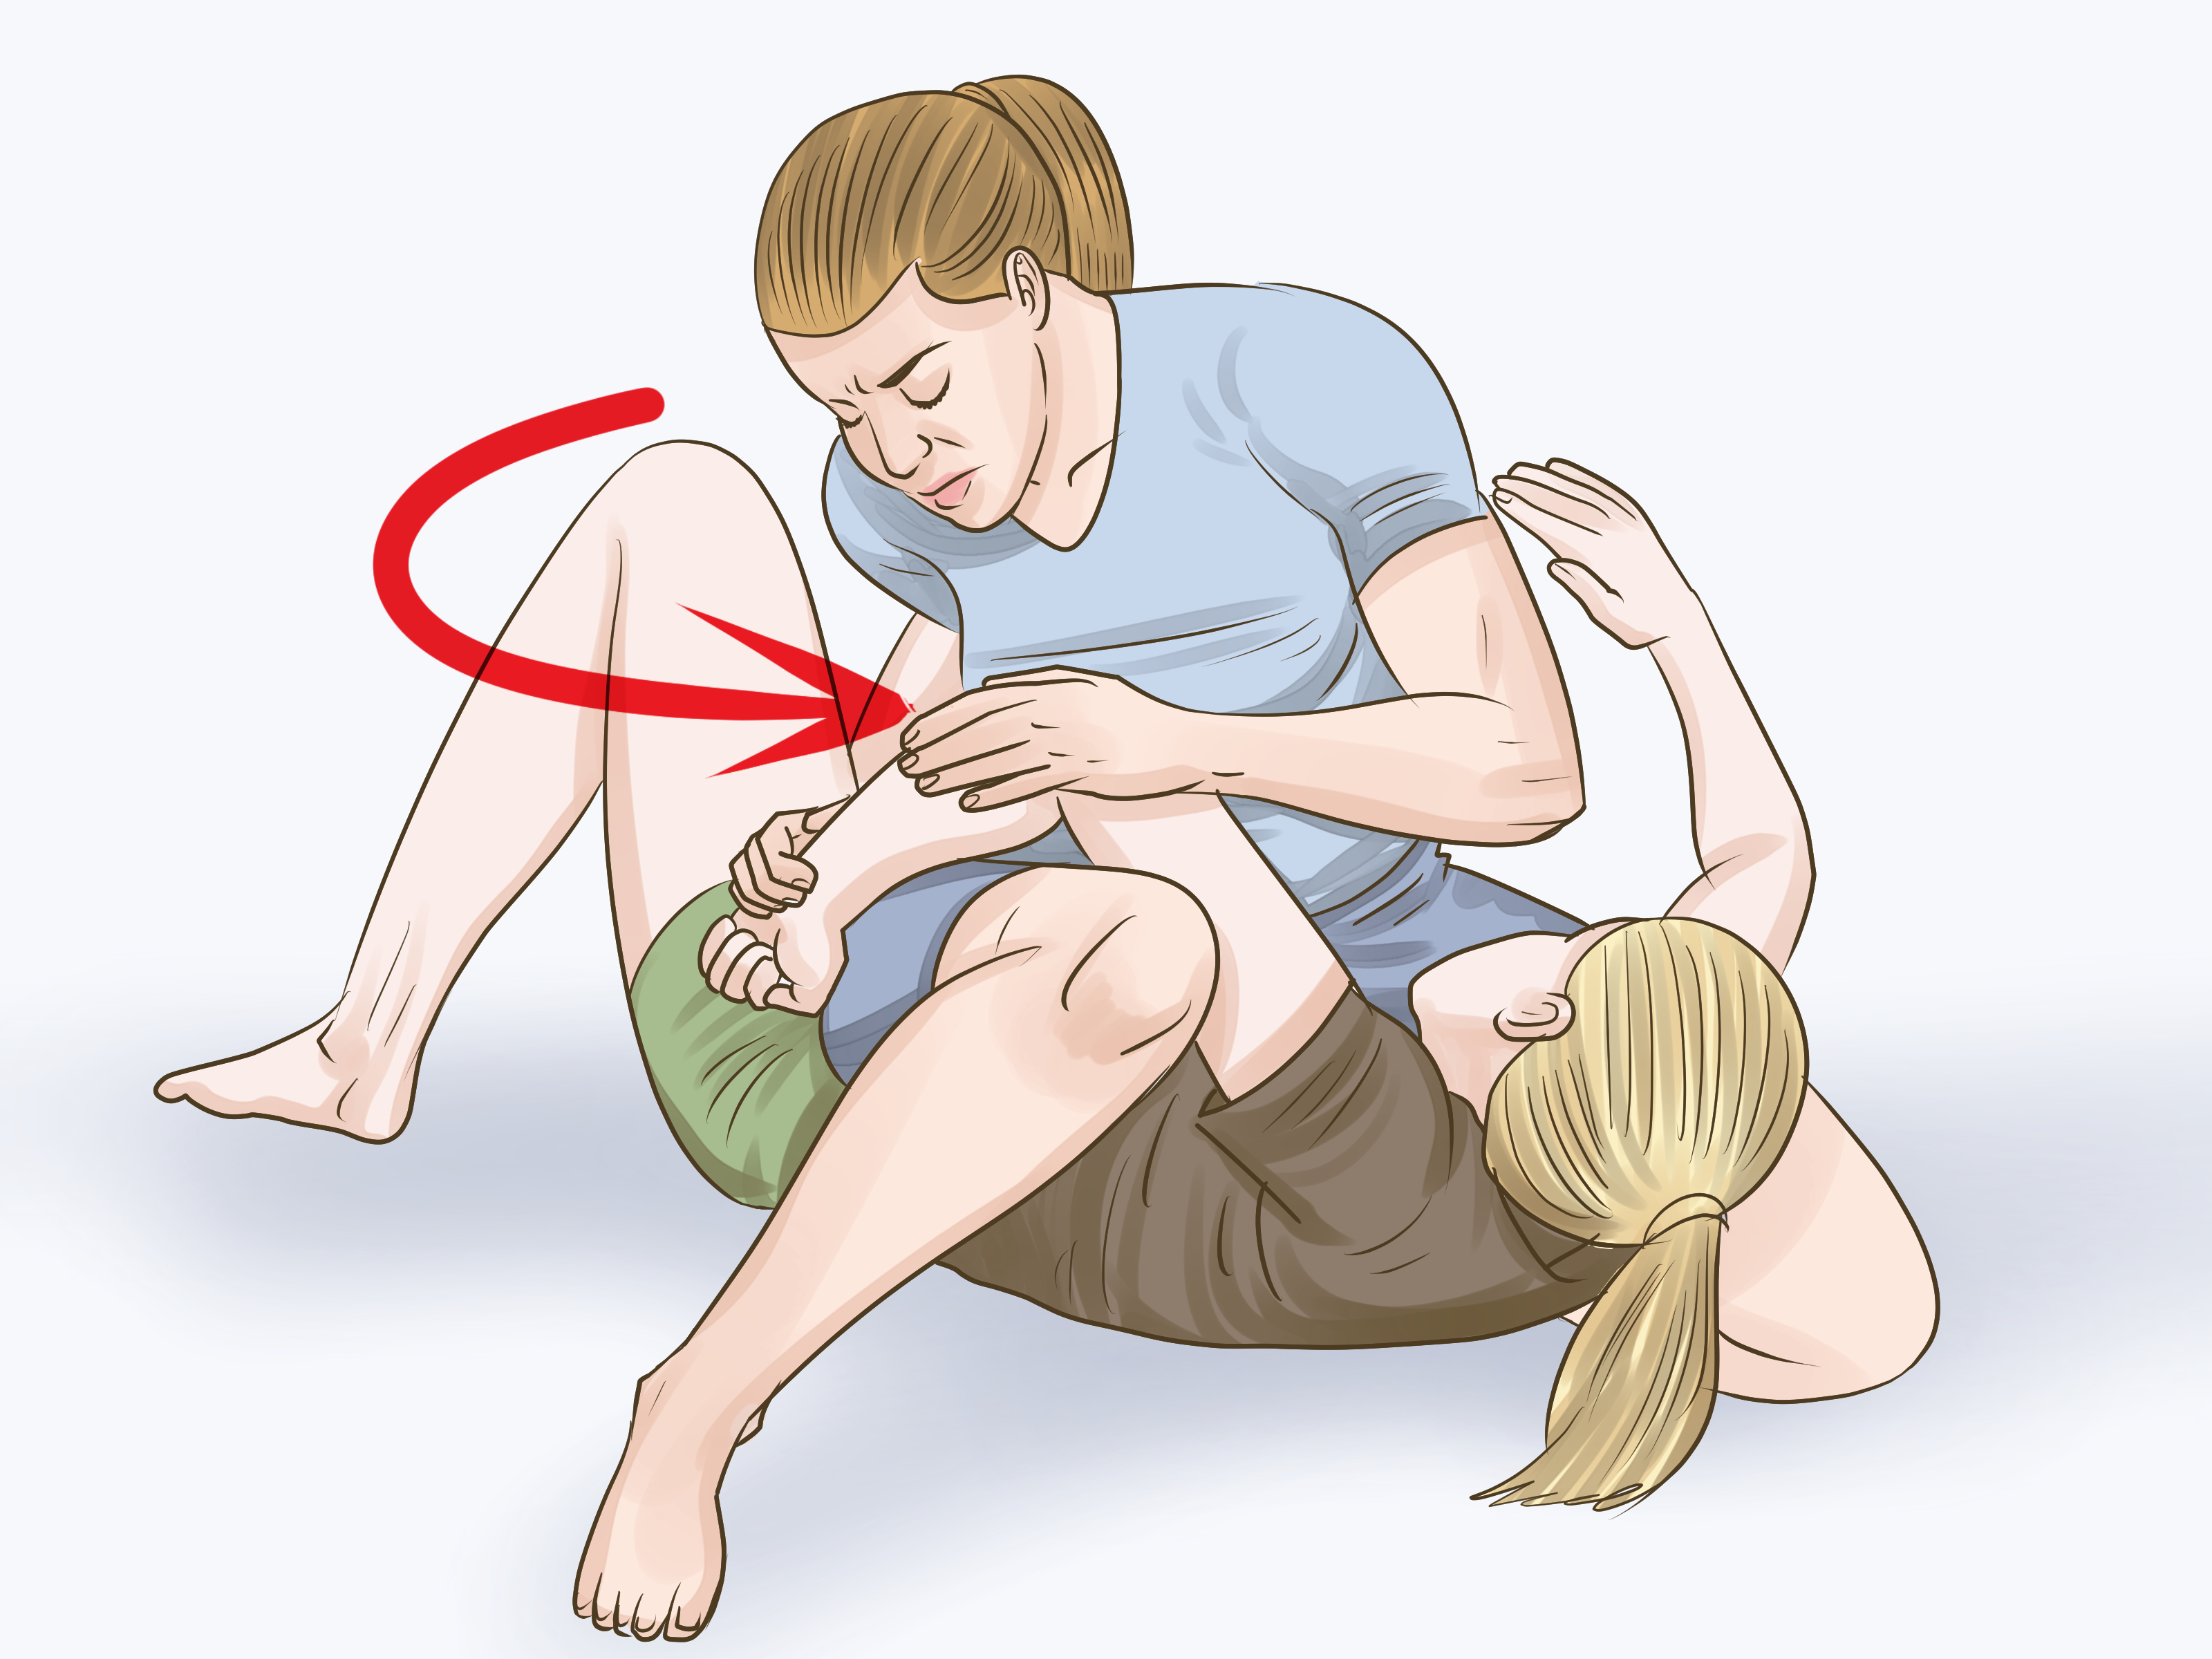
A Kimura submission isolates a bent arm and internally rotates the shoulder using a figure-four configuration. One hand controls the opponent’s wrist. The other arm circles the opponent’s upper arm before its hand grabs your own wrist. Your arms then form a connected frame that can control the opponent’s wrist, elbow, and shoulder.
The technique is named after Japanese judoka Masahiko Kimura, who defeated Hélio Gracie with the lock during their famous 1951 match in Brazil. The submission existed long before that contest, but the encounter permanently attached Kimura’s name to it within Brazilian jiu-jitsu.
The Basic Figure-Four Kimura Grip
- Control one of your opponent’s wrists with your same-side hand.
- Bring your other arm over the opponent’s upper arm.
- Thread that arm underneath the opponent’s arm near the elbow or armpit.
- Grab your own wrist to complete the figure-four grip.
Use a firm wrist grip rather than holding the fingers. Keep your elbows connected to your body whenever possible. If your arms drift away from your torso, the grip becomes weaker and your opponent gains room to straighten the arm, rotate, or pull free.
Control Before Rotation
The Kimura is not supposed to be an enthusiastic arm-wrestling contest. Good mechanics come from immobilizing the shoulder, maintaining a bend in the elbow, and using the movement of your hips and torso. Once the opponent’s posture and escape routes are controlled, very little finishing motion should be necessary.
1. Kimura Submission From Closed Guard
The closed-guard Kimura is one of the first shoulder locks many BJJ students learn. It commonly becomes available when the top player places a hand on the mat, reaches too far forward, or allows an elbow to separate from the ribs.
Step 1: Break the Opponent’s Posture
Begin with your legs closed around the opponent’s waist. Use your knees, core, and upper-body controls to bring the opponent forward. A person sitting upright with both elbows tucked beside the body is difficult to attack. A person posting a hand on the floor has kindly placed an arm where you can reach it.
If the opponent posts with the right hand, control that wrist with your left hand. Pin it to the mat or keep it from returning safely to the torso. Avoid squeezing as if you are trying to turn the wrist into orange juice. Accurate placement matters more than white-knuckle strength.
Step 2: Sit Up and Build the Figure Four
Open your guard and sit toward the captured arm. Your free hand can briefly post behind you for balance. Bring your free arm over the opponent’s right upper arm, thread it underneath near the armpit, and grab your own left wrist.
Once the figure-four grip is connected, keep the opponent’s elbow bent. Pull your elbows close to your ribs and keep your chest connected to the opponent’s shoulder. This reduces the space needed for a defensive arm straightening or posture recovery.
Step 3: Create a Better Hip Angle
Return your upper body toward the mat while moving your hips away from the opponent. Turn onto your side so that you are not lying flat underneath them. A flat guard limits your leverage; an angled guard allows your torso and hips to participate.
Your leg on the attacking side can climb high across the opponent’s back to prevent posture. Keep your knees active. If your legs become decorative noodles, the opponent may stand, stack, or drive forward before the submission is secure.
Step 4: Finish Gradually
Keep the opponent’s elbow bent at approximately a right angle and close to your torso. Move the captured wrist away from the mat and toward the space behind the opponent’s back. Use your body angle rather than attempting to curl the arm with your biceps.
Stop as soon as resistance becomes firm. During drilling, your partner should tap before discomfort becomes intense. The correct finish often feels smaller than beginners expect. If you need a dramatic windup, something earlier in the setup probably escaped.
Common Closed-Guard Errors
- Attacking an upright opponent: Break posture before committing both arms.
- Staying flat: Move your hips and turn onto your side.
- Letting the elbow straighten: Maintain the bend and keep the arm close.
- Ignoring your legs: Use them to control posture and distance.
- Chasing only the tap: If the opponent defends, use the grip to sweep or improve position.
2. Kimura From Side Control and North-South
A top-position Kimura is especially useful because gravity, chest pressure, and hip movement help control the opponent. It also fits naturally into an attacking chain that can include an armbar, back take, north-south control, or positional transition.
Step 1: Establish Stable Side Control
Secure side control before hunting for a submission. Control the opponent’s head and upper body, keep your knees active, and distribute your weight through your chest rather than resting all of it on the floor.
The far arm is a common target. Encourage the opponent to place a hand on your shoulder, frame against your neck, or push at your body. You can also use pressure to separate the elbow from the ribs. The goal is to expose the wrist without sacrificing your base.
Step 2: Pin the Wrist and Connect the Grip
Control the exposed wrist and guide it toward the mat. Thread your other arm under the opponent’s upper arm and grab your own wrist. Keep the opponent’s elbow bent and prevent the shoulder from freely rotating.
A frequent beginner mistake is reaching for the grip while the opponent is still flat, strong, and tightly connected. Use chest pressure and body positioning to turn the opponent slightly onto the side. This gives you room to thread your arm while making it harder for the opponent to hide the hand beneath the body.
Step 3: Move Toward North-South
Once the Kimura grip is secure, walk around the opponent’s head toward north-south. Stay low and maintain chest contact. Do not rise high enough to provide a scenic view of the escape route.
Your knees and hips should block the opponent from following your movement. Keep the captured upper arm separated from the torso while preventing the opponent from rolling freely. If necessary, adjust your position before attempting the finish.
Step 4: Finish With Your Body
Keep the opponent’s elbow bent and controlled. Bring the captured wrist behind the opponent’s back while rotating your torso as a connected unit. Maintain downward control of the shoulder so that your finishing movement transfers directly into the joint instead of merely moving the entire opponent across the mat.
Apply the lock slowly. Top pressure makes this variation powerful, and a partner may have less room to rotate or roll with the force. A responsible grappler gives a clear opportunity to tap.
Useful Alternatives When the Opponent Defends
Many opponents will clasp their hands, grab clothing, or hold their own belt to protect the arm. Rather than exhausting yourself in a tug-of-war, treat the Kimura grip as positional control. You may step over the head for an armbar, pull the opponent onto the side for a back take, switch sides, or maintain north-south while separating the defensive grip.
This is why experienced practitioners often call it a Kimura system rather than a single submission. The grip can remain valuable even when the shoulder lock itself is unavailable.
3. Standing Kimura With a Controlled Takedown
The standing Kimura can appear during wrestling exchanges, clinches, single-leg attempts, and scrambles. It is better treated as a control and takedown tool than as a reason to twist a standing partner’s shoulder. Falling body weight and unpredictable footwork make fast standing finishes unnecessarily dangerous.
Step 1: Capture the Wrist During the Clinch
When an opponent reaches, underhooks, or exposes an arm, control the wrist and keep it close to your body. Circle your other arm over the opponent’s upper arm, thread underneath it, and connect to your own wrist.
Keep your stance balanced, your knees slightly bent, and your head in a safe position. Do not cross your feet or lean backward while concentrating on the grip. The opponent still has legs, balance, and opinions.
Step 2: Move to the Outside Angle
Step toward the outside of the captured arm. Keep the opponent’s elbow bent and bring it away from the body. Your goal is to turn the opponent’s shoulders while staying beside them rather than directly in front.
Use small steps and connected upper-body pressure. Pulling only with the arms encourages a strength contest and may allow the opponent to posture, roll, or reverse the position.
Step 3: Use the Grip to Bring the Match Down Safely
Under qualified coaching, the standing Kimura can assist a controlled turn, trip, or mat return. Follow your partner to the floor while maintaining balance and avoiding uncontrolled pressure on the shoulder. Once grounded, stabilize side control or north-south before attempting the submission.
During casual practice, do not launch yourself beneath a standing partner, force a rolling variation without preparation, or crank the arm to make the takedown happen. Drill the footwork separately and introduce resistance only when both partners understand the movement.
Step 4: Stabilize and Finish on the Ground
After reaching the mat, pause long enough to establish control. Confirm that the opponent’s shoulder is pinned, the elbow remains bent, and your base is secure. Then finish with the same gradual body rotation used in the side-control variation.
How to Make Your Kimura More Effective
Attack the Position, Not Just the Arm
A reliable Kimura begins with control of the opponent’s posture and shoulder line. From guard, break posture and create an angle. From top position, pin the torso and restrict rotation. From standing, establish balance and reach the outside angle before trying to move the opponent.
Keep the Grip Close to Your Core
Your torso is stronger than your isolated arms. Keep the figure-four frame compact and move your body around the grip. When the elbows flare and the hands drift away, the opponent gains space to defend.
Learn the Follow-Up Chain
Practice moving from the Kimura to a sweep, armbar, back take, or dominant top position. The threat of one option often exposes another. A partner who stubbornly protects the wrist may accidentally surrender the back; a partner who straightens the arm may create an armbar transition.
Tap Early and Release Quickly
The Kimura applies rotational force to structures that do not benefit from surprise renovations. The person caught should tap with the hand, foot, or voice as soon as the position is secured and escape is no longer technically available. The attacker should release immediately rather than adding one final “just to be sure” twist.
Mat Experiences: What Training the Kimura Actually Teaches
The following practical observations reflect common experiences reported by students and coaches during supervised BJJ training. They are not a substitute for in-person instruction, but they explain why the Kimura often feels very different in live sparring than it does during a quiet demonstration.
The First Lesson Is Usually About Space
Beginners often remember the hand sequence but forget everything surrounding it. They grab the wrist, thread the arm, connect the figure four, and then discover that the opponent’s elbow is glued to the ribs. The grip exists, but the submission does not.
This is a useful revelation. The Kimura is not simply a collection of hand placements. The practitioner must first create enough space to separate the elbow while removing enough space to immobilize the shoulder. That apparent contradiction becomes easier to understand through positional drilling.
A productive drill begins with the grip already connected. The attacker receives thirty seconds to improve the angle or reach a stable finishing position, while the defender uses controlled resistance. The goal is not to wrench the arm. It is to recognize how hip movement, shoulder pressure, and elbow placement change the position.
Strength Works Until It Meets Better Structure
Another common experience is the forearm-burning phase. A student squeezes the grip at maximum intensity while the opponent calmly clasps the hands. After half a minute, the attacker’s arms feel like they have been carrying grocery bags up twelve flights of stairs.
The lesson is not that strength is useless. Strength helps, but it works best when attached to sound mechanics. Moving around the opponent’s head, changing the shoulder angle, controlling the hips, or transitioning to an armbar often accomplishes more than pulling harder.
During practice, students can deliberately begin against a defensive hand clasp. Instead of forcing the hands apart, the attacker works toward north-south, a back-take angle, or a controlled armbar position. This teaches the broader Kimura system and makes the grip valuable against partners who know the obvious defense.
Live Resistance Exposes Loose Elbows
In cooperative drilling, a wide figure-four grip may appear successful because the partner remains still. During sparring, that same space allows the defender to straighten the arm, rotate the thumb, sit up, roll, or pull the elbow back to the body.
Students improve when they focus on keeping their elbows connected to their ribs and their chest close to the captured shoulder. Compact control makes the position feel heavier without requiring frantic effort. It also gives the defender a clearer, safer signal that the submission has reached its final stage.
The Kimura Becomes Better When Losing It Is Acceptable
Many successful attacks begin when the practitioner stops treating the submission as the only acceptable outcome. From closed guard, a defended Kimura may create a hip-bump sweep. From side control, it may expose the back. During a scramble, it may prevent an opponent from settling into top position.
This mindset reduces tunnel vision. Instead of staring at the trapped arm while the rest of the match wanders away, the practitioner monitors base, posture, hips, and available transitions. Ironically, becoming willing to abandon the Kimura often creates more Kimura finishes because the opponent must defend several possibilities.
Controlled Drilling Builds Trust
The most important training experience is learning how little movement a well-controlled finish requires. Good partners apply pressure in stages, pause when the position becomes tight, and release instantly at the tap. Defenders tap before pain rather than testing whether their shoulder has hidden superpowers.
A sensible progression begins with static repetitions, continues with positional rounds at moderate resistance, and only later introduces the technique into open sparring. Standing applications require additional coaching because falls and sudden rotations multiply the risk.
Trust changes the quality of practice. When partners know the attacker will not crank the lock, they can provide realistic reactions instead of panicking. The attacker receives better feedback, the defender practices intelligent escapes, and everyone remains healthy enough to return for the next classwhich is the most underrated submission victory of all.
Conclusion
The three most practical ways to perform a Kimura submission are from closed guard, from side control or north-south, and from a standing grip that transitions safely to the ground. Each variation uses the same core principles: control the wrist, isolate the bent arm, connect a compact figure-four grip, immobilize the shoulder, and rotate with the body.
Start slowly and prioritize position over force. A technically sound Kimura should feel controlled, predictable, and surprisingly efficient. If the submission requires a heroic facial expression and every available muscle fiber, return to the angle, elbow position, and shoulder control. Your techniqueand your training partner’s rotator cuffwill appreciate the adjustment.

