
Beauty Unlocked
25+ DIY Planter Tutorials
Jun
Note: This original article is written for web publishing and is based on practical DIY planter-building principles, container gardening best practices, and real home-garden experience.
DIY planters are the gateway craft of gardening. One minute you are “just reusing a coffee can,” and the next you own three bags of potting mix, a cordless drill, and strong opinions about drainage holes. The good news? Building your own planter is one of the easiest ways to make a patio, balcony, porch, kitchen window, or backyard look intentional without spending designer-container money.
This guide gathers more than 25 DIY planter tutorials for every skill level: beginner-friendly recycled planters, classic wooden planter boxes, concrete pots, hanging planters, raised garden beds, herb containers, and clever statement pieces. Each idea includes a quick tutorial, suggested materials, and a practical tip so your plants do not merely survive their new homethey move in, unpack, and thrive.
Before You Start: The Three Rules of DIY Planters
1. Drainage Is Not Optional
Most plants hate sitting in soggy soil. Always add drainage holes unless you are creating a cachepot, which is a decorative outer container that holds a nursery pot. If water cannot escape, roots can rot, leaves may yellow, and your beautiful planter becomes a tiny botanical swamp.
2. Use Potting Mix, Not Yard Soil
Garden soil can become heavy and compacted in containers. A quality potting mix is lighter, drains better, and gives roots the air they need. For succulents, use cactus mix. For vegetables, choose a container-friendly mix with compost or slow-release nutrients.
3. Match the Planter to the Plant
Small herbs can live happily in modest containers, but tomatoes, peppers, dwarf shrubs, and deep-rooted flowers need more room. When in doubt, go slightly larger. Plants appreciate elbow room too, even though they do not technically have elbows.
25+ DIY Planter Tutorials for Indoors and Outdoors
1. Classic Wooden Planter Box
Build a rectangular box from cedar, redwood, or exterior-rated pine. Cut four side boards, attach them to corner posts with exterior screws, and add bottom slats with small gaps for drainage. Line the inside with landscape fabric if needed, then fill with potting mix. This is the reliable blue-jeans-and-white-shirt of DIY planters: simple, useful, and always looks good.
2. Raised Patio Planter With Legs
A raised planter is perfect for herbs, lettuce, strawberries, or gardeners who prefer not to fold themselves like lawn chairs. Build a shallow wooden box, attach sturdy legs, add a bottom support frame, and line it with hardware cloth and landscape fabric. Keep the planting depth at least 8 to 12 inches for leafy greens and herbs.
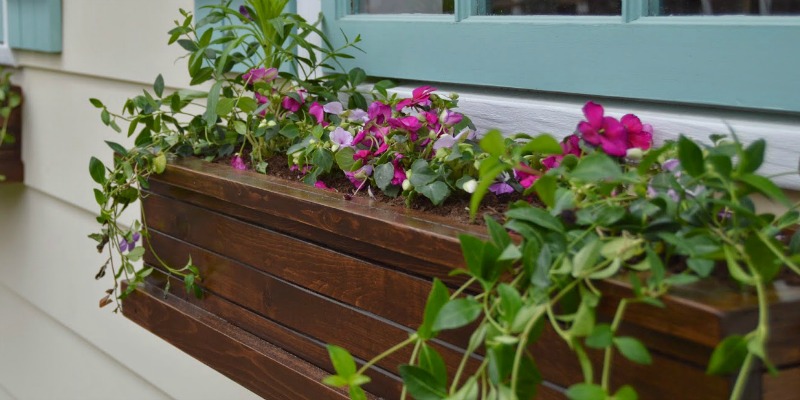
3. Window Box Planter
Measure the width of your window, build a long narrow box, and mount it with strong exterior brackets. Add drainage holes and paint the box to match your trim. For curb appeal, plant a “thriller, filler, spiller” combination: one upright focal plant, several mounding flowers, and trailing vines along the front edge.
4. Cedar Deck Rail Planter
Use rot-resistant cedar boards to create a narrow planter that sits securely over a deck rail. Build two side channels underneath so the planter hugs the railing. Plant compact flowers, herbs, or trailing nasturtiums. Check that the finished box is stable before adding soil, because wet potting mix is heavier than it looks.
5. Self-Watering Planter Box
Create a water reservoir at the bottom of a planter using perforated drain pipe or a plastic storage insert. Add a fill tube, a soil platform, and an overflow hole. The soil wicks moisture upward as plants need it. This tutorial is excellent for thirsty vegetables and forgetful waterers who are busy, distracted, or simply living their truth.
6. Concrete Bowl Planter
Mix concrete according to package directions, pour it into a large plastic bowl, then press a smaller bowl into the center to create the planting cavity. Weigh the inner bowl down and let the concrete cure. Drill a drainage hole with a masonry bit. Sand rough edges and plant succulents, sedum, or compact herbs.
7. Painted Terra-Cotta Pot Makeover
Clean a terra-cotta pot, let it dry, and apply exterior craft paint or masonry paint. Add stripes, color blocking, stencils, or modern arches. Seal the outside if the pot will live outdoors. Terra-cotta breathes well, which is helpful for many plants, but it dries quickly, so water more often during hot weather.
8. Hanging Macrame Planter
Cut cotton cord into equal lengths, knot them around a metal ring, and create a basket shape using square knots. Slip in a lightweight pot with drainage and a saucer. This works beautifully for pothos, spider plants, trailing philodendron, or string of pearls. Hang it from a ceiling hook anchored into a joist, not from wishful thinking.
9. Recycled Coffee Can Planter
Wash a metal or plastic coffee can, punch or drill holes in the bottom, and decorate the outside with paint, peel-and-stick wallpaper, twine, or fabric. Add a layer of potting mix and plant basil, parsley, marigolds, or compact annuals. This is one of the cheapest DIY planter tutorials and a great weekend project for families.
10. Plastic Bottle Herb Planter
Cut a clean plastic bottle in half, poke drainage holes in the bottom, and decorate the outside. For a self-watering version, invert the top half into the bottom half, thread cotton string through the cap, and fill the lower section with water. Plant small herbs or seedlings in the upper section.
11. Vertical Pallet Planter
Choose a heat-treated pallet marked “HT,” sand rough spots, and staple landscape fabric across the back and bottom of each planting pocket. Fill with lightweight potting mix and plant herbs, succulents, or shallow-rooted annuals. Lean it securely against a wall or attach it properly. Avoid using unknown pallets that may have chemical residue.
12. Rain Gutter Planter
Cut vinyl or metal guttering into short lengths, add end caps, drill drainage holes, and mount the gutters on a fence or wall. These shallow planters are best for lettuce, strawberries, pansies, and herbs. They are not ideal for deep-rooted crops, but they are fantastic for small-space gardening.
13. Tiered Ladder Planter
Repurpose an old wooden ladder by sanding it, sealing it, and setting pots on each step. You can also attach small planter boxes to the rungs. This creates instant height on a patio and lets you group sun-loving plants together. For safety, secure the ladder so wind cannot turn your herb garden into a drama.
14. Cinder Block Planter Wall
Stack cinder blocks in a staggered pattern, turning some openings outward to create planting pockets. Make sure the structure is stable and level. Fill the open cells with potting mix and add succulents, herbs, or annual flowers. Paint the blocks for a modern look, or leave them raw for industrial garden style.
15. Fabric Grow Bag Planter
Sew a simple grow bag from heavy landscape fabric, outdoor canvas, or breathable felt. Create a cylinder or square bag, reinforce the handles, and fill it with container mix. Fabric planters allow air pruning, which helps prevent circling roots. They are especially useful for potatoes, peppers, tomatoes, and balcony vegetables.
16. Teacup Succulent Planter
Use a thrifted teacup as a decorative cachepot or carefully drill a drainage hole with a ceramic bit. Add cactus mix and a small succulent. Top with decorative gravel if desired. These tiny planters make charming gifts, especially for people who love plants but have windowsills the size of a bookmark.
17. Wooden Crate Planter
Line a wooden crate with landscape fabric, staple it neatly inside, and fill with potting mix. Add casters underneath if you want a movable patio planter. Crates are excellent for herbs, annuals, and shallow-rooted flowers. Use an exterior sealer to protect the wood from moisture.
18. Drawer Planter
Turn an old dresser drawer into a rustic planter by removing hardware, drilling drainage holes, sealing the wood, and lining the inside with landscape fabric. Add short legs or place it on bricks so water drains freely. This is a great shabby-chic project for cottage gardens and porch displays.
19. File Cabinet Planter
Remove the drawers from a metal file cabinet, prime and paint the exterior, then create drainage holes. Add a base if needed and fill with lightweight container mix. This project turns office furniture into an urban garden statement. Finally, your paperwork can support personal growth.
20. Hanging Basket Planter Refresh
Take an old wire basket, add a coco liner or moss liner, and fill it with potting mix. Plant trailing petunias, calibrachoa, sweet potato vine, or ivy geraniums. Hanging baskets dry out quickly, so check moisture daily in hot weather and fertilize regularly during the growing season.
21. Mason Jar Herb Planter
Mason jars work best as indoor cachepots because they do not naturally drain. Place a small nursery pot inside the jar or add pebbles only as a decorative base beneath a removable pot. Grow mint, chives, or parsley near a bright window. Avoid overwatering, because glass hides moisture at the bottom.
22. Rope-Wrapped Planter
Transform a plain plastic pot by wrapping it with jute rope and hot glue. Start at the bottom, coil upward, and finish with a neat tucked end. Use this as a decorative cover for nursery pots. It gives inexpensive containers a coastal, farmhouse, or boho look without requiring carpentry skills.
23. Modern Hexagon Planter
Cut six equal wood pieces with angled ends, join them into a hexagon, and stack multiple rings to create height. Add a bottom panel with drainage holes and seal the wood for outdoor use. This geometric planter looks polished beside a front door, especially with ornamental grasses or sculptural succulents.
24. House Number Planter
Build a small vertical wooden box, attach house numbers to the front, and add a narrow planter pocket below or beside the numbers. Paint it to coordinate with your exterior. Fill it with seasonal flowers or hardy succulents. It is practical, attractive, and more exciting than a lonely number nailed to the siding.
25. Trellis Planter Box
Build a rectangular planter box and attach a simple trellis panel at the back. Use it for climbing jasmine, black-eyed Susan vine, peas, beans, or compact clematis. This tutorial adds privacy and vertical interest to patios and balconies. Make the base heavy enough to prevent tipping.
26. Wine Box Planter
Drill drainage holes in a wooden wine crate, seal the inside, and line it with landscape fabricill drainage holes in a wooden wine crate, seal the inside, and line it with landscape fabric. Add herbs, lettuce, or edible flowers. The printed branding on wine boxes gives the planter instant character. It is also a stylish way to pretend last weekend’s dinner party was really just preparation for gardening.
27. Colander Planter
A metal colander already has drainage, which makes it a surprisingly useful planter. Add a coffee filter or mesh liner to keep soil from washing out, then plant herbs, pansies, or trailing flowers. Attach chains to the handles for a hanging version. It is quirky, functional, and very forgiving.
28. Log Planter
Hollow out a section of log with a chisel, drill, or saw, then add drainage holes. Fill the cavity with potting mix and plant succulents, moss, or shallow-rooted annuals. A log planter blends naturally into woodland gardens and makes a beautiful centerpiece for outdoor tables.
Best Plants for DIY Planters
For sunny outdoor planters, try petunias, marigolds, geraniums, lantana, lavender, rosemary, thyme, basil, peppers, cherry tomatoes, and strawberries. For shady porches, consider coleus, impatiens, begonias, ferns, caladiums, and hostas. Indoors, start with forgiving favorites like pothos, snake plant, spider plant, philodendron, ZZ plant, and peace lily.
When combining plants, match their light and water needs. A cactus and a fern may look cute together for about twelve minutes, but one likes dry conditions and the other wants moisture. Choose plant roommates who agree on the basics.
DIY Planter Mistakes to Avoid
Using Containers That Are Too Small
Tiny planters dry out quickly and restrict roots. They are fine for succulents and small herbs, but vegetables and large annuals need bigger containers.
Skipping Drainage Holes
Decorative pots without drainage can work as outer covers, but directly planting in them is risky. Drill holes when possible or use the double-pot method.
Adding Rocks to “Improve” Drainage
A layer of rocks at the bottom does not magically fix drainage. In many containers, it simply reduces soil volume. Use a good potting mix and real drainage holes instead.
Forgetting the Weight
Large planters become heavy after soil, water, and plants are added. Build them where they will stay or add heavy-duty casters before filling.
Real-World Experience: What DIY Planters Teach You After the First Weekend
The first thing you learn from making DIY planters is that “easy weekend project” can mean many things. A coffee can planter may take 20 minutes. A raised cedar box with legs, trim, liner, and a trellis may take a full Saturday, two hardware store trips, and one moment where you stare at a board wondering why it is somehow both too short and too long. That is normal. DIY gardening rewards patience, not perfection.
In my experience, the most successful planter projects begin with the plant, not the container. It is tempting to build the cutest box first and worry about plant needs later, but plants are living things with preferences. Herbs want sun and fast drainage. Lettuce likes cooler weather and steady moisture. Succulents want a gritty mix and dislike being fussed over. Tomatoes need room, support, food, water, and the emotional confidence of a plant that plans to take over your summer.
Another practical lesson: always test drainage before planting. Fill the empty planter with a little water and watch where it goes. If water pools, add more holes. If soil leaks everywhere, cover the holes with mesh, window screen, or a coffee filter. Do this before adding plants, because removing wet soil from a finished container is a messy little tragedy.
Wood planters are the most satisfying for outdoor spaces because they feel sturdy and custom. Cedar is a favorite because it resists rot better than many softwoods, but even budget lumber can work if you seal it properly and accept that it may not last forever. Paint and stain do more than make the planter pretty; they help protect the material. Just avoid coating surfaces that will directly contact edible plant roots unless the product is safe for that use.
Recycled planters are where personality shines. Old drawers, cans, crates, baskets, colanders, and bottles can become charming containers when they are cleaned, drained, and matched with the right plant. The trick is restraint. One quirky planter is delightful. Twenty unrelated quirky planters can make a porch look like a yard sale started photosynthesizing. Repetition helps: paint several containers the same color, group similar materials, or use matching plants to create a pulled-together look.
Watering is the daily reality check. Containers dry faster than garden beds, especially on sunny balconies and windy patios. In summer, small planters may need water every day. Larger planters are more forgiving, and self-watering designs are excellent for busy households. The finger test still works: push your finger about an inch or two into the potting mix. If it feels dry at that depth, water thoroughly until excess drains out.
Finally, DIY planters make gardening feel more personal. A store-bought pot can be beautiful, but a planter you built from scrap wood or rescued from the recycling bin carries a little story. It turns a plant into a project and a corner into a place. Whether your first planter is a polished window box or a yogurt container with drainage holes, the point is the same: you are creating space for something to grow. That includes the plant, obviouslybut also your confidence with tools, design, and the fine art of not overwatering basil.
Conclusion
DIY planter tutorials are popular for a reason: they are affordable, customizable, and useful in almost any home. You can build a cedar planter box for vegetables, refresh a terra-cotta pot for houseplants, turn a plastic bottle into a self-watering herb container, or create a dramatic vertical garden from a pallet. The best projects balance style with plant health. That means drainage holes, quality potting mix, enough root space, and a container that suits your light, climate, and maintenance habits.
Start with one simple planter, learn from it, and then level up. Before long, you may find yourself looking at every empty can, crate, and drawer as a future home for basil. Congratulations: that is not a problem. That is gardening.
