
Hair Care
Nixie Tube RPN Calculator Project
Aug
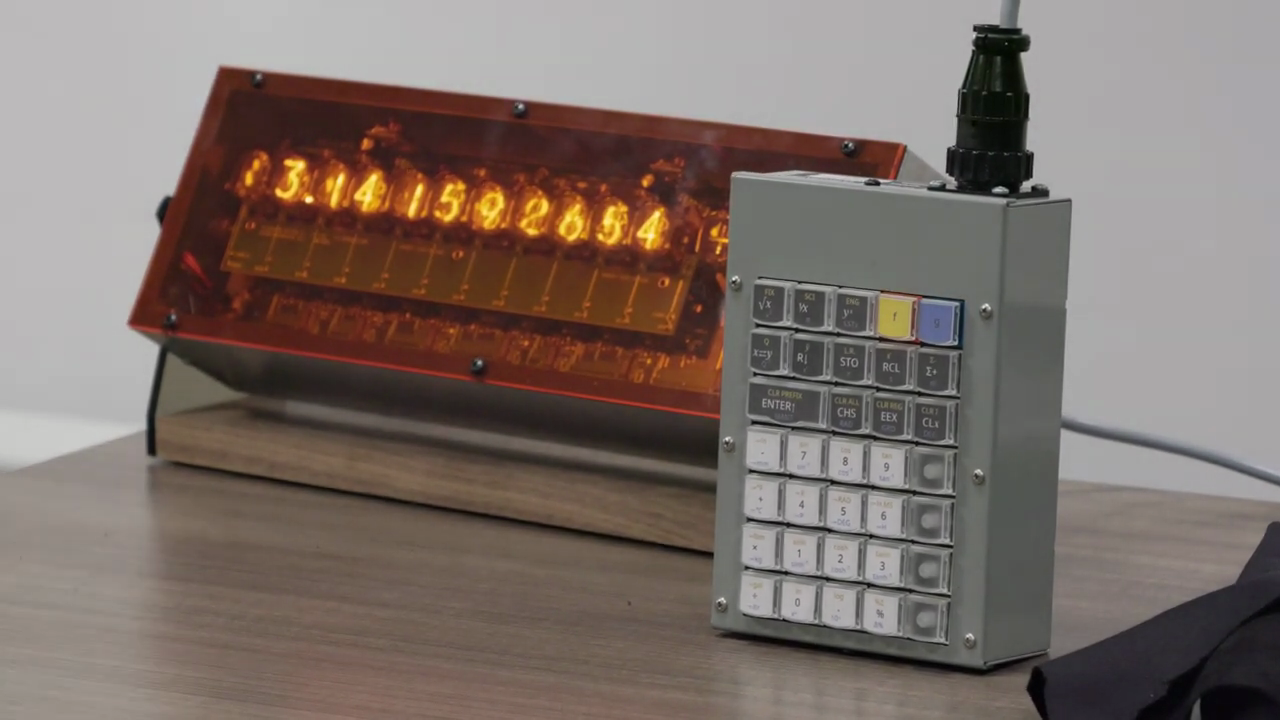
A Nixie Tube RPN Calculator Project is what happens when retro computing, glowing glass, and calculator nerdiness all walk into the same workshop and refuse to leave. It is not just a calculator. It is a conversation piece, a tiny museum exhibit, and a surprisingly serious engineering challenge wearing a warm orange grin.
At its heart, the idea is simple: build a working calculator that uses Nixie tubes for its display and Reverse Polish Notation, or RPN, for input. In reality, it is a layered project involving vintage display technology, modern microcontrollers, keypad design, firmware logic, power management, enclosure planning, and a healthy respect for electrical safety. The result feels like something an engineer from 1968 might have dreamed about after seeing a Raspberry Pi, a CNC router, and a really good cup of coffee.
This article explores how a Nixie tube RPN calculator works, why makers love it, what design choices matter, and what real project experience teaches along the way.
What Is a Nixie Tube RPN Calculator?
A Nixie tube RPN calculator combines two beloved ideas from electronics history: cold-cathode numeric display tubes and stack-based calculator input. Nixie tubes display numbers using shaped metal cathodes sealed inside glass. When the selected cathode is energized, it glows with that unmistakable orange neon look. Unlike modern LEDs or OLEDs, Nixies do not look flat or digital in the ordinary sense. Their digits appear to float at different depths inside the tube, giving each number a tiny sculptural quality.
RPN, short for Reverse Polish Notation, is a calculator input method where operators come after the numbers. Instead of typing “2 + 3 =,” an RPN user enters “2, Enter, 3, +.” That sounds strange for about five minutes. Then it starts feeling oddly elegant, especially for multi-step calculations. RPN removes the need for many parentheses because the calculator stores numbers on a stack and performs operations on the most recent entries.
Put those together, and you get a device that is both functional and theatrical. It calculates, yes, but it also performs. Every number lights up with a little vintage drama, as if the calculator is saying, “I could have been a lab instrument during the Space Age, but I chose art school.”
Why Nixie Tubes Still Fascinate Makers
Nixie tubes were once used in test equipment, frequency counters, early calculators, and industrial instruments. Today, they are prized because they make numbers feel physical. A modern screen can show millions of colors, but a Nixie tube has presence. It glows, warms the mood, and makes a simple digit look important.
For makers, the attraction is not only visual. Nixie projects force you to think across disciplines. You deal with display multiplexing or digit control, firmware timing, enclosure layout, button feel, noise reduction, and power isolation. A Nixie tube RPN calculator adds another layer: the calculator logic must feel fast, reliable, and intuitive. A clock can update once per second. A calculator has to respond instantly, because nobody wants to wait for the number 7 to “consider its career options” before appearing.
Why Use RPN Instead of a Normal Calculator Layout?
RPN has a loyal following because it rewards structured thinking. Traditional algebraic calculators often ask you to type expressions in the same way they appear on paper. RPN asks you to break the calculation into steps. That difference makes it especially useful for engineering, finance, and scientific work where calculations are chained together.
A Simple RPN Example
Imagine you want to calculate:
(8 + 4) × 3
On a typical calculator, you may type parentheses, numbers, and operators. On an RPN calculator, you can enter:
8 Enter 4 + 3 ×
The calculator first adds 8 and 4, keeps the result on the stack, then multiplies by 3. No parentheses. No drama. No tiny algebraic traffic jam.
This is why RPN fits beautifully into a custom calculator project. It simplifies parts of the input model and creates a distinctive user experience. It also gives the device a strong historical connection to classic Hewlett-Packard calculators, especially the HP-35 and later RPN models beloved by engineers and calculator collectors.
Core Design Goals of a Nixie Tube RPN Calculator Project
A successful Nixie tube RPN calculator is not just a circuit with pretty lights. It needs a clear design philosophy. The best projects usually balance five goals: usability, reliability, safety, serviceability, and style.
1. Usability
The keypad should feel natural. RPN users expect certain keys to be easy to find: Enter, arithmetic operators, decimal point, sign change, clear, memory functions, and possibly stack controls. A calculator can have a beautiful walnut enclosure and glowing tubes, but if the Enter key is awkwardly placed, users will notice immediately.
2. Reliability
Button presses must be debounced. Display updates must be stable. Decimal handling must be accurate. Firmware should avoid strange rounding surprises. A calculator is a trust machine; if users suspect it is guessing, the magic disappears quickly.
3. Safety
Nixie tube circuits require high-voltage sections that are far above normal low-voltage hobby electronics. A responsible project keeps these areas enclosed, insulated, and clearly separated from user controls. This is not the place for careless exposed wiring or casual tinkering while powered. Anyone building or servicing such a device should understand the risks, work under proper supervision if needed, and use safe, tested modules and enclosures.
4. Serviceability
Nixie tubes are vintage components, and many popular models are no longer manufactured. A thoughtful design makes tubes replaceable, boards accessible, and connectors logical. Future-you will be grateful when one digit starts behaving like it has joined a jazz band.
5. Style
The look matters. Nixie projects live partly in the world of industrial design. Wood, brushed metal, acrylic, black anodized aluminum, and retro-style keycaps all work well. The enclosure should frame the tubes rather than bury them. The goal is not merely “old.” The goal is “old technology presented with modern care.”
Major Hardware Elements
A typical Nixie tube RPN calculator includes a display assembly, keypad, controller, power system, enclosure, and firmware storage. Some designs place the keypad and display in the same case. Others use a modular approach, separating the keyboard from the display and connecting them through a serial interface. That can make development cleaner and the physical object more flexible.
Nixie Display Section
The display section is the visual centerpiece. Common designs use multiple numeric tubes to show the mantissa, sign, decimal point, exponent, or stack state. The number of tubes affects everything: case size, power needs, cost, and firmware formatting. A seven-tube display can look compact and dramatic. A larger display can feel more like a laboratory calculator, but it also increases complexity.
Keypad and Switch Feel
The keypad determines whether the calculator feels premium or frustrating. Mechanical switches are popular because they provide clear tactile feedback. Keycaps should be readable, durable, and arranged logically. For RPN, the Enter key deserves special attention. It should be large enough or positioned well enough that users can hit it confidently without playing finger Twister.
Controller and Firmware
Modern Nixie calculator projects often rely on microcontrollers or small single-board computers. The controller reads keypresses, maintains the RPN stack, formats numbers, handles errors, and updates the tube display. Firmware design matters because a calculator must be precise and predictable. Even basic arithmetic needs careful treatment of decimal points, negative numbers, overflow, underflow, and display rounding.
Firmware: Where the Calculator Becomes a Calculator
The firmware is where the project stops being a glowing sculpture and starts doing math. A basic RPN calculator needs a stack, usually with registers like X, Y, Z, and T. The X register is the visible current entry. When the user presses Enter, values move through the stack. When an operator is pressed, the calculator applies that operation to the appropriate stack values and displays the result.
For example, pressing the plus key usually takes the top two stack values, adds them, and returns the result to the display. That sounds easy until you consider real-world behavior: What happens after a decimal point? How many digits should show? What if the answer is too large? What if the user presses Enter twice? What if the display has fewer digits than the internal number?
Great calculator firmware answers these questions consistently. It does not need to become a full scientific calculator on day one. In fact, the smartest path is usually to start with reliable four-function arithmetic, then add features such as square root, reciprocal, memory storage, percentage, constants, or scientific notation later.
Designing the Display Experience
Nixie tubes are slower and more theatrical than modern displays, which is part of their charm. But a calculator still needs clarity. The display should make it obvious when a number is negative, when a decimal point is active, and when an error occurs. Some builders use additional indicators, small LEDs, separator tubes, or dedicated symbols to make the state more readable.
There is also the question of leading zeroes. Should the display show “0000123” or simply “123”? Most users prefer a clean display, but a brief leading-zero animation can be fun during startup. The trick is knowing when style helps and when it becomes a tiny glowing clown show.
Enclosure Ideas: From Lab Bench to Living Room
The enclosure is where the project’s personality emerges. A Nixie tube RPN calculator can look like a Cold War laboratory instrument, a boutique desk accessory, or a cyberpunk cash register from a very exclusive coffee shop.
Wood cases add warmth and pair beautifully with orange glow. Aluminum gives the device a professional instrument feel. Acrylic can highlight the internal electronics, but it should be used carefully so the result does not look like a school science fair project that accidentally became expensive.
The enclosure should also support safety. High-voltage areas should not be reachable during normal use. Ventilation, insulation, strain relief, and secure mounting are not glamorous, but they are part of good design. The best enclosure is not only pretty; it is responsible.
Common Challenges in a Nixie Tube RPN Calculator Project
Tube Availability
Many Nixie tubes are new old stock, meaning they were manufactured years ago and stored until now. Prices can vary widely depending on model, condition, and rarity. A project should be designed around tubes that are realistically available, not unicorn parts that require a treasure map and three auction alerts.
Display Formatting
Limited digits create hard decisions. Should the calculator prioritize fixed decimal display or scientific notation? How should it round? How should it show negative exponents? These choices define the user experience.
Power and Noise
Nixie power systems can introduce electrical noise if not designed and isolated properly. Sensitive keypad scanning and controller logic need stable operation. A clean layout helps avoid flicker, ghosting, and random behavior.
Heat and Power Consumption
Nixie calculators are not usually pocket devices. The display hardware, enclosure, and power requirements make them better suited for a desk. That is part of the appeal. This is not a calculator you lose in a backpack. This is a calculator that occupies space with confidence.
What Makes the Project Worth Building?
The reward is not convenience. Your phone already has a calculator. Your laptop has one. Your watch may have one. A Nixie tube RPN calculator is worth building because it turns computation into an object again.
It teaches electronics, interface design, firmware structure, mechanical layout, and historical appreciation. It also creates something rare: a tool that people want to touch. In a world where many devices are sealed rectangles, a handmade calculator with glowing glass digits feels refreshingly alive.
Real-World Experience: Lessons From Building and Using a Nixie Tube RPN Calculator
The first experience most people have with a Nixie tube RPN calculator project is not mathematical. It is emotional. The first time the tubes light correctly, the room changes. The glow is soft but confident, like a tiny sunset trapped inside glass. You may have spent hours troubleshooting firmware, checking continuity, revising a case design, or fixing a keypad layout, but when the display finally shows a clean number, the project suddenly feels real.
One practical lesson is that the calculator should be designed from the user’s hands backward. Beginners often start with the tubes because they are exciting. That is understandable; Nixie tubes are the movie stars of the project. But the keypad is the part the user touches. If the keys are cramped, poorly labeled, or arranged without thought, the calculator will feel unfinished no matter how beautiful the display is. A good layout makes Enter easy to reach, places arithmetic operators in a predictable cluster, and keeps clear functions away from keys that might be pressed by accident.
Another lesson is that firmware deserves more planning than expected. Basic addition and subtraction may work quickly, but edge cases arrive like uninvited guests. Decimal entry, sign changes, stack lift behavior, display overflow, and rounding all need rules. Writing those rules down before coding can save hours of confusion. A calculator should never feel moody. It should behave the same way every time, even when the user presses keys in a weird order.
Enclosure design is also more important than it first appears. A prototype on the bench may look charming, but a finished calculator needs structure. Tubes should sit at a comfortable viewing angle. The case should not wobble during keypresses. Internal sections should be organized so that low-voltage controls and high-voltage display circuitry are safely separated. The power switch, cable entry, and ventilation should feel intentional, not added during the final five minutes while muttering.
There is also a maintenance mindset. Because many Nixie tubes are vintage, it is wise to think about replacement before something fails. Socketed tubes, labeled connectors, and accessible boards can make future repairs much easier. Documentation helps too. A simple note describing firmware behavior, tube type, and assembly layout can turn a future repair from a mystery novel into a short errand.
The most satisfying part of the project is how it changes the act of calculation. With RPN, each step feels deliberate. With Nixie tubes, each result feels visible in a physical way. The calculator slows the experience just enough to make math feel crafted rather than disposable. It is not the fastest calculator in the room, and that is fine. It is the one people remember.
Conclusion
A Nixie Tube RPN Calculator Project is a brilliant blend of vintage display technology, classic calculator logic, and modern maker creativity. It is not the easiest electronics project, and it should be approached with respect, especially because Nixie displays involve high-voltage sections that require careful design and safe handling. But as a learning project and a finished desk object, it offers something rare: usefulness with soul.
The best version of this project is not merely a nostalgic copy of old hardware. It is a thoughtful modern interpretation. It uses today’s controllers, cleaner firmware, better fabrication options, and safer enclosure design while preserving the warm glow and focused input style that made earlier technology so memorable. Whether built as a personal challenge, a display piece, or a tribute to calculator history, a Nixie tube RPN calculator proves that numbers can still have personality.

