
Beauty Tools & Accessories
How to Make Wooden Bead Napkin Rings DIY
Jul
Some home projects require power tools, safety goggles, three weekends, and a pep talk. This is not one of them. Learning how to make wooden bead napkin rings DIY is one of those delightfully simple crafts that makes your table look thoughtfully styled without making your wallet cry into the linen drawer.
Wooden bead napkin rings are popular for a reason: they are affordable, beginner-friendly, customizable, and surprisingly elegant. They work with farmhouse tables, coastal brunches, modern minimalist dinners, holiday place settings, rustic weddings, and Tuesday night spaghetti when you want the table to look like an adult lives there. Best of all, you can make a full set in less time than it takes to choose a movie everyone agrees on.
In this guide, you will learn the supplies you need, the best bead sizes, how to string and secure the rings, design variations, troubleshooting tips, styling ideas, and real-life crafting experience so your DIY wooden bead napkin rings look charming instead of “I made this at midnight with questionable glue.” Let’s make your table setting a little more beautiful, one bead at a time.
Why Wooden Bead Napkin Rings Are Worth Making
Wood bead napkin rings sit in the sweet spot between simple craft and stylish home decor. They add texture, warmth, and handmade character to a tablescape without overpowering the plates, linens, candles, flowers, or food. Natural wood beads have a relaxed look that pairs beautifully with cotton, linen, jute, ceramic dishes, woven placemats, glassware, and greenery.
They are also practical. A napkin ring keeps folded cloth napkins tidy, helps each place setting feel complete, and makes even casual meals look more intentional. If you host often, a set of handmade napkin rings is an easy way to refresh your table without buying an entirely new dinnerware set. Your plates can stay the same; the napkin rings do the flirting.
Another reason to love this project is flexibility. You can keep the beads raw and natural, stain them, paint them, dye them, add tassels, attach charms, mix bead sizes, or tie on seasonal ribbon. A basic wooden bead napkin ring can become rustic for Thanksgiving, coastal for summer, romantic for a wedding shower, or Scandinavian-inspired for winter.
Supplies You Need
Before you begin, gather everything in one place. This prevents the classic craft-table panic where one hand is holding elastic under tension while the other hand is searching for scissors under a pile of beads.
Basic Materials
- Natural wooden beads, usually 10 mm, 12 mm, 16 mm, or 20 mm
- Elastic cord, stretch cord, jewelry wire, jute twine, or waxed cotton cord
- Scissors or wire cutters
- Clear craft glue or a small dot of hot glue
- Large-eye needle or beading needle, optional but helpful
- Ruler or measuring tape
- Painter’s tape, optional for holding cord ends
Optional Decorative Supplies
- Acrylic paint, wood stain, or fabric dye
- Small tassels
- Jute ribbon, velvet ribbon, or gingham ribbon
- Mini charms, name tags, or place cards
- Clear matte sealer for painted beads
- Fine-grit sandpaper if any beads feel rough
For a clean, classic ring, 16 mm to 20 mm beads are a great choice. Smaller beads create a more delicate look, while larger beads feel bold and modern. If you want a chunky farmhouse napkin ring, 20 mm beads are your friend. If you prefer a refined, boutique-style finish, combine 12 mm and 16 mm beads in a repeating pattern.
Choosing the Right Cord or Wire
The cord determines how your napkin ring behaves. Elastic cord is the easiest for beginners because it stretches around thicker napkins and returns to shape. It is forgiving, flexible, and ideal for everyday use. Jewelry wire creates a sturdier circular form, which is excellent if you want a firm ring that holds its shape permanently. Jute twine gives a rustic look but does not stretch, so you need to size it carefully.
For most DIYers, elastic cord is the best starting point. Choose a cord that fits through the bead holes easily but still feels strong. If the cord is too thick, threading becomes a wrestling match. If it is too thin, the ring may feel flimsy. A medium-weight stretch cord usually works well with craft wood beads.
How Many Beads Do You Need Per Napkin Ring?
The number depends on bead size and the diameter you want. A standard napkin ring usually measures around 2 to 3 inches across. For most cloth napkins, the following estimates work well:
- 10 mm beads: about 18 to 22 beads per ring
- 12 mm beads: about 16 to 18 beads per ring
- 16 mm beads: about 12 to 14 beads per ring
- 20 mm beads: about 10 to 12 beads per ring
These numbers are not carved into stone tablets. Napkin thickness matters. Thin cotton napkins need less space, while thick linen napkins need a slightly larger ring. When in doubt, string the beads loosely first, wrap them around a folded napkin, and adjust before tying the final knot.
Step-by-Step: How to Make Wooden Bead Napkin Rings DIY
Step 1: Plan Your Design
Decide whether you want all-natural beads, painted beads, stained beads, or a mixed pattern. Lay the beads out on the table before threading them. This step sounds almost too obvious, but it saves you from realizing bead number eleven should have been bead number three. Craft regrets are real.
For a simple design, use all natural wood beads. For a modern look, alternate natural beads with white, black, or muted sage green beads. For a holiday table, combine natural wood beads with gold accents, burgundy ribbon, or tiny evergreen sprigs.
Step 2: Cut the Cord
Cut a piece of elastic cord about 10 to 12 inches long for each napkin ring. You will not use all of that length, but the extra makes tying easier. Tiny cord ends are the enemy of calm crafting.
If you are using wire, keep it attached to the spool while stringing the beads, then cut it after checking the size. This gives you more control and reduces waste.
Step 3: Thread the Beads
String the beads onto the elastic cord one at a time. If the cord frays or refuses to pass through the bead hole, wrap a tiny piece of tape around the end or use a large-eye needle. Continue until the ring is the size you want.
Slide the beads together, but do not pull them so tight that the ring becomes stiff or oddly shaped. The beads should sit comfortably next to each other with enough movement to form a smooth circle.
Step 4: Test the Fit Around a Napkin
Before tying anything permanently, wrap the beaded strand around a folded napkin. The ring should hold the napkin neatly without crushing it like it owes money. If it feels too tight, add one or two beads. If it slips off too easily, remove a bead.
This is especially important if you use bulky linen napkins, layered napkins, or decorative folded shapes. A little testing now prevents table-setting drama later.
Step 5: Tie a Secure Knot
Bring the two ends of the elastic together and tie a firm double knot or surgeon’s knot. Pull gently to tighten. Add a tiny dab of clear craft glue to the knot for extra security, then let it dry completely.
Once dry, trim the excess cord close to the knot. Tuck the knot inside one of the bead holes if possible. This creates a cleaner finish and keeps the knot from showing on the table.
Step 6: Add Finishing Touches
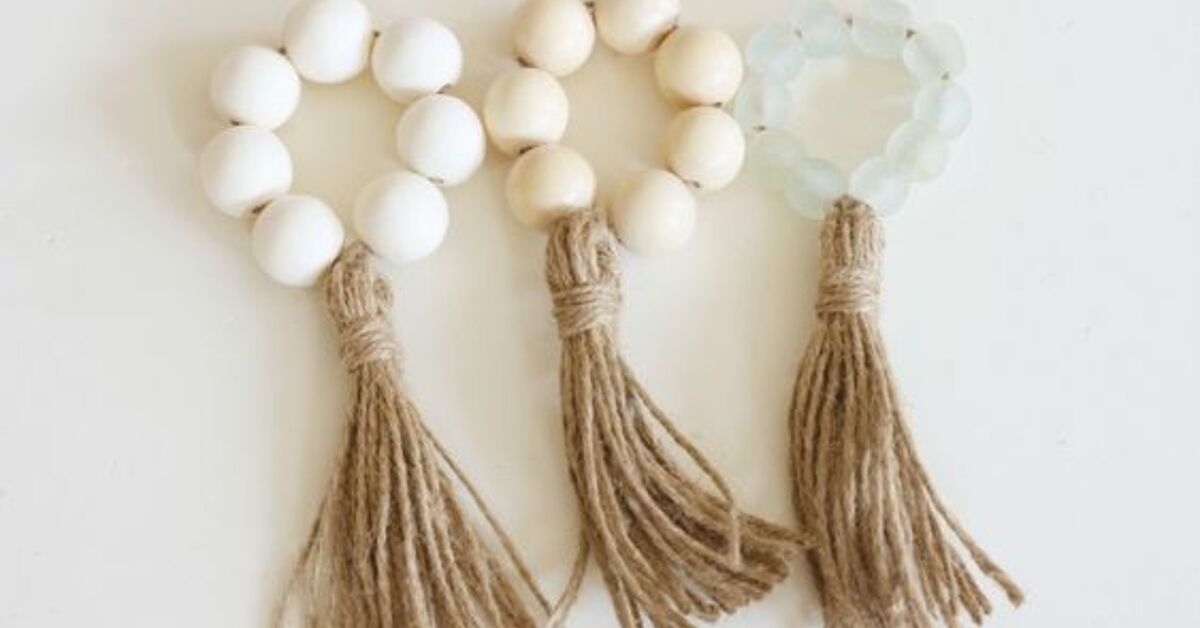
You can stop here and have a beautiful wooden bead napkin ring. But if you enjoy a little extra flair, add a tassel, charm, bow, or small name tag. A jute tassel gives a farmhouse look. A velvet ribbon feels elegant. A handwritten kraft paper tag turns each napkin ring into a place card.
For seasonal decor, tie on a sprig of faux eucalyptus, rosemary, dried orange, cinnamon stick, or mini ornament. Just remember that anything attached should not interfere with guests actually using the napkin. Style is lovely; wrestling with dinner linens is not.
Design Ideas for Every Style
Natural Farmhouse Style
Use unfinished wooden beads with jute twine or tan elastic cord. Add a small tassel or burlap ribbon. Pair with white plates, linen napkins, woven chargers, and a simple greenery centerpiece.
Modern Minimalist Style
Use smooth round beads in natural wood, matte black, or white. Keep the ring plain with no tassels or tags. Place it around crisp white or charcoal napkins for a clean, architectural look.
Boho Table Style
Mix bead sizes and add fringe, macrame cord, or soft cotton tassels. This style looks beautiful with terracotta dishes, rattan placemats, dried flowers, and warm candlelight.
Coastal Style
Use pale wood beads with white cord, blue ribbon, or small shell charms. Pair with striped napkins, sea glass colors, and casual dishes. The result feels beachy without looking like a souvenir shop exploded.
Holiday Style
Paint a few beads metallic gold, deep green, cranberry red, or snowy white. Add velvet ribbon or a mini bell for Christmas, dried leaves for Thanksgiving, pastel ribbon for Easter, or a small heart charm for Valentine’s Day.
Painting, Staining, or Dyeing Wooden Beads
Natural wooden beads are beautiful, but color can make the project more personal. Acrylic paint works well for bold, opaque color. Wood stain gives a warmer, richer finish while keeping the grain visible. Fabric dye can create soft, translucent color, especially on unfinished beads.
To paint beads neatly, slide them onto wooden skewers and rest the skewers across a cup, bowl, or cardboard box. This allows the beads to dry without sticking to the table. Apply thin coats rather than one thick coat. Thick paint can clog the bead holes and make threading more difficult.
If the napkin rings will be handled often, use a clear matte sealer after the paint dries. Let everything cure fully before placing the rings near napkins. Painted or sealed beads should be used as decorative table accessories, not as items for food contact.
Common Mistakes and How to Avoid Them
Mistake 1: Making the Ring Too Small
A tight napkin ring may look cute while empty, but it can squeeze a folded napkin into a sad fabric burrito. Always test with the napkin you plan to use.
Mistake 2: Using Weak Cord
Thin or old elastic can snap after a few uses. Choose a cord with enough strength and stretch, especially if the napkin rings will be used for parties, weddings, or holiday dinners.
Mistake 3: Skipping the Glue on the Knot
A knot may seem secure at first, but repeated stretching can loosen it. A tiny dot of clear glue helps keep the ring intact. Do not use too much glue, or the knot area may become bulky.
Mistake 4: Forgetting About Storage
Wooden bead napkin rings should be stored in a dry place. Tossing them into a crowded drawer may cause paint scratches, tangled tassels, or mysterious bead chaos. A small box, pouch, or divided organizer works better.
How to Style Wooden Bead Napkin Rings on the Table
Once your rings are finished, the fun really begins. Slide one over a rolled napkin for a casual look, or place it around a flat-folded napkin for a more formal table. You can position the napkin across the center of the plate, under the fork, or beside the plate on top of a charger.
For everyday dinners, keep the setup simple: napkin, ring, plate, done. For special occasions, layer textures. Try a linen napkin, wooden bead ring, small place card, and a sprig of greenery. The combination looks thoughtful but not fussy.
If your table already has a lot going on, such as patterned plates or a dramatic centerpiece, choose plain wood bead rings. If your table is simple, use the napkin rings to introduce color or contrast. Good tablescaping is a little like seasoning soup: enough to make it interesting, not so much that everyone notices only the salt.
Budget Breakdown
DIY wooden bead napkin rings are usually inexpensive, especially if you make several at once. A bag of craft beads, a spool of elastic cord, and basic glue can produce a full set for far less than many store-bought napkin rings. The exact cost depends on bead size, wood type, and decorative extras, but this is generally a budget-friendly home decor project.
To save money, buy beads in bulk, use ribbon scraps, repurpose leftover craft cord, or make tassels from embroidery floss. If you are making napkin rings for a wedding or large event, create one sample first. Once you like the size and style, multiply the materials based on the number of place settings.
DIY Wooden Bead Napkin Rings as Gifts
A handmade set of napkin rings makes a thoughtful hostess gift, housewarming present, bridal shower favor, or holiday stocking stuffer. Bundle four or six rings with a set of cloth napkins and tie them together with ribbon. Add a small tag that says “handmade” if you enjoy receiving compliments, which, let’s be honest, most of us do.
You can personalize the set by matching the recipient’s home style. For a modern friend, use black and natural beads. For a coastal home, add pale blue ribbon. For someone who loves entertaining, make a larger set of eight or twelve. Small handmade details often feel more personal than generic decor because they show time, thought, and a little bit of bead-threading commitment.
Care and Maintenance
Wooden bead napkin rings are low maintenance, but they are not designed for soaking, dishwashing, or being scrubbed like a casserole pan after lasagna night. Wipe them gently with a dry or slightly damp cloth. Let them air dry fully before storing.
If the beads are unfinished, avoid exposing them to oily foods, sauces, or heavy moisture. If they are painted or stained, keep them away from harsh cleaners. For tassel versions, comb the fibers gently with your fingers before storing so they do not look like they had a stressful day.
of Real-Life Experience: What This Project Teaches You
The first thing you notice when making wooden bead napkin rings is how quickly the project rewards you. Some DIY projects have an awkward middle stage where everything looks terrible and you must “trust the process.” This one is kinder. After stringing just a few beads, you can already see the shape forming. That instant progress makes it perfect for beginners, busy parents, apartment decorators, wedding planners, or anyone who wants a creative win without converting the dining room into a construction zone.
One practical experience is that bead size matters more than you expect. Tiny beads look delicate in the package, but they can make the ring feel too busy if you use too many. Large beads look dramatic, but they can overwhelm small napkins or narrow plates. The most balanced results usually come from medium beads or a mix of sizes. A repeating pattern, such as one large bead followed by two smaller beads, creates visual rhythm without requiring advanced crafting skills.
Another lesson is that elastic cord is wonderfully forgiving. If you are making these with kids or friends during a craft night, elastic cord keeps the process relaxed. Wire produces a more structured ring, but it can be pokier, fussier, and less forgiving if someone twists it too much. Elastic lets everyone work at a comfortable pace, and the finished rings fit different napkin thicknesses. That flexibility is especially useful during holidays when one person brings linen napkins, another brings cotton napkins, and someone else brings “napkins” that are actually very enthusiastic paper towels.
Color testing is also worth the extra few minutes. Paint and stain can look different on wood beads than they do on paper or sample cards. Natural wood absorbs color unevenly, which can be beautiful if you want an organic look but surprising if you expected perfect uniformity. Testing one bead before painting the entire batch helps you avoid making twelve napkin rings in a color best described as “accidental pumpkin.”
When using tassels or ribbons, restraint helps. A tassel can make the napkin ring look finished and stylish, but too many dangling pieces can crowd the place setting. If the table already includes flowers, candles, chargers, glassware, menus, and place cards, a simple bead ring may look more elegant. Handmade decor works best when it supports the table, not when it tries to headline the entire dinner.
Finally, this project teaches that small details can change the mood of a meal. A wooden bead napkin ring does not cook the food, clean the kitchen, or convince guests to stop discussing traffic. But it does make the table feel cared for. It says, “Someone thought about this.” That is the quiet magic of DIY home decor. It turns ordinary materials into a warm welcome. And if guests ask where you bought the napkin rings, you get to casually say, “Oh, I made them,” which is basically the crafter’s version of a standing ovation.
Conclusion
Making wooden bead napkin rings is simple, affordable, and stylish enough to earn a permanent spot in your table decor collection. With just wooden beads, elastic cord, scissors, and a little creativity, you can create napkin rings that look polished, personal, and far more expensive than they really are.
The best part is how easy the project is to customize. Keep the beads natural for everyday elegance, paint them for seasonal color, add tassels for boho charm, or attach tags for weddings and dinner parties. Whether you are decorating for Thanksgiving, hosting brunch, planning a rustic wedding, or simply upgrading weeknight dinners, DIY wooden bead napkin rings bring texture and personality to the table without requiring expert skills.
So gather your beads, cut your cord, and give your napkins the tiny jewelry they never knew they needed. Your table will look better, your guests will notice, and your craft drawer will finally justify its existence.
Note: These napkin rings are intended as decorative table accessories. If you paint, stain, or seal the beads, allow them to dry and cure completely before use, and wipe clean rather than soaking or washing in a dishwasher.
SEO Tags

