
Hair Care
How to Label an Envelope in 3 Easy Parts
Jun
Labeling an envelope sounds like one of those tasks everyone is supposed to know automatically, like folding a fitted sheet or remembering where the tape went. But the moment you are mailing a birthday card, business document, wedding invitation, payment, school form, or thank-you note, the front of that blank envelope can suddenly feel like a tiny paper exam.
The good news: learning how to label an envelope is not complicated. In the United States, most properly addressed envelopes follow the same three-part system: the return address, the delivery address, and the postage. Put each piece in the right place, write it clearly, and your envelope has a much better chance of arriving where it should instead of taking an accidental vacation through the mail system.
This guide breaks the process into three easy parts, with examples, formatting tips, common mistakes, and practical advice for domestic mail, business mail, apartment addresses, military addresses, and international envelopes. By the end, your envelope will look less like a mystery note from a movie and more like something the postal system can process smoothly.
Part 1: Add the Return Address in the Upper Left Corner
The return address is the sender’s address. In plain English, it tells the postal service, “If this envelope cannot be delivered, please send it back here instead of launching it into the void.” It usually goes in the upper left corner on the front of the envelope.
A complete return address includes your name, street address, city, state, and ZIP Code. If you live in an apartment, condo, dorm, or suite, include that unit information too. The return address should be written on the same side of the envelope as the recipient’s address and postage.
Standard Return Address Format
Use this simple format:
For a business envelope, you may include the company name:
Notice the clean, stacked format. Each line has a job. The first line identifies the sender. The second line gives the street address. The last line gives the city, two-letter state abbreviation, and ZIP Code. No confetti. No cursive gymnastics. No tiny handwriting that requires detective-level squinting.
Why the Return Address Matters
The return address is not just decorative. It helps protect you from lost mail. If the recipient moved, the address is incomplete, the ZIP Code is wrong, or the envelope cannot be delivered for another reason, the return address gives the mailpiece a way home.
For personal cards, invitations, and everyday letters, a return address is simply smart. For many business mailings and certain mail classes, it may also be expected or required. Even when it is not technically required, skipping it is like sending your envelope on a road trip without a map, snacks, or emergency contact.
Return Address Tips
Write the return address smaller than the delivery address, but still make it readable. Use dark ink on a light-colored envelope whenever possible. Black or blue ink is best for handwritten envelopes. If you use printed labels, make sure the label is straight, smooth, and firmly attached.
Some people like placing the return address on the back flap for formal invitations, especially wedding invitations. That can look elegant, but for everyday mailing, the upper left corner on the front is the safest and clearest option. If style matters, choose a clean printed return label rather than a swirling script that looks beautiful to humans but confusing to sorting machines.
Part 2: Write the Delivery Address in the Center
The delivery address is the recipient’s address. This is the star of the envelope. It should go in the center of the front side, slightly toward the lower half. Give it enough space so it stands apart from the return address and postage.
The delivery address tells the postal service exactly where the envelope needs to go. A good delivery address is complete, clear, and arranged in the correct order. Think of it as giving step-by-step driving directions to a very busy machine that does not appreciate riddles.
Standard Delivery Address Format
For most U.S. envelopes, use this format:
If the recipient lives in an apartment or suite, include the unit number:
If the apartment, suite, floor, or unit information does not fit neatly on the street address line, place it above the street address line rather than below the city, state, and ZIP Code line:
This matters because apartment and suite numbers are not optional decoration. They are part of the delivery point. Leaving off “APT 12C” can turn a simple delivery into a building-wide guessing game, and nobody wants their electric bill becoming lobby furniture.
How to Address Business Mail
When mailing to a company, include the recipient’s name, department, company name, and full mailing address when available. If you are sending something to a specific person inside a company, do not rely on the company name alone.
If you need to send mail “care of” someone, use “C/O” above the street address:
Use “ATTN” when the envelope should be routed to a person, department, or role within an organization:
City, State, and ZIP Code
The final line of a U.S. address should include the city, the two-letter state abbreviation, and the ZIP Code. If you know the ZIP+4 Code, you can include it because it provides even more precise delivery information.
Use the correct state abbreviation, not a nickname or full state name if you want the most standardized format. Write “CA” instead of “California,” “NY” instead of “New York,” and “TX” instead of “Texas.” The envelope is not offended by abbreviations. In fact, it prefers them.
Directionals and Street Suffixes Matter
Do not ignore directionals such as N, S, E, W, NE, NW, SE, and SW. “100 MAIN ST” and “100 MAIN ST NW” may be completely different places. The same goes for street suffixes like ST, AVE, BLVD, DR, LN, CT, RD, and PKWY.
For example:
Those addresses may look similar, but they are not interchangeable. A missing directional or incorrect street suffix can delay delivery or send the envelope to the wrong location. It is one of the smallest details with the biggest “oops” potential.
Part 3: Place the Postage in the Upper Right Corner
The third part of labeling an envelope is postage. For a standard envelope, the stamp or postage mark goes in the upper right corner on the same side as the addresses. If the return address is the envelope’s “send it back if needed” information and the delivery address is “where it goes,” postage is the tiny paid ticket that lets the envelope join the mail party.
For regular First-Class Mail letters, a Forever Stamp is commonly used for standard-size envelopes within the United States, as long as the envelope meets basic weight and size requirements. Heavier envelopes, oversized envelopes, square envelopes, rigid envelopes, or envelopes with unusual thickness may need extra postage.
Where Exactly Does the Stamp Go?
Place the stamp neatly in the upper right corner. Do not put it in the center. Do not place it upside down as a personality statement. Do not hide it under a sticker, seal, wax stamp, or decorative ribbon. The stamp needs to be visible and scannable.
For metered postage or printed postage, follow the same general placement: upper right area on the front of the envelope. If you are printing postage through mailing software, make sure your printer settings match the envelope size so the postage does not wander into the wrong neighborhood.
Check Size, Weight, and Shape Before Mailing
Before dropping your envelope in a mailbox, check whether it is standard. A typical letter envelope should be rectangular, flexible, and thin enough for machine processing. If your envelope contains keys, coins, thick cards, USB drives, bulky charms, or seventeen layers of stickers, it may require different handling or extra postage.
Square envelopes are often treated differently because they do not move through machines the same way rectangular envelopes do. Very rigid or uneven envelopes may also need additional postage. When in doubt, take the envelope to a Post Office counter. It is better to spend an extra minute checking than to have your carefully labeled envelope return home looking embarrassed.
Best Practices for Clear Envelope Labeling
Use Clear Printing
Print or write addresses clearly. Block letters are best. If your handwriting has been described as “creative,” “expressive,” or “possibly ancient,” consider using printed labels. Mail sorting equipment reads best when addresses are simple, dark, and easy to distinguish from the envelope background.
Avoid overly decorative fonts, glitter pens, pale ink, metallic ink, and tiny lettering. They may look charming on stationery, but the postal system is not judging your aesthetic board. It is trying to read the address quickly and accurately.
Skip Most Punctuation
For mailing addresses, punctuation is usually unnecessary. You do not need commas between the city and state, and you do not need periods in abbreviations like “ST” or “APT.” A clean standardized address is easier to process.
Instead of:
Use:
This does not mean your envelope will explode if you use a comma. It simply means clean, standardized formatting is better for efficient processing.
Use the Same Side for Everything
The return address, delivery address, and postage should all be on the same side of the envelope. That side is the front. The back is for sealing, not for turning your envelope into a treasure map.
If you put important address information on the back, the envelope may be delayed or returned. Keep the front organized: return address upper left, delivery address center, postage upper right.
Examples of Properly Labeled Envelopes
Example 1: Personal Letter
Example 2: Apartment Address
Example 3: Business Mail
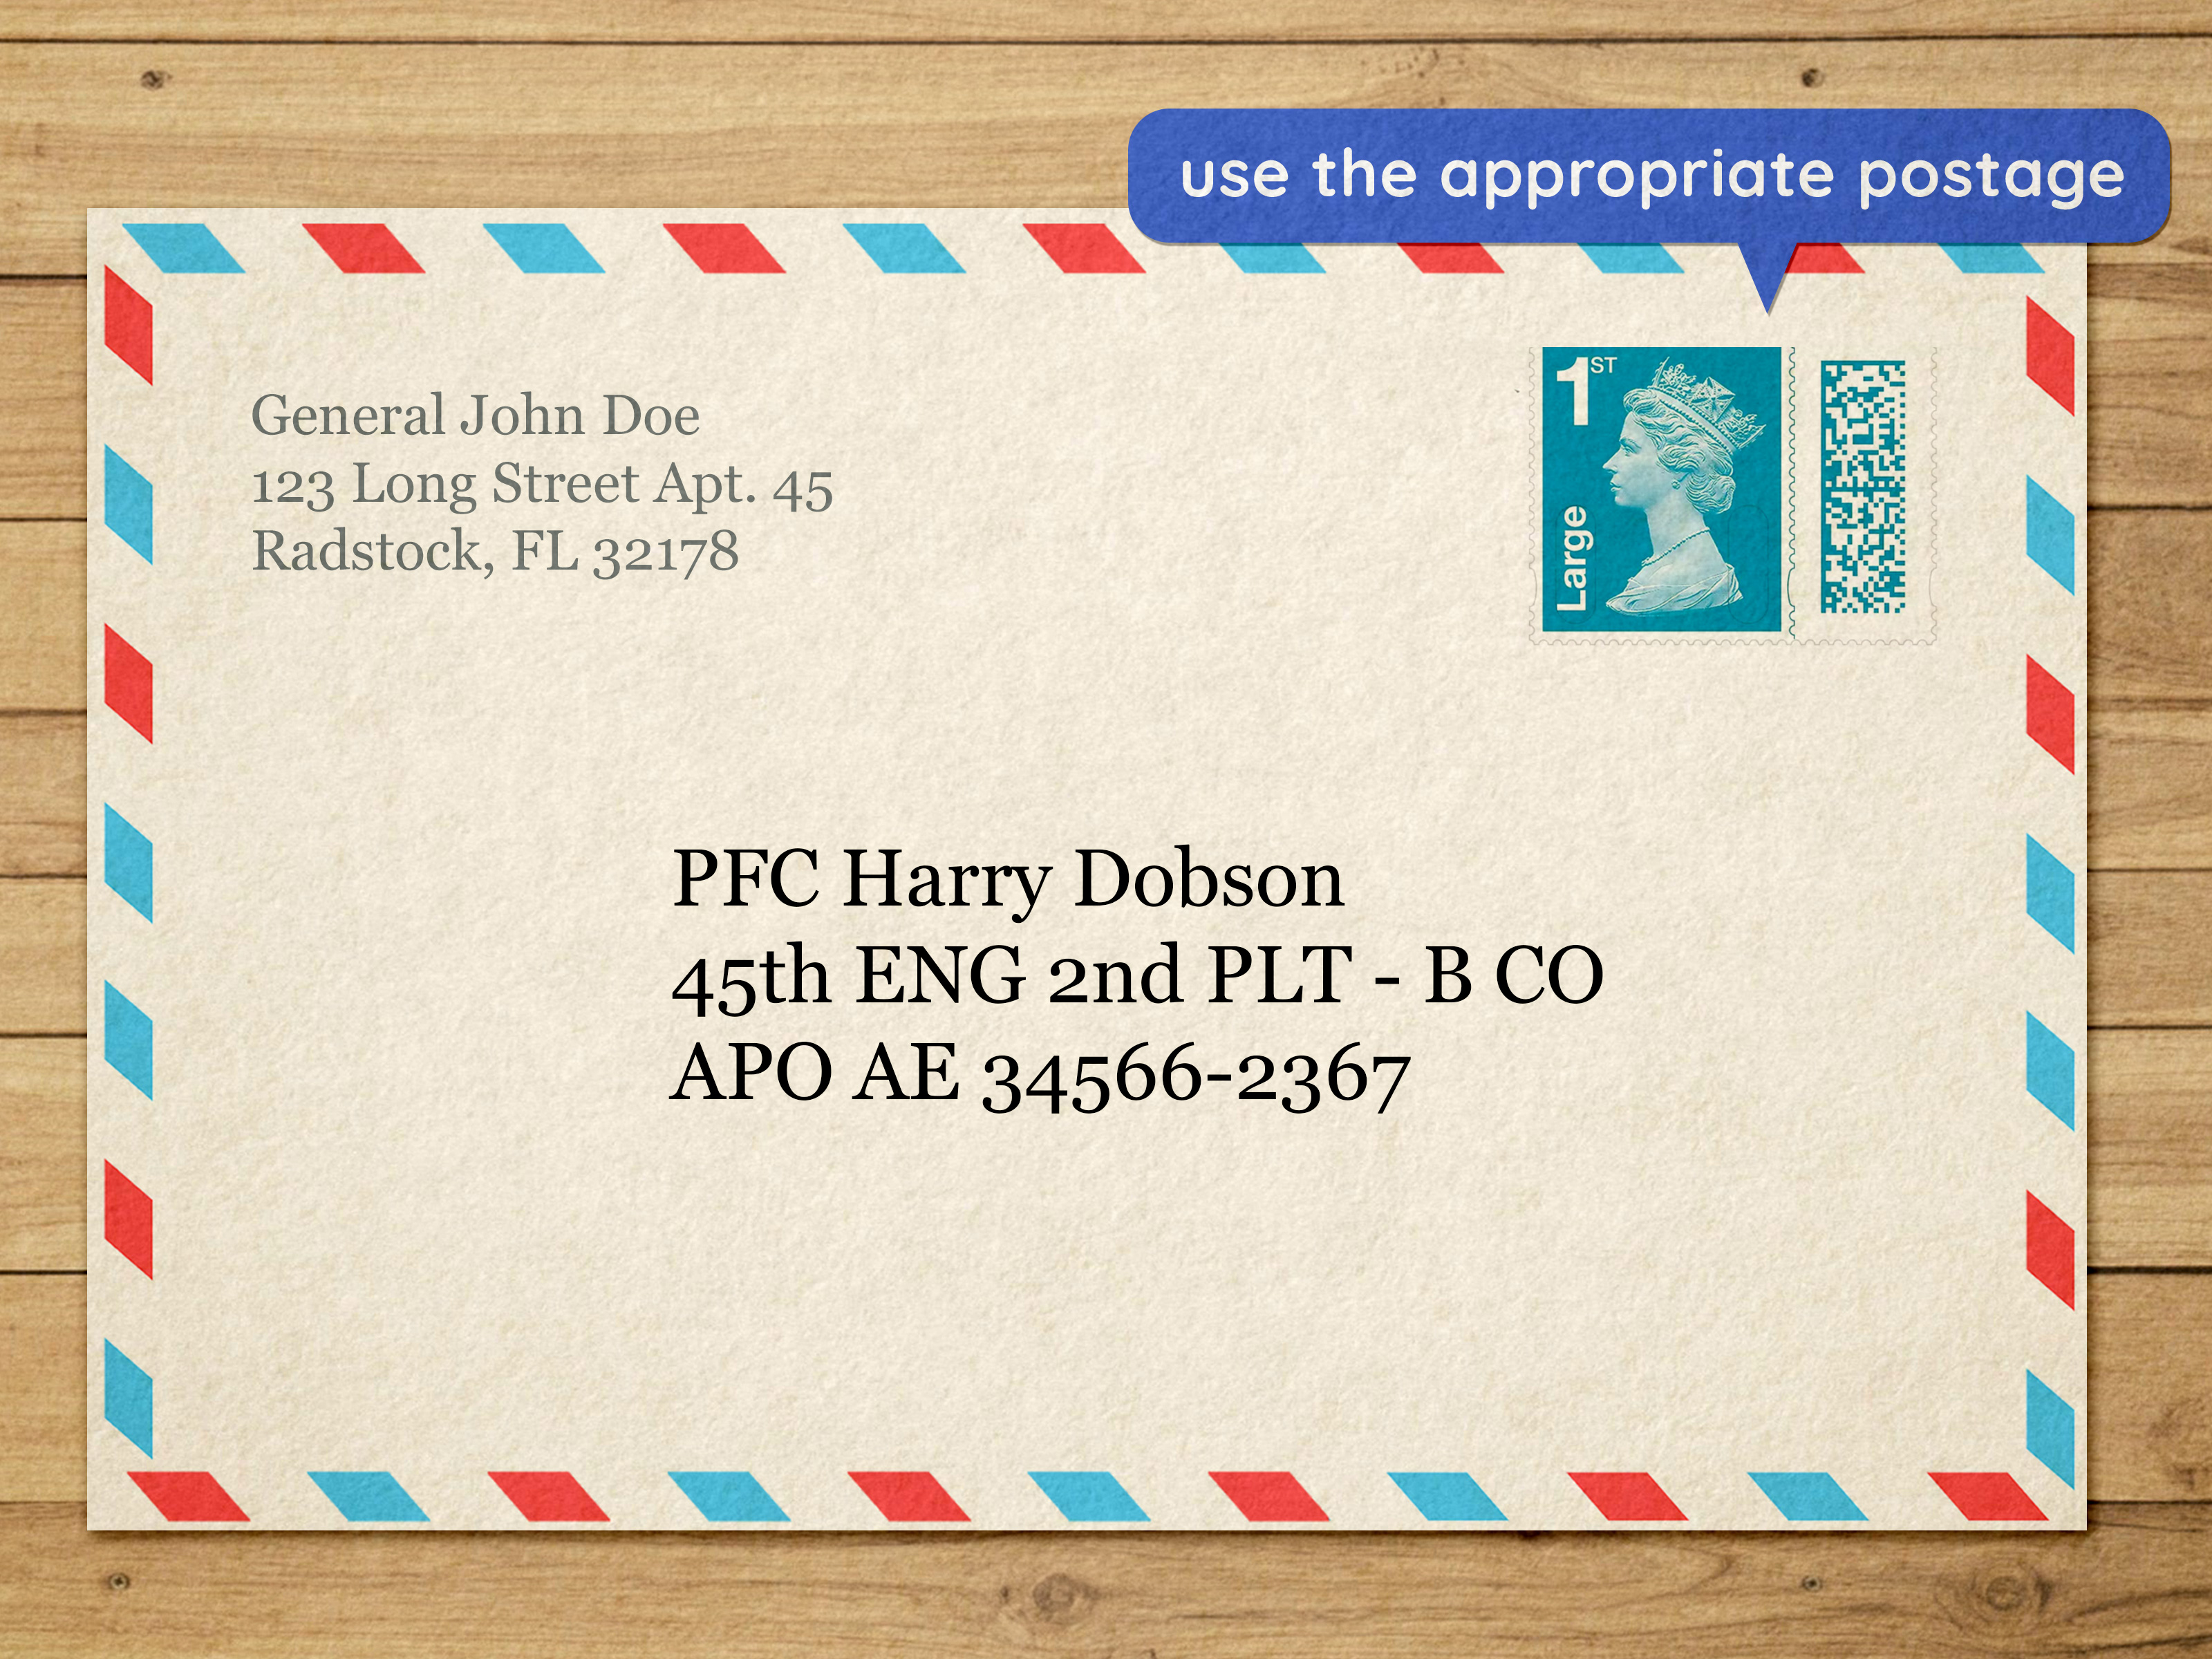
Example 4: Military Mail
Military and diplomatic addresses use special formatting. Do not include a foreign city or country name for APO, FPO, or DPO mail. Use the service member’s name, unit information, APO/FPO/DPO designation, appropriate “state” abbreviation such as AA, AE, or AP, and ZIP Code.
Always include a return address on military mail, and make sure the recipient is a specific person. “Any Service Member” may sound generous, but it is not accepted for proper military mail addressing.
Example 5: International Envelope
For international mail, write the sender’s address in the upper left corner and include “USA” on the last line of the return address. Write the delivery address in the center, and put the destination country name in English on the last line, preferably in capital letters.
Common Envelope Labeling Mistakes to Avoid
Mistake 1: Putting the Recipient Address Too High
The delivery address belongs near the center of the envelope, not crammed into the top left area beside the return address. If both addresses are too close together, sorting equipment and postal workers may have to pause and figure out which address is which. That is not the kind of suspense your electric bill needs.
Mistake 2: Forgetting the Apartment or Suite Number
This is one of the most common addressing problems. The street address may get the envelope to the building, but the apartment or suite number gets it to the right person. If you are mailing to a large apartment complex, office building, dorm, medical building, or shared workspace, the unit information is essential.
Mistake 3: Using Hard-to-Read Ink
Gold ink on a cream envelope may look fancy, but it can be difficult to read. Red ink can be less clear. Pencil can smudge. Pale markers may disappear under postal handling. Use dark ink that contrasts strongly with the envelope.
Mistake 4: Guessing the ZIP Code
Do not guess the ZIP Code unless you enjoy creating tiny logistical dramas. A wrong ZIP Code can send mail to the wrong sorting area. If you are unsure, look it up before mailing. The ZIP Code is not just a number; it is part of the route.
Mistake 5: Overdecorating the Front
Stickers, drawings, wax seals, washi tape, and doodles can be fun, but keep them away from the address area and postage. The front of the envelope should be easy to scan. Save the full art project for the inside card, where it can shine without confusing machinery.
How to Label an Envelope by Hand
Hand-labeling an envelope is perfectly fine as long as the writing is clear. Start with the return address in the upper left corner. Then write the recipient’s full name and address in the center. Finally, place the stamp in the upper right corner.
Use a ruler or a sheet of paper as a guide if you want straighter lines. Write slowly. Let the ink dry before stacking envelopes, especially if you are using gel pens. If you make a mistake, use a new envelope when possible. Heavy scribbling can make the address harder to read and gives the envelope the energy of a failed crossword puzzle.
How to Use Address Labels
Address labels are excellent for invitations, business mail, holiday cards, newsletters, and any situation where you are sending more than a few envelopes. They save time, look professional, and reduce handwriting errors.
Place the return address label in the upper left corner and the recipient label in the center. Make sure labels are not crooked, wrinkled, peeling, or covering the stamp area. If you are printing labels, use a simple font, readable size, and strong contrast.
Before printing a full sheet of labels, print one test page on regular paper. Hold it behind the label sheet to check alignment. This little step can save you from producing thirty labels that are each slightly off-center, which is the stationery version of stepping on a rake.
Real-World Experiences: What Actually Happens When You Label Envelopes
After you label enough envelopes, you begin to notice that the small details make a big difference. The first time many people mail something important, they focus on the stamp and forget the return address. That usually feels harmless until the envelope comes back weeks later, or worse, never comes back at all. A return address is one of those details that feels unnecessary only until you need it.
One common experience is mailing a card to an apartment building and forgetting the unit number. The address may be technically close, but “close” is not the same as delivered. In a building with 200 units, a missing apartment number turns the postal carrier into an unwilling contestant on a guessing show. The envelope may be delayed, returned, or placed somewhere that requires the recipient to conduct a mini investigation.
Another real-life lesson comes from decorative envelopes. Many people love using dark envelopes with metallic pens for weddings, birthdays, graduations, or holiday cards. They look beautiful in photos, but they can be tricky in the mailstream. If the ink does not contrast enough, the address may be hard to read. The best compromise is simple: use beauty around the edges, but keep the address block clean, clear, and practical. Think of it as giving your envelope a nice outfit without making it wear sunglasses indoors.
Business mail teaches another lesson: clarity beats cleverness. A company name alone may not be enough. Large offices often have multiple departments, floors, mailrooms, and employees with similar names. Adding “ATTN,” department names, suite numbers, and full street information helps the envelope get beyond the front desk and into the right hands.
Holiday mailing offers perhaps the best envelope-labeling education. When you are sending twenty, fifty, or one hundred cards, tiny mistakes multiply quickly. One wrong ZIP Code becomes one returned card. One old address becomes one confused text message. One smudged label becomes a mystery. The easiest system is to update your address list before printing, use standardized formatting, and check one finished envelope before preparing the rest. It is not glamorous, but neither is redoing a stack of envelopes at midnight while muttering at your printer.
People also learn that the envelope itself matters. A standard rectangular envelope is usually the easiest to process. Thick, lumpy, square, or rigid envelopes can require extra postage or hand processing. If you are mailing something important, unusual, or time-sensitive, visiting a postal counter can prevent surprises. A postal clerk can weigh the envelope, confirm postage, and tell you whether it needs special handling.
The biggest practical takeaway is this: labeling an envelope is not about perfection. It is about communication. You are giving the postal system three pieces of information: who sent it, where it is going, and whether postage has been paid. When those three parts are clear, the envelope has a much better chance of doing its one job successfully. It may not win an award for drama, but it will get where it needs to goand honestly, for an envelope, that is a pretty heroic career goal.
Final Checklist Before You Mail
- Return address is in the upper left corner.
- Delivery address is centered and easy to read.
- Apartment, suite, unit, floor, or department information is included if needed.
- City, state abbreviation, and ZIP Code are correct.
- Postage is in the upper right corner.
- All address information is on the front side of the envelope.
- Ink is dark, clear, and not smudged.
- The envelope is not too bulky, rigid, square, or heavy for standard postage.
Conclusion
Learning how to label an envelope in 3 easy parts is really about keeping the front of the envelope organized. Put the return address in the upper left corner, the delivery address in the center, and the postage in the upper right corner. Then make the address clear, complete, and easy to read.
Whether you are sending a thank-you card, a rent check, a business document, a wedding invitation, or a letter to someone who still appreciates actual mail, the same basic rules apply. Clean formatting helps postal equipment and postal workers process your envelope efficiently. Complete details help prevent delays. Correct postage keeps the envelope moving.
In a world full of instant messages, a properly labeled envelope is a small but satisfying skill. It says, “I have my life together,” even if you labeled it at the kitchen counter five minutes before the mail carrier arrived. And sometimes, that is enough.
Note: This article is based on standard U.S. mailing and addressing best practices. For unusual mailpieces, international shipments, heavy envelopes, or time-sensitive documents, confirm postage and handling requirements before mailing.
