
Hair Care
How to Grow Mulberry Trees in Canada
Aug
Growing mulberry trees in Canada sounds slightly rebellious. Mulberries are often associated with warmer orchards, silk production, and birds that somehow locate ripe fruit three minutes before you do. Yet with the right variety, planting location, and winter strategy, a mulberry tree can become a productive part of many Canadian gardens.
The secret is not treating every mulberry as interchangeable. Some varieties tolerate winters that make outdoor furniture reconsider its career choices, while others struggle as soon as temperatures fall sharply. Canadian gardeners must match the tree to their local hardiness zone, protect young plants from winter injury, and give the fruit enough summer heat to ripen.
This guide explains how to select, plant, prune, protect, and harvest a mulberry tree in Canada, including practical advice for Ontario, Quebec, British Columbia, Atlantic Canada, and colder Prairie locations.
Can Mulberry Trees Grow in Canada?
Yes, mulberry trees can grow in Canada, particularly in areas with Canadian plant hardiness ratings roughly equivalent to the warmer parts of zones 4 through 7. Success becomes less predictable in colder zone 3 locations, although exceptionally hardy selections may survive in protected microclimates.
Southern Ontario, southwestern Quebec, coastal British Columbia, the Maritimes, and sheltered urban areas generally offer the most favorable conditions. Gardeners on the Prairies face greater challenges because extreme winter lows, drying winds, rapid temperature swings, and late spring frosts can damage young branches.
A tree surviving winter is only half the assignment. It also needs a sufficiently long, warm growing season to mature its wood and ripen its fruit. A cold-hardy cultivar planted against a sunny, heat-reflecting wall may perform better than a supposedly superior variety standing in an exposed field.
Choosing the Best Mulberry Variety for Canada
White and Russian Mulberries
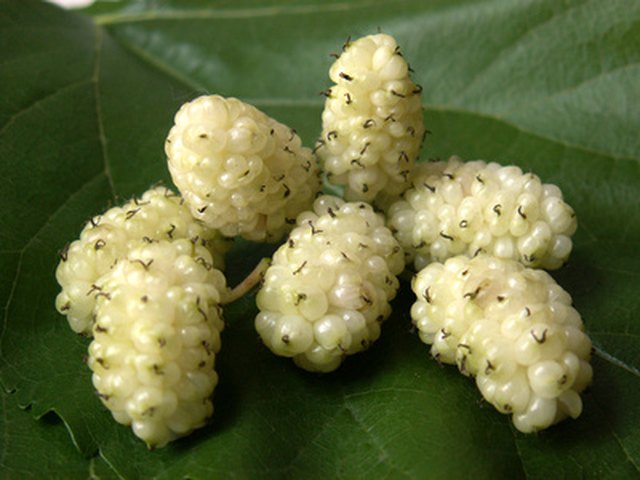
White mulberry, botanically known as Morus alba, is generally the most adaptable mulberry species for cold climates. Its name refers to botanical characteristics rather than fruit color; a white mulberry tree may produce white, pink, red, or nearly black fruit.
Russian mulberry, usually classified as Morus alba var. tatarica, is considered one of the hardiest forms. Certain selections are capable of growing in conditions approaching zone 3 or 4. Fruit quality varies considerably, however, so purchase a named fruiting cultivar instead of an unidentified seedling.
White mulberry can spread aggressively and is considered invasive or weedy in several regions. Check provincial and municipal recommendations before planting it, especially in southern Ontario.
Red Mulberry
Red mulberry, or Morus rubra, is native to eastern North America and produces flavorful dark fruit. It is generally more cold-tolerant than true black mulberry but may be less hardy than the toughest white mulberry selections.
Native red mulberry is endangered in Canada and occurs naturally in limited areas of southern Ontario. Its greatest biological threat is hybridization with introduced white mulberry. Gardeners near natural red mulberry habitat should consult local conservation authorities before planting white mulberry or unidentified hybrids.
Black Mulberry
True black mulberry, Morus nigra, is famous for richly flavored fruit but is usually the riskiest choice for cold Canadian gardens. It prefers milder winters and a longer growing season. It may succeed in protected parts of coastal British Columbia or exceptionally warm urban microclimates, but it is not the sensible default for most of the country.
Named Cold-Hardy Cultivars
Look for a locally tested, self-fruitful cultivar sold by a reputable Canadian nursery. Illinois Everbearing and hardy Russian-type selections are frequently considered for cold climates, but nursery ratings can differ. Ask where the nursery’s parent trees are grown and whether the cultivar has survived winters comparable to yours.
Choose a tree rated at least as cold-hardy as your location. For an exposed property, selecting a cultivar rated one zone colder provides a useful safety margin.
Finding the Right Planting Site
Provide Plenty of Sun
Mulberries tolerate partial shade, but fruit production and ripening are usually best in full sun. Aim for at least six hours of direct sunlight per day, with eight or more hours preferred in cool Canadian climates.
A south- or southwest-facing location can extend the effective growing season. A nearby masonry wall may absorb daytime heat and release it slowly after sunset, creating a warmer microclimate. Do not plant directly against a foundation, however, because mature mulberries can develop broad crowns and extensive root systems.
Protect the Tree From Winter Wind
Cold temperatures are more damaging when combined with drying wind. Plant on the sheltered side of a building, fence, hedge, or windbreak while preserving adequate sunlight and air circulation.
Avoid low areas where cold air settles. These frost pockets can delay spring growth, damage emerging leaves, and shorten the period available for fruit ripening.
Allow Room for Fruit and Roots
A standard mulberry may grow 30 to 50 feet tall with a similarly broad canopy. Dwarf cultivars and regularly pruned trees remain smaller, but labels describing a mulberry as a “bush” should not be interpreted as a legally binding promise.
Keep full-size trees approximately 20 to 30 feet from buildings and other large trees. Dwarf or trained cultivars may be spaced 8 to 15 feet apart, depending on their mature dimensions.
Do not position a fruiting mulberry over a driveway, deck, sidewalk, swimming pool, or favorite white patio furniture. Ripe fruit drops easily and can stain hard surfaces. Birds eat the berries and contribute their own modern art to the surrounding area.
Preparing the Soil
Mulberries tolerate several soil types, but they perform best in deep, fertile, well-drained soil. Loam is ideal, although sandy or clay soil can work when drainage is adequate.
A slightly acidic to neutral soil is generally suitable. Before planting, consider obtaining a soil test rather than diagnosing the ground through intuition and vigorous staring.
Heavy clay should not be replaced with a pocket of rich potting soil. That approach can create a bowl that traps water around the roots. Instead, loosen a broad planting area, preserve the native soil structure, and improve surface drainage when necessary.
If water remains in the planting area for long periods after rain, select another location or construct a broad raised mound. Mulberries tolerate occasional moisture but should not spend spring pretending to be aquatic plants.
When to Plant a Mulberry Tree in Canada
Early spring is usually the best planting time. Plant after the soil becomes workable but while the tree is still dormant or just beginning to wake. This gives roots an entire growing season to establish before the next Canadian winter arrives.
Bare-root mulberries should be planted promptly while dormant. Container-grown trees can be planted later in spring, but planting during hot summer weather increases watering demands and transplant stress.
Fall planting may work in mild parts of British Columbia or southern Ontario, but it is less reliable in cold regions. A newly planted tree may not establish enough roots before the soil freezes.
How to Plant a Mulberry Tree Step by Step
- Water the tree before planting. A hydrated root ball separates more easily from its container and experiences less transplant stress.
- Locate the root flare. Find the point where the trunk widens and the main roots begin. Remove excess nursery soil if the flare is buried.
- Dig a wide, shallow hole. Make the hole two or three times wider than the root ball but no deeper than the root system.
- Inspect the roots. Loosen or cut circling container roots so they grow outward instead of continuing to wrap around the trunk.
- Position the tree correctly. Set the root flare at soil level or slightly above grade, particularly in heavy soil.
- Backfill with native soil. Firm gently to remove large air pockets without compacting the soil into concrete.
- Water deeply. Saturate the root ball and surrounding soil immediately after planting.
- Apply mulch. Spread two to four inches of wood chips over the root zone while leaving several inches of bare space around the trunk.
Do not create a mulch volcano against the bark. Constant moisture around the trunk encourages decay, weakens bark, and provides luxury accommodations for rodents.
Watering a Mulberry Tree
New mulberry trees need consistent moisture during their first two growing seasons. Water deeply whenever the upper few inches of soil become dry. Depending on rainfall, soil, and temperature, this may mean watering once or twice per week during warm weather.
Deep watering encourages roots to expand downward and outward. Frequent light sprinkling promotes shallow roots that are more vulnerable to heat, drought, and rapid freezing.
Established mulberries are reasonably drought-tolerant, but prolonged dryness can reduce fruit size and cause premature fruit drop. Maintain even moisture while fruit is developing without keeping the soil constantly saturated.
Reduce supplemental watering toward the end of summer unless conditions are unusually dry. Excessive late-season water and nitrogen can encourage tender growth that does not harden before winter.
Fertilizing Mulberry Trees
Mulberries are vigorous trees and generally require less fertilizer than apples, peaches, or gardeners standing in the fertilizer aisle may assume.
Apply compost around the outer root zone in spring, keeping it away from the trunk. Use commercial fertilizer only when a soil test or visible growth pattern indicates a deficiency.
A young tree producing roughly 12 to 24 inches of healthy annual growth usually does not need additional nitrogen. Excess fertilizer can create long, weak branches that are more vulnerable to wind, ice, and winter dieback.
Pollination and Fruit Production
Mulberry reproduction can be confusing because trees may be male, female, or occasionally change flowering behavior under certain conditions. Many named fruiting cultivars sold for home gardens are self-fruitful and can produce berries without a second tree.
Confirm the cultivar’s pollination requirements before buying. Seed-grown trees are unpredictable: they may be male, produce mediocre fruit, or take many years to bear. A grafted or clonally propagated cultivar provides more reliable fruit quality, mature size, and cold hardiness.
Young trees may begin producing within a few years, although establishment, climate, cultivar, and pruning affect the schedule. In cold areas, patience is not merely a virtue; it is part of the equipment list.
How to Prune a Mulberry Tree
Begin With Structural Pruning
During the first several years, develop a strong framework with one main trunk and well-spaced scaffold branches. Remove competing leaders, broken branches, and narrow branch unions that may split under fruit, ice, or wet snow.
Prune During Dormancy
Late winter is the normal pruning period, before active growth begins. Avoid pruning during extreme cold, and do not remove more live wood than necessary.
Mulberries may bleed sap from cuts made as growth resumes. The bleeding usually looks more dramatic than it is, but dormant pruning reduces the spectacle.
Keep the Canopy Manageable
Remove dead, damaged, rubbing, and inward-growing branches. Use reduction cuts back to outward-facing lateral branches when controlling height. Repeatedly cutting every branch to a stub produces weak shoots and turns annual maintenance into a wrestling match.
For easier harvesting, maintain a smaller open tree rather than allowing maximum height. Light summer pruning can control overly vigorous shoots, but avoid heavy pruning late in the season because new growth may not mature before frost.
Protecting Mulberry Trees During Canadian Winters
Young trees deserve extra protection for their first two or three winters, particularly near the cold limit of their cultivar.
- Maintain a broad mulch layer over the root zone, but keep mulch away from the trunk.
- Install a trunk guard to discourage rabbits, mice, and voles from feeding on bark.
- Use hardware cloth around the lower trunk where rodent pressure is severe.
- Protect exposed young trees with a breathable burlap wind screen rather than wrapping the entire canopy in plastic.
- Water deeply in fall before the ground freezes if autumn has been dry.
- Brush off unusually heavy, loose snow carefully, but do not strike frozen branches.
Spring temperature swings can be as damaging as midwinter cold. A trunk exposed to bright afternoon sun may warm during the day and freeze rapidly after sunset. A light-colored tree wrap can help protect young bark, but it should be removed or inspected regularly to prevent moisture and insect problems.
Growing Mulberries in Containers
Dwarf mulberries can grow in large containers, but container gardening does not magically cancel winter. Roots above ground experience colder temperatures than roots protected by garden soil.
Use a large frost-resistant container with generous drainage holes and a well-drained potting mix. Water whenever the mix begins to dry, because containers lose moisture quickly during summer.
Before winter, move the dormant tree into an unheated garage, shed, or protected cold frame where it remains cold but avoids extreme temperature swings. Another option is to sink the container into the ground and mulch around it heavily.
A heated home is usually unsuitable for winter storage because the tree requires dormancy. A confused mulberry growing weak indoor leaves in January is not getting an exciting head start.
Common Mulberry Problems
Mulberries are generally resilient, but stressed trees can develop cankers, twig dieback, leaf spots, bacterial problems, scale insects, mites, or wood-boring insect damage.
Prevention begins with good drainage, correct planting depth, moderate pruning, and sensible watering. Remove dead branches and fallen or spoiled fruit. Clean pruning tools between trees when disease is suspected.
Soft fruit may attract spotted wing drosophila in regions where the pest is present. Harvest ripe berries frequently, refrigerate them promptly, and remove overripe fruit from the ground.
Birds are the most persistent competitors. Netting a mature mulberry is difficult and may endanger wildlife if installed poorly. Many gardeners simply harvest early in the morning and accept a negotiated settlement with the local robins.
Harvesting Mulberries
Mulberries ripen over an extended period rather than all at once. Fully ripe berries become soft, sweet, and easy to detach. Color alone is not always a reliable indicator because some cultivars ripen white, pink, red, or dark purple.
Spread a clean tarp or sheet beneath the canopy and gently shake a branch. Ripe fruit falls readily while unripe berries usually remain attached. Collect the fruit immediately to limit bruising and bird interest.
Mulberries are delicate and have a short refrigerated life. Eat them fresh, freeze them on trays, dry them, or use them in jam, syrup, pie, smoothies, and sauces. Wear clothing that can survive a purple fingerprint or two.
Practical Experiences From Growing Mulberries in Canadian Conditions
One of the most common lessons from cold-climate mulberry growing is that the planting location can matter almost as much as the cultivar. A tree labeled hardy to zone 4 may struggle in an open, windy field yet grow well a few yards away beside a south-facing fence. Snow cover, wind exposure, soil drainage, and stored heat from nearby structures create surprisingly different microclimates on the same property.
Gardeners also learn that winter survival should not be judged too early. After a difficult winter, branch tips may appear lifeless while buds lower on the same stems remain viable. Waiting until late spring before removing questionable wood prevents accidental pruning of branches that are merely slow to wake up. Once new growth clearly shows the living portions, dead tips can be cut back to healthy tissue.
Another frequent experience involves buying the wrong plant. An inexpensive seedling labeled only “mulberry” may grow enthusiastically but produce poor fruit, no fruit, or fruit that ripens too late for the local season. A named cultivar costs more initially, yet it removes much of this uncertainty. The grower knows approximately how large the tree will become, whether it is self-fruitful, what the berries taste like, and which winters it has a reasonable chance of surviving.
Young mulberries often grow rapidly during their second or third summer. This can tempt gardeners to apply extra fertilizer and celebrate every long shoot. In northern climates, however, extremely lush late growth may remain soft when frost arrives. Moderate nutrition, steady watering, and an end to fertilizing by midsummer usually produce sturdier wood than an aggressive feeding program.
Fruit placement is another lesson that arrives in vivid color. A small mulberry planted beside a driveway looks harmless for several years. Once mature, it can drop hundreds of juicy berries onto vehicles, paving stones, shoes, and pets. Experienced growers usually place fruiting trees over grass, mulch, or a naturalized garden area where stains do not matter and fallen fruit can be collected easily.
Bird pressure varies dramatically. Some gardeners harvest generous bowls before wildlife notices the crop. Others discover that every berry has been sampled by dawn. A practical response is to harvest daily as soon as berries loosen, place a tarp beneath the canopy, and gently shake selected branches. This is often easier than attempting to cover an entire mature tree with netting.
Prairie growers commonly report that shelter is essential. Winter wind can dry young stems even when minimum temperatures remain within the cultivar’s published range. A breathable wind barrier, deep fall watering, rodent protection, and reliable snow accumulation around the root zone may determine whether a young tree merely survives or returns with vigorous growth.
Container growers face a different surprise: a tree rated for their zone may still die because its roots freeze inside an exposed pot. Moving the dormant container into an unheated but protected structure, or burying and insulating the pot, greatly improves the odds. The branches can tolerate considerable cold, but the roots are less forgiving.
Finally, successful mulberry growers become comfortable with imperfection. The tree may leaf out later than expected, lose a few branch tips, attract birds, and stain a pair of gloves. In return, it can provide shade, wildlife value, and bowls of unusually sweet fruit with relatively little spraying or complicated maintenance. The most reliable formula is simple: select a genuinely hardy cultivar, plant it in the warmest sensible location, protect it while young, and allow it time to adapt.
Final Thoughts
Learning how to grow mulberry trees in Canada begins with realistic variety selection. Cold-hardy white, Russian-type, red, or hybrid cultivars have the best chance of succeeding, while true black mulberries are better reserved for mild, protected climates.
Choose a sunny, well-drained location away from paving and vehicles. Plant in early spring, keep the root flare visible, water deeply during establishment, and avoid excessive fertilizer. Structural pruning, winter wind protection, rodent guards, and a generous but properly placed mulch layer will help the tree withstand its early Canadian winters.
Before planting white mulberry in southern Ontario, investigate local ecological guidance because introduced trees can hybridize with Canada’s endangered native red mulberry. Choosing a locally recommended cultivar protects both your investment and the surrounding environment.
With thoughtful preparation, a mulberry can become one of the most productive and entertaining trees in a northern garden. Just remember that when the berries ripen, the birds will already have the date marked on their calendars.

