
Beauty Tools & Accessories
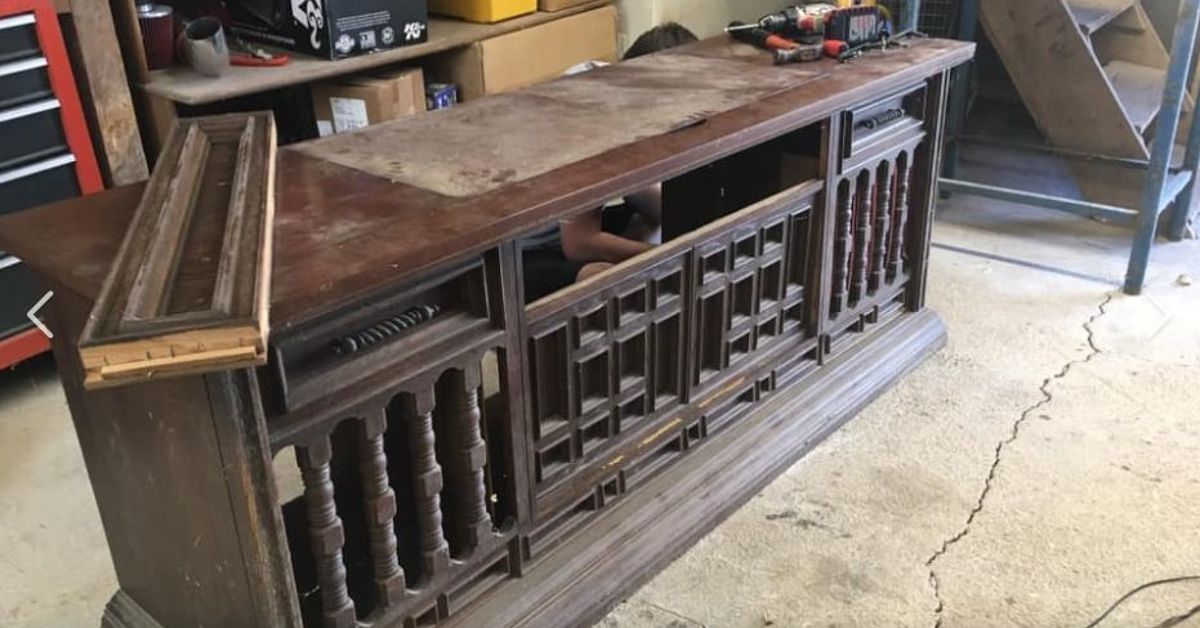
How to Turn an Old Stereo into a New Television Stand DIY
Aug
There is something wonderfully rebellious about taking a bulky old stereo consolethe kind that once treated eight-track tapes like cutting-edge technologyand turning it into a sleek, useful television stand. Instead of sending a beautifully built vintage cabinet to the landfill, you can give it a second career as a media console with storage, cable management, and enough character to make flat-pack furniture look painfully shy.
This old stereo to TV stand DIY project works especially well with midcentury stereo consoles, wooden record-player cabinets, vintage hi-fi furniture, and even some console-radio cabinets. Many were constructed from substantial plywood, hardwood frames, or attractive veneer, making them excellent candidates for furniture upcycling.
The trick is not simply ripping out the stereo and dropping a television on top. A good conversion requires checking structural strength, planning component ventilation, repairing the finish, organizing cables, and making sure the finished furniture is stable enough to safely support modern electronics. Done correctly, the result can look intentionally designed rather than like your television accidentally landed on Grandma’s record player.
Why Convert an Old Stereo Console into a TV Stand?
Vintage stereo cabinets were essentially media centers before anyone used the term “media center.” They frequently included large storage compartments, speaker cavities, hinged lids, shelves, doors, and sturdy wooden frames. Those features translate surprisingly well to today’s entertainment equipment.
Repurposing also gives you something mass-market TV furniture often lacks: personality. A walnut-toned 1960s console with tapered legs can look fantastic beneath a modern flat-screen TV, while a chunky 1970s stereo cabinet can become an impressive contemporary entertainment center after some careful modifications.
There is an environmental advantage, too. Reusing the cabinet reduces furniture waste, while removed receivers, turntables, speakers, wiring, and other electronic components can often be donated or taken to an appropriate electronics recycling program rather than thrown away.
Start by Evaluating the Old Stereo
Check the Cabinet Structure
Before buying paint or becoming emotionally attached to your brilliant makeover plan, inspect the stereo cabinet carefully.
Push gently on the corners and sides. The cabinet should not rock, twist, or wobble excessively. Look underneath for broken supports, loose joints, water damage, separated plywood layers, cracked legs, and deteriorated particleboard.
Pay particular attention to the top because it may eventually carry your television. A large TV might not be extraordinarily heavy by old television standards, but its weight still needs to be distributed across a solid surface.
Measure the width and depth of both the cabinet and the television’s base or feet. The complete television support should fit comfortably on the furniture without hanging over an edge. Ideally, the cabinet should look slightly wider than the screen, which generally creates better proportions as well as a more secure setup.
Determine Whether the Surface Is Veneer or Solid Wood
Many vintage stereo consoles look like solid walnut, teak, or mahogany but are actually built with a thin decorative wood veneer over plywood or another substrate. That isn’t a flaw. High-quality vintage veneer can be beautiful and durable.
It does change how you refinish the piece, however. Aggressive power sanding can cut through thin veneer surprisingly quickly. Once that attractive walnut layer disappears, no amount of inspirational DIY music is bringing it back.
Use light hand sanding whenever possible, particularly along corners and edges. Loose veneer can often be carefully glued and clamped instead of removed completely.
Consider the Age of Painted Finishes
If the cabinet has an unknown vintage painted finish, avoid immediately attacking it with a power sander. Older painted furniture may contain materials you do not want turned into airborne dust.
When the history of an antique or vintage painted piece is uncertain, use appropriate precautions and consider testing before disturbing the coating. This is especially important around children and pregnant people.
Tools and Materials You May Need
Your exact supplies will depend on whether you plan to preserve the original wood finish or completely modernize the cabinet. A typical television stand conversion may require:
- Screwdrivers and basic hand tools
- Drill and drill bits
- Needle-nose pliers
- Measuring tape
- Painter’s tape
- Wood glue
- Wood filler
- Clamps
- Fine-grit sandpaper or sanding sponges
- Primer if painting
- Furniture paint or wood finish
- Small foam roller or quality paintbrush
- Cable grommets
- Cable clips or reusable cable ties
- Replacement knobs or handles
- Shelf boards if additional shelves are needed
- Anti-tip hardware
- Safety glasses, gloves, and appropriate dust protection
You may also need a jigsaw or hole saw if you plan to create larger ventilation or cable openings. There is no prize for owning every power tool in the hardware store, so borrow or rent specialized equipment if you only need it once.
Step 1: Photograph Everything Before Disassembly
Take several pictures of the original console before removing anything. Photograph the back, wiring routes, hinges, brackets, and interior supports.
This may seem unnecessary when your goal is to remove most of the stereo equipment anyway, but vintage cabinets sometimes contain structural pieces that resemble electronic mounting hardware. Photos give you a useful reference if you later wonder whether a bracket was decorative, electrical, or secretly holding half the cabinet together.
Step 2: Remove the Old Stereo Components
Unplug the console completely before working on it. Remove loose records, removable speakers, antennas, and accessories first.
Next, carefully examine how the receiver, record player, speakers, and control panels are mounted. Many components can be removed by taking out screws or brackets from inside the cabinet.
Do not randomly cut electrical components apart if you are unfamiliar with vintage electronics. If the electrical assembly is complicated or its condition is questionable, have a knowledgeable electronics technician disconnect it.
Try to preserve decorative elements that contribute to the console’s appearance. Original speaker cloth, knobs, brass trim, sliding doors, and control panels can sometimes remain purely decorative even after their electronics are removed.
Step 3: Decide What the Interior Will Become
Once the electronics are gone, you may suddenly discover that your enormous stereo console is approximately 40 percent furniture and 60 percent empty space. Excellent. Empty space is useful.
Create Shelves for Media Equipment
Former speaker compartments can become storage for:
- Streaming boxes
- Game consoles
- Routers
- Controllers
- Movies and games
- Books
- Board games
- Record collections
- Small speakers
Measure each compartment and cut plywood or furniture-grade shelving to fit. Simple cleats screwed into the cabinet sides can support removable shelves.
If you intend to place powered electronics inside a closed compartment, remember that those devices produce heat. Provide ventilation and avoid packing devices tightly together. Open shelving, vent holes, perforated panels, or discreet openings at the back can improve airflow.
Keep Some Vintage Details
You do not need to erase every clue that the piece was once a stereo. In fact, keeping a little evidence of its previous life usually makes the finished television stand more interesting.
For example, original speaker grille cloth can hide modern components while allowing remote-control signals or ventilation through some configurations. An old tuner display can remain as decoration. Turntable compartments can become lift-top storage for remotes, headphones, and game controllers.
Step 4: Repair the Cabinet
Tighten loose screws and reinforce weak joints before doing cosmetic work. Apply wood glue to separated wooden joints and clamp them until fully cured according to the adhesive manufacturer’s directions.
Fill unnecessary screw holes, dents, and small imperfections with suitable wood filler if you plan to paint the cabinet. When preserving natural wood, choose repairs that match the surrounding finish more carefully because standard filler may remain visible under stain.
For loose veneer, gently lift only enough to introduce adhesive underneath, then clamp the area flat using a protective block so the clamp does not damage the surface.
Step 5: Clean Before You Sand
Decades-old stereo furniture can accumulate furniture polish, nicotine residue, cooking grease, wax, dirt, and approximately three geological eras of household dust.
Clean the cabinet thoroughly before refinishing it. Otherwise, sanding may simply grind contaminants deeper into the surface.
After cleaning and drying the furniture, lightly sand sound finishes to improve adhesion if you are painting. Fine sanding is generally preferable for veneered furniture. Work carefully around edges, where veneer is easiest to damage.
Step 6: Choose a Finish
Option A: Restore the Natural Wood
If the cabinet has attractive walnut, oak, teak, or mahogany veneer, preserving it can produce the most impressive result.
Minor scratches and faded areas may need much less intervention than you expect. After cleaning and appropriate surface preparation, a compatible furniture finish can revive the grain while retaining the vintage personality.
This approach works particularly well with midcentury modern stereo consoles. Pair the warm wood cabinet with a black television and minimal accessories, and the contrast looks surprisingly contemporary.
Option B: Paint the Stereo Cabinet
Paint makes sense when the original finish is badly damaged, mismatched, or simply not your style.
After cleaning and light sanding, use the appropriate primer for the existing surface. Damaged or bare wood should be properly primed, and stained surfaces may benefit from stain-blocking primer.
Apply several thin coats rather than one heroic coat thick enough to qualify as cake frosting. Light coats level more evenly and are less likely to run.
Colors such as charcoal, deep navy, black, warm white, muted green, and soft gray can turn a dated stereo into a modern media console. Dark finishes also pair naturally with television screens and can make the electronics visually recede.
Step 7: Add Cable Management
This is the difference between “custom media console” and “wooden box being attacked by spaghetti.”
Determine where your television, soundbar, streaming device, gaming console, and router will sit. Then create cable openings near those locations.
A hole saw can create clean circular openings for plastic or metal desk grommets. If the cabinet already has a removable fiberboard back, you can sometimes create larger access openings without modifying visible wood.
Use clips or reusable ties inside the cabinet to separate power cords from excess cable. Leave enough slack to pull components forward for maintenance.
Avoid trapping plugs, adapters, and power strips in tightly enclosed spaces. Keeping the rear of the console accessible makes future upgrades far easier.
Step 8: Update the Hardware
New hardware can make a surprisingly large visual difference.
Simple brass pulls can reinforce a midcentury look. Matte black hardware creates a more contemporary style, while leather pulls can soften a boxy cabinet.
That said, inspect the original hardware before throwing it away. Vintage handles and knobs may look dramatically better after cleaning, and retaining them helps preserve the furniture’s character.
Step 9: Check the Height of Your New TV Stand
A converted stereo console may be taller than modern low-profile media furniture, so check your viewing position before declaring victory.
Sit normally on your sofa and look straight ahead. Ideally, you should be able to watch comfortably without spending two hours staring upward as if your television were giving a presentation from the ceiling.
If the cabinet is unusually tall, wall mounting the television slightly above it may not improve matters. In some cases, shortening removable legs can produce better proportions, provided doing so does not compromise structural stability.
Step 10: Make TV Safety Part of the Conversion
A beautiful television stand still needs to be a safe television stand.
The furniture should be sturdy and stable, with the television positioned toward the back rather than near the front edge. The TV’s entire base or feet must fit securely on the top.
Anchoring the furniture and television is particularly important in homes where children may climb or pull on furniture. Use suitable anti-tip hardware installed according to its instructions and appropriate for your wall construction.
Store heavier objects toward the bottom of the cabinet whenever practical. Besides helping organization, this generally keeps the furniture’s center of gravity lower.
Design Ideas for Your Finished Stereo TV Console
Midcentury Modern
Preserve walnut veneer, clean the original brass hardware, and pair the console with minimal decor. Add tapered replacement legs only if the cabinet structure safely accommodates them.
Modern Black Media Console
Paint the exterior satin or matte black while leaving selected wood accents natural. Replace decorative speaker cloth with black grille fabric for a clean monochromatic appearance.
Two-Tone Vintage Makeover
Keep the top natural wood and paint the cabinet body deep green, charcoal, cream, or navy. This approach hides damaged side panels while showcasing the best wood surface.
Record Lover’s Entertainment Center
If you still collect vinyl, keep one compartment dedicated to records while converting the other spaces for contemporary electronics. Your furniture can support streaming technology without pretending records never happened.
Common Mistakes to Avoid
Sanding veneer too aggressively: Thin veneer can be damaged quickly. Start gently and increase abrasion only when necessary.
Ignoring ventilation: A cabinet built for passive speakers may become too enclosed for modern game consoles, receivers, and streaming hardware.
Painting over dirt: Paint does not magically convert grease into a clean substrate.
Forgetting cable access: Plan openings before installing shelves and electronics.
Assuming the cabinet is automatically strong enough: Vintage does not always mean indestructible. Repair loose joints and weakened panels first.
Skipping anti-tip protection: A heavy cabinet combined with a large television deserves proper stabilization.
Throwing old electronics in household trash: Look for appropriate electronics donation or recycling programs for removed equipment.
Experience-Based Lessons From Old Stereo TV Stand Makeovers
The most successful stereo-console conversions usually begin with restraint. The temptation is to disassemble the cabinet immediately, sand every surface, paint everything, replace the legs, install six shelves, add LEDs, and somehow incorporate a beverage refrigerator before lunch. In practice, carefully studying the original furniture often produces a better result.
One common experience with vintage consoles is discovering that the cabinet looks worse before cleaning than it actually is. A dull brown finish that appears destined for paint can reveal surprisingly attractive walnut or mahogany tones after years of grime and old polish are removed. Because of that, cleaning a small hidden section before committing to paint can completely change the direction of the project.
Another lesson involves veneer. DIYers accustomed to refinishing solid lumber sometimes reach immediately for an orbital sander. On vintage stereo cabinets, patience tends to win. Light hand sanding gives you far more control, especially along corners and decorative edges. Preserving a slightly imperfect original veneer often looks better than creating a perfectly smooth surface that no longer has any veneer left.
The interior also tends to require more planning than expected. After the speakers and receiver come out, enormous cavities appear, and it is easy to assume shelves can simply be installed anywhere. Then comes the discovery that cables need to pass behind them, game consoles require airflow, the router needs access, and one strangely shaped wooden brace cannot be removed because it stabilizes the entire side of the cabinet.
A cardboard mockup helps enormously. Before permanently attaching new shelves, pieces of scrap cardboard can represent game consoles, streaming devices, baskets, or speakers. This quickly shows whether there is enough clearance for plugs and ventilation.
Cable management is another detail people tend to appreciate only after living with the finished stand. One carefully positioned rear opening is rarely enough. Modern entertainment systems accumulate HDMI cables, USB chargers, power adapters, network cables, soundbar connections, and mysterious wires nobody remembers purchasing. Creating accessible cable routes during construction is much easier than drilling around installed electronics later.
Height can also surprise you. Old consoles were sometimes designed around operating a record player while standing, not watching a television while seated. Put a modern 65-inch screen on top and the TV may suddenly feel enormous. Testing the setup by temporarily placing a cardboard rectangle or the unplugged television on the cabinet can reveal whether the viewing height is comfortable before refinishing begins.
Finally, the projects that look most convincing usually preserve something original. Maybe it is the speaker cloth, walnut doors, brass knobs, sliding panels, or quirky tuning scale. Those details prevent the finished piece from becoming just another painted cabinet. The goal is not to disguise the stereo so thoroughly that nobody knows what it was. The fun comes from seeing what it used to be and realizing how naturally it works in its new role.
Conclusion: Give That Old Stereo Another Generation of Use
Turning an old stereo into a television stand combines furniture restoration, practical storage, sustainability, and a little technological irony. Yesterday’s home entertainment center becomes today’s home entertainment centerit just needs fewer vacuum tubes and more HDMI cables.
Start with a structurally sound cabinet, preserve valuable veneer whenever possible, thoughtfully remove obsolete electronics, create ventilated storage, organize cables, and stabilize the finished unit properly. The result can be stronger, more distinctive, and far more personal than an inexpensive new TV stand.
Most importantly, let the original furniture influence the design. Vintage stereo consoles survived decades because many were built with proportions and details worth saving. A thoughtful makeover gives those qualities a new purpose instead of replacing them.
Note: Vintage furniture and electronics vary greatly in construction and condition. If you encounter questionable electrical components, significant structural damage, or an unknown old painted coating, consult an appropriate professional before dismantling, sanding, or modifying the piece. Recycle unwanted electronic components through suitable local electronics recycling programs.

