
Body Care
Basement Finishing Guide: Pro Tips You Need to Know
Jun
Finishing a basement is one of those home projects that sounds simple until your tape measure, your budget, and your local building inspector all start having opinions. One minute you are dreaming about a cozy media room, a quiet home office, or a guest suite with hotel vibes. The next minute you are learning words like “egress,” “vapor barrier,” “rim joist,” and “why is there a mysterious damp spot behind the water heater?”
The good news is that a finished basement can add valuable living space, improve comfort, and make your home feel dramatically larger without building a full addition. The less glamorous news is that basements live below grade, which means moisture, airflow, drainage, ceiling height, utilities, and code requirements matter more than paint colors. Paint is fun. Mold is not. Mold is basically the uninvited roommate who never pays rent.
This basement finishing guide walks through the pro tips homeowners need before framing walls, choosing flooring, installing lighting, or calling the space “done.” Whether you are planning a family room, home gym, playroom, bedroom, workshop, laundry upgrade, or multi-use hangout zone, the smartest remodel begins with preparation, not Pinterest panic.
Start With a Clear Basement Plan
The best finished basements do not begin with drywall. They begin with a plan that respects how the space already works. Before you buy lumber or luxury vinyl plank, decide what the basement needs to become. A movie room has different wiring, soundproofing, and lighting needs than a guest bedroom. A basement bathroom needs plumbing access and ventilation. A home office needs outlets, internet reliability, and a quiet corner away from the furnace orchestra.
Measure the entire basement carefully, including ceiling height, beams, columns, stairs, windows, drains, utility areas, and mechanical equipment. Sketch zones for living, storage, laundry, HVAC access, and circulation. Do not design a beautiful wall that blocks the electrical panel, water shutoff, sump pump, cleanout, or furnace service door. Future-you will not admire your creativity while crouching behind a sectional sofa with a flashlight.
Think in Zones, Not Just Rooms
Basements often work best as flexible zones. Instead of chopping the space into small dark boxes, consider an open family room with a workout nook, built-in storage, and a game table. Use rugs, lighting, furniture, ceiling changes, or partial walls to define areas without making the basement feel cramped. Keep storage realistic. If the basement currently stores holiday bins, tools, sports gear, and the mysterious box labeled “miscellaneous cables,” those things still need a home after the remodel.
Fix Moisture Before You Finish Anything
Moisture control is the first serious rule of basement finishing. If your basement has leaks, damp walls, musty odors, efflorescence, condensation, or water stains, stop. Do not cover the problem with framing and drywall. That is not remodeling; that is gift-wrapping a future repair bill.
Start outside. Many basement water issues are caused by poor drainage, clogged gutters, short downspouts, negative grading, cracked window wells, or soil sloping toward the foundation. Extend downspouts away from the house, clean gutters, repair exterior cracks, and make sure water drains away from the foundation. Inside, check for plumbing leaks, condensation on cold pipes, sump pump performance, and floor drain issues.
For persistent water intrusion, bring in a qualified waterproofing contractor or foundation specialist. Interior drainage systems, sump pumps, vapor barriers, exterior waterproofing, and foundation repairs may be needed depending on the situation. It is better to spend money on dryness first than to spend twice as much replacing wet drywall later.
Test Humidity Like a Pro
Use a hygrometer to monitor basement humidity. A comfortable finished basement should generally stay in a moderate humidity range, and many homeowners use a dehumidifier to keep the space comfortable during humid seasons. Choose a model sized for the area and place it where air can circulate. If the basement smells like wet cardboard after a rainstorm, do not ignore it. Your nose is a surprisingly decent building science instrument.
Test for Radon Before Construction
Radon testing belongs near the top of every basement finishing checklist. Radon is a naturally occurring radioactive gas that can enter homes through soil, foundation cracks, sump pits, and other openings. Because basements are closest to the ground, they are often the first place to test. The smart move is to test before finishing so any mitigation work can be integrated cleanly into the remodel.
Homeowners can use short-term or long-term radon test kits, or hire a certified radon professional. If levels are elevated, mitigation may include sub-slab depressurization, sealing openings, and venting radon safely outdoors. Finishing the basement first and testing later can make mitigation more complicated and more expensive. In other words, test before the drywall goes up, not after the new carpet starts judging you.
Check Permits, Codes, and Egress Requirements
Basement finishing usually involves permits when you add walls, electrical wiring, plumbing, HVAC changes, bathrooms, bedrooms, or structural alterations. Requirements vary by city and state, so contact your local building department before work begins. Skipping permits may seem faster, but it can create problems during resale, insurance claims, appraisals, or future renovations.
Bedrooms are especially important. A legal basement bedroom typically needs a safe emergency escape and rescue opening, commonly called an egress window or exterior door. The room also needs proper ceiling height, smoke and carbon monoxide alarms, ventilation, heating, and electrical compliance. A room with a bed and no legal egress may be cozy, but it is not automatically a legal bedroom.
Do Not Guess on Electrical and Plumbing
Electrical and plumbing work should meet current local code. That means correct outlet spacing, GFCI protection where required, lighting circuits, smoke alarms, bathroom ventilation, drain slope, venting, and safe fixture installation. Handy homeowners can do many finish tasks, but licensed professionals are worth it for systems hidden behind walls. A crooked baseboard is annoying. A bad electrical connection is a different category of excitement.
Insulate and Air Seal the Right Way
Insulation makes a basement warmer, quieter, and more energy efficient, but below-grade walls need special attention. Concrete can transfer moisture, so the wall assembly must manage water vapor and condensation. Rigid foam board, spray foam, mineral wool, and properly detailed framed walls are common approaches, but the best choice depends on climate, local code, wall condition, and budget.
Air sealing matters as much as insulation. Seal rim joists, sill plates, gaps around pipes, wiring penetrations, duct chases, and other air leaks before walls are closed. This improves comfort and helps prevent condensation. Do not trap moisture inside a wall with the wrong vapor barrier. In cold climates, vapor control may be needed in a specific location. In mixed or humid climates, the wrong plastic sheeting can create moisture problems. When in doubt, ask a local building professional who understands basement wall assemblies in your region.
Leave Access Where Access Is Needed
Plan access panels for shutoff valves, cleanouts, junction boxes, dampers, sump equipment, and mechanical systems. Hidden access points should be neat, labeled, and easy to reach. Future maintenance is part of good design. A basement should not require archaeological excavation every time a plumber visits.
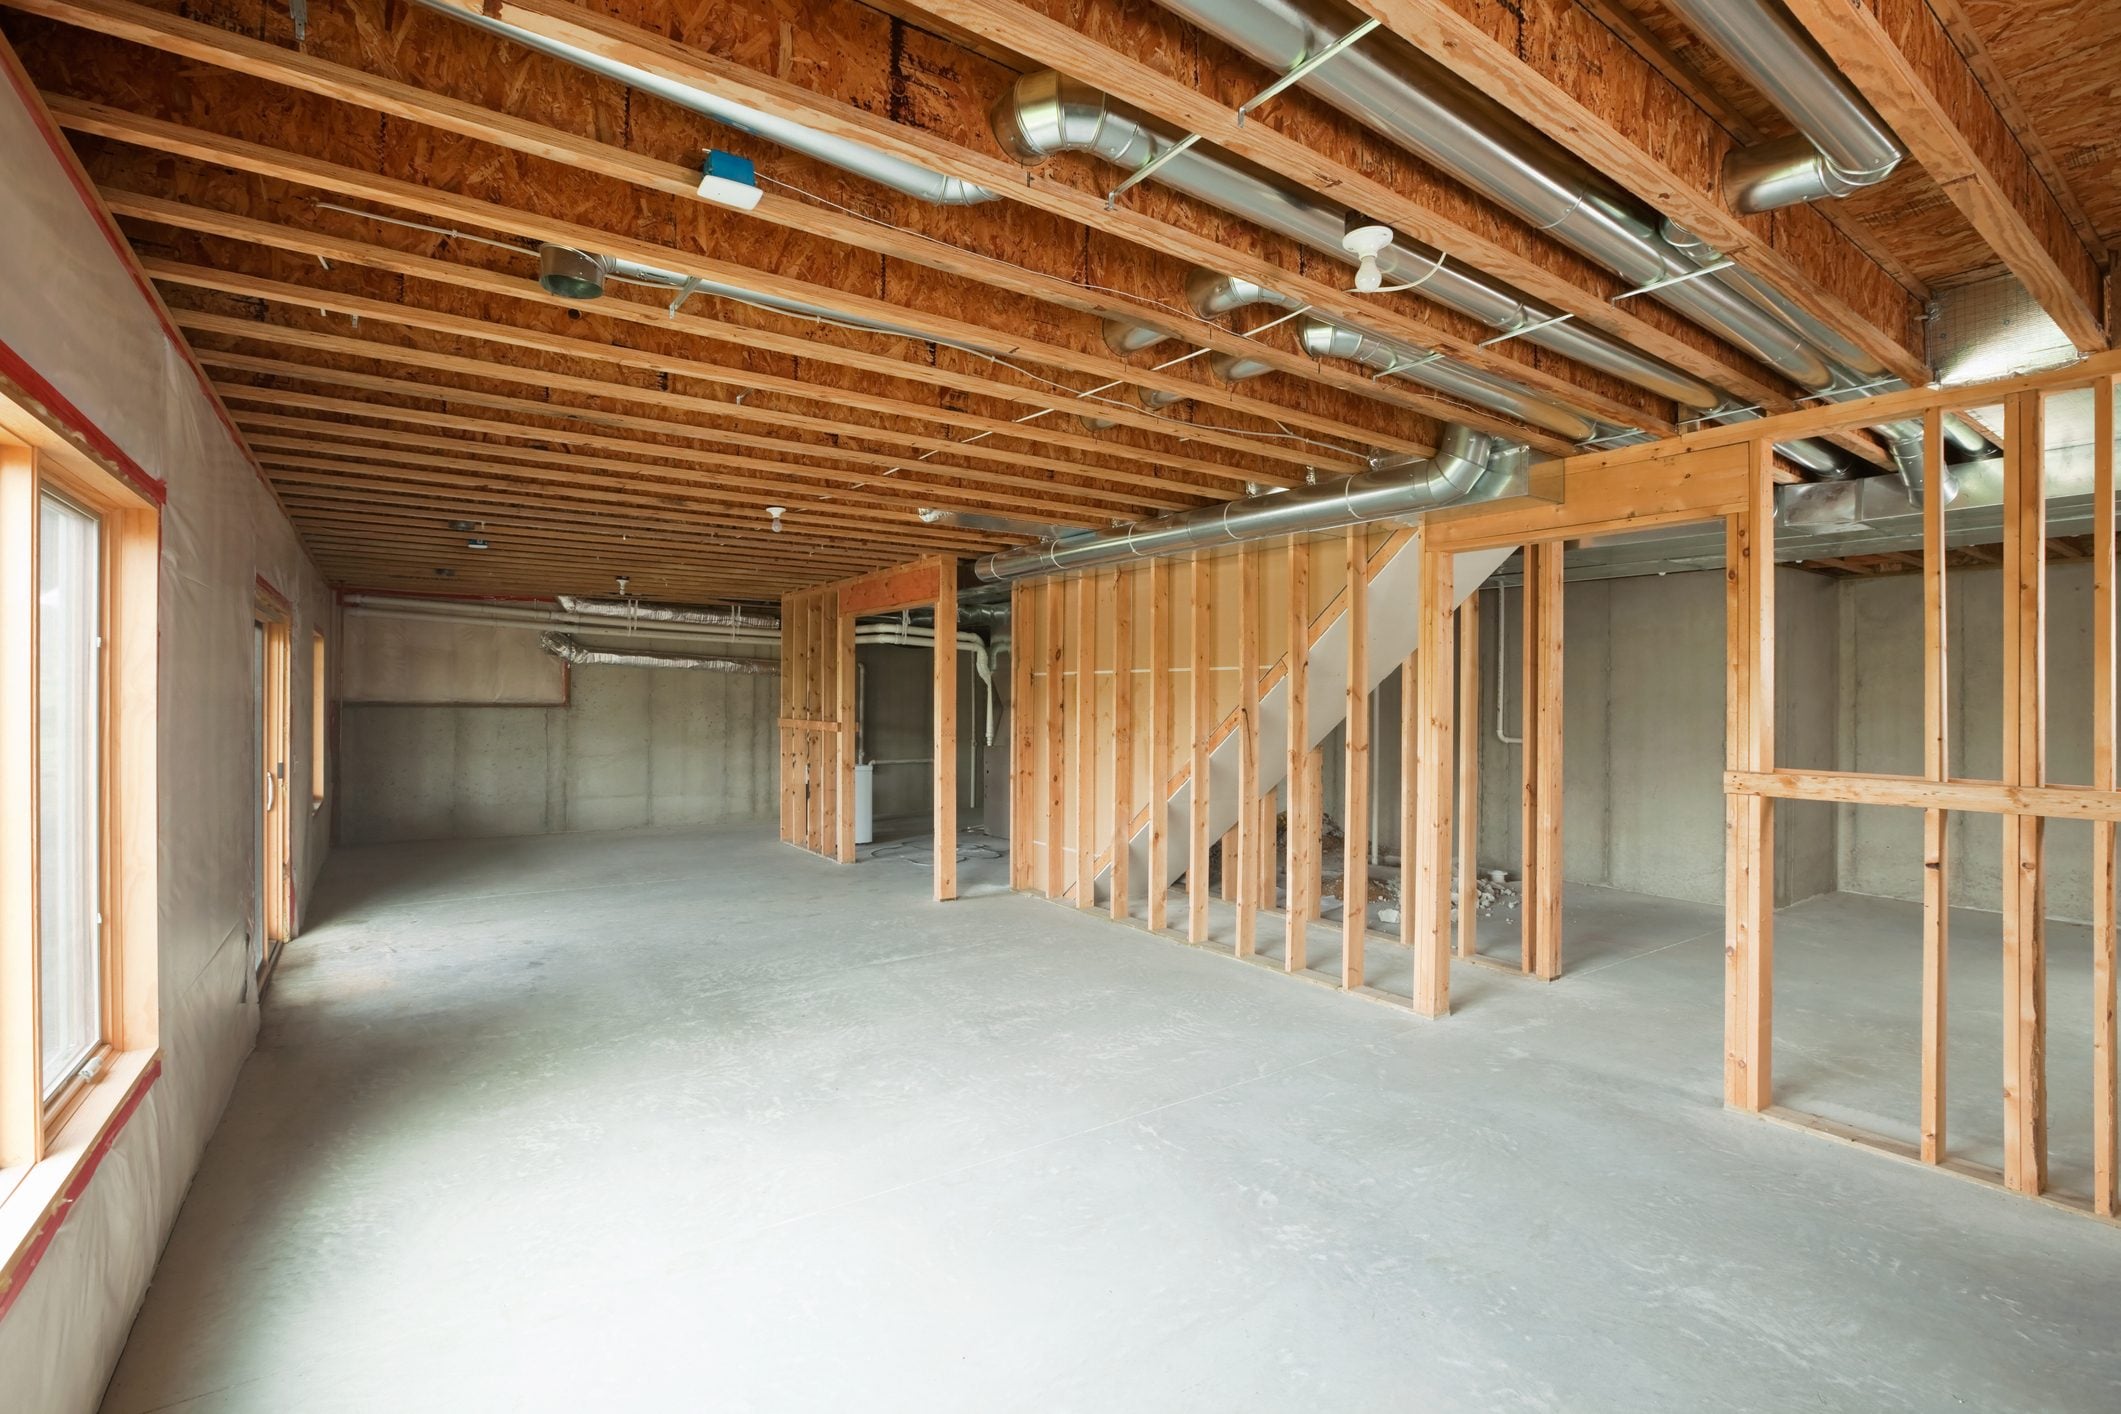
Frame Basement Walls With Breathing Room
Basement framing is not exactly the same as main-floor framing. Keep wood framing slightly away from concrete walls unless your insulation system is designed otherwise. Use pressure-treated lumber where wood contacts concrete, such as bottom plates. Check walls for plumb, but understand that old basement walls may have personality. Frame straight walls inside imperfect foundation walls rather than forcing drywall to follow every bump and wave.
Before framing, mark the locations of outlets, switches, plumbing lines, ducts, soffits, and doors. Decide whether you will build soffits around low pipes and ducts or leave a portion of the ceiling exposed. Make sure door swings make sense, hallways are comfortable, and furniture can actually get downstairs. A sectional sofa that cannot turn the stair corner is not furniture; it is a basement legend.
Choose Basement Flooring That Handles Real Life
Basement floors need to tolerate moisture better than typical above-grade flooring. Solid hardwood is usually a poor choice below grade because it can expand, cup, or warp. More basement-friendly options include luxury vinyl plank, tile, sealed concrete, engineered wood approved for below-grade installation, carpet tiles, and floating floors with moisture-resistant underlayment.
Luxury vinyl plank is popular because it is durable, attractive, and more forgiving around occasional moisture. Tile works well in bathrooms, laundry areas, and walkout basements. Carpet can make a family room feel warmer, but choose products designed for basements and consider carpet tiles because damaged sections can be replaced individually. If the slab is uneven, address that before flooring goes down. Flooring does not magically flatten concrete. It only makes the problem more decorative.
Consider a Subfloor System
A basement subfloor can add warmth, improve comfort underfoot, and create a capillary break between the slab and finished floor. Options include dimpled membranes, insulated panels, and moisture-resistant subfloor tiles. These systems cost more than laying flooring directly on concrete, but they can make the finished space feel less like a converted storage bunker and more like a real room.
Build a Lighting Plan, Not Just a Ceiling Full of Cans
Basements often lack natural light, so lighting should be layered. Recessed lights provide general illumination, but they should be spaced thoughtfully. Add task lighting near desks, bars, craft tables, laundry counters, and reading areas. Use wall sconces, LED strips, floor lamps, or accent lights to create warmth and depth. The goal is not to make the basement look like an airport runway. The goal is comfort.
If the basement has small windows, maximize them. Use light-colored window treatments, keep furniture from blocking natural light, and consider enlarging windows if code, budget, and structure allow. Mirrors, bright wall colors, and glass doors can also help light move through the space.
Pick the Right Ceiling Strategy
Basement ceilings usually hide pipes, ducts, wiring, beams, and joists. A drywall ceiling gives the most finished look, but it limits access to mechanical systems. A drop ceiling offers easier access and can help with acoustics, though older styles can look office-like. Modern ceiling tiles are much better than the speckled panels of yesteryear, which looked like they were designed during a beige committee meeting.
Another option is an exposed ceiling painted in a dark or light color. This can work well in industrial, modern, or casual basements and preserves ceiling height. However, exposed ceilings require careful cleaning, spraying, and planning so wiring and ductwork look intentional rather than forgotten.
Plan HVAC, Ventilation, and Comfort Early
A finished basement needs heating, cooling, ventilation, and humidity control. Do not assume the existing HVAC system can handle the added living space. Ask an HVAC professional to evaluate supply and return air, duct sizing, air balance, and whether a mini-split, additional return, or dedicated dehumidification makes sense.
Bathrooms need proper exhaust ventilation to the exterior. Laundry rooms may need make-up air, dryer vent planning, and moisture management. Home gyms need extra airflow. Home theaters may need sound control and heat management from equipment. Comfort planning is invisible when done well and painfully obvious when ignored.
Soundproofing Makes the Basement Feel Finished
Basements often sit under bedrooms, kitchens, or high-traffic living areas. Soundproofing can make a major difference, especially for media rooms, music spaces, offices, guest rooms, and playrooms. Add insulation in ceiling joist bays, use resilient channels or sound isolation clips where appropriate, seal gaps, and choose solid-core doors for rooms that need privacy.
Soft finishes also help. Rugs, upholstered furniture, curtains, acoustic panels, and bookshelves reduce echo. A basement with all hard surfaces can sound like a basketball court wearing drywall. A few smart materials can make it feel calm and comfortable.
Budget for the Boring Stuff First
Basement finishing costs vary widely based on size, location, labor, layout, materials, and whether you add a bathroom, bar, bedroom, theater, or custom built-ins. Instead of starting with finishes, budget first for moisture repairs, permits, electrical work, HVAC, insulation, framing, plumbing, and code requirements. Those items may not be glamorous, but they protect the project.
A smart budget includes a contingency of at least 10 to 20 percent because basements enjoy surprises. You may discover old wiring, uneven slabs, hidden leaks, low ducts, foundation cracks, or plumbing that needs relocation. Spend where performance matters: waterproofing, safe electrical work, insulation, ventilation, and durable flooring. Save on items that can be upgraded later, such as furniture, décor, cabinet hardware, or accent walls.
Basement Finishing Mistakes to Avoid
The most expensive basement mistakes usually happen before the pretty finishes arrive. Do not finish over moisture. Do not skip radon testing. Do not ignore permits. Do not install the wrong flooring. Do not bury access to shutoffs or cleanouts. Do not assume a basement bedroom is legal without egress. Do not use standard drywall in areas prone to dampness. Do not forget lighting, ventilation, or storage.
Another common mistake is designing only for today. A basement should adapt. Kids grow. Work needs change. Fitness equipment migrates. Guests arrive. Hobbies multiply. Build flexible storage, leave some open space, and avoid over-customizing every square foot. A basement shaped entirely around one enormous hobby may become awkward when the hobby changes, unless the hobby is laundry, in which case congratulations, it never leaves.
Pro Tips for a Basement That Feels Like Part of the House
Use consistent trim, doors, hardware, and paint quality so the basement feels connected to the rest of the home. Choose warm lighting temperatures, comfortable flooring, and furniture scaled to ceiling height. Add built-ins around columns or awkward corners. Use pocket doors or barn-style doors where swing space is tight. Keep mechanical areas clean and accessible with attractive utility doors.
For low ceilings, avoid bulky fixtures and heavy crown molding. Use recessed lights, vertical wall details, and lighter paint to create a sense of height. For long narrow basements, break up the tunnel effect with furniture groupings, area rugs, ceiling beams, or partial partitions. For dark basements, layer light and use reflective surfaces sparingly. A little brightness is good. A room full of mirrors can feel like a magic trick gone wrong.
Real-World Experience: Lessons From Basement Projects That Actually Work
One of the biggest lessons from successful basement finishing projects is that patience pays better than speed. Homeowners often want to rush to drywall because that is when the room starts looking real. But the hidden phase is where the project wins or loses. The best basements I have seen started with boring checklists: moisture readings, radon tests, permit calls, HVAC review, electrical planning, and careful layout sketches. Nobody posts a glamorous photo of a properly sealed rim joist, but that small detail can make the finished room warmer and more comfortable for years.
Another practical experience is that open layouts usually age better than overly divided spaces. A family might think they need a separate TV room, gaming room, office, gym, and storage room, but the basement may not have enough light or ceiling height to support that many walls. A better solution is often one open main area with flexible furniture, a dedicated storage wall, and one enclosed room for quiet work or guests. This keeps the basement useful instead of creating a maze where every room feels slightly too small.
Lighting is another area where real projects reveal the difference between “finished” and “comfortable.” A basement with only six recessed lights in a grid can technically be bright, but it may still feel flat. The better approach is to layer lighting. Put general lights on dimmers, add lamps near seating, place under-cabinet lighting at a wet bar, and use wall lights or LED strips to highlight shelves. A basement should have moods. Movie night, homework time, laundry duty, and birthday parties should not all feel like the same dentist waiting room.
Flooring decisions also benefit from experience. Many homeowners fall in love with a beautiful floor sample in a showroom and forget the basement has a concrete slab, seasonal humidity, and maybe a water heater nearby. Durable, moisture-resistant flooring is usually the wiser choice. Luxury vinyl plank, tile, and quality basement-rated carpet tiles are popular because they balance comfort with practicality. If there is any history of moisture, a removable or replaceable flooring system can save major headaches later.
Storage deserves more respect than it gets. Before finishing, basements often absorb clutter from the entire house. After finishing, homeowners sometimes forget that the clutter does not vanish; it simply becomes homeless. The best projects include closets, built-ins, under-stair storage, mechanical-room shelving, and hidden cabinets. If you create a stylish family room but leave no place for decorations, tools, luggage, or sports gear, the new room will slowly become a storage unit with throw pillows.
Finally, the best basement finishing tip is to design for maintenance. Leave access panels. Label shutoffs. Keep mechanical pathways reachable. Choose materials that can survive real life. A basement is not a museum; it is a hardworking part of the home. When planned carefully, it can become the most flexible space in the house: a guest suite today, teen hangout tomorrow, home office next year, and movie room whenever someone finds the remote.
Conclusion
Finishing a basement is not just about adding drywall, flooring, and a sofa big enough to require three adults and a motivational speech. It is about turning below-grade square footage into safe, dry, comfortable, code-compliant living space. The winning formula is simple: solve moisture first, test for radon, understand permits, insulate properly, plan lighting, choose durable materials, protect access to utilities, and spend money where it prevents future problems.
A well-finished basement can become one of the most loved areas of the home. Done poorly, it can become an expensive lesson in why concrete, water, and optimism should be supervised. Plan carefully, hire pros where systems and safety are involved, and treat the hidden work as the foundation of the finished result. Your basement does not need to feel like a basement. With the right strategy, it can feel like the bonus level your house was hiding all along.
