
Beauty Tools & Accessories
26 DIY Kitchen Cabinet Updates So You Don’t Have to Replace Them
Aug
Kitchen cabinets are like the eyebrows of your kitchen: you may not think about them every day, but when they look tired, the whole room looks surprised, confused, or slightly overdue for help. The good news? You do not have to rip out perfectly usable cabinets just because they look dated, dull, or builder-grade basic. With the right DIY kitchen cabinet updates, you can refresh your space, improve storage, and make your kitchen feel newer without paying for a full cabinet replacement.
Replacing cabinets can be expensive, messy, and disruptive. But if your cabinet boxes are structurally sound, your layout works, and your biggest problem is style, there are dozens of smart ways to revive what you already have. Paint, hardware, trim, lighting, refacing, open shelving, and interior organizers can all create a dramatic change for far less money.
Below are 26 DIY kitchen cabinet updates that range from “I can do this on Saturday” to “clear the weekend and order pizza.” Whether your cabinets are oak, laminate, painted, stained, flat-front, or old enough to remember dial-up internet, there is a cabinet makeover idea here with your name on it.
Why Update Kitchen Cabinets Instead of Replacing Them?
Cabinet replacement makes sense when cabinets are damaged, poorly built, moldy, warped, or arranged in a layout that simply does not work. But if the structure is solid, updating cabinets is often the smarter move. It saves money, reduces waste, and lets you customize the kitchen gradually instead of turning your home into a renovation obstacle course.
Many cabinet updates are also beginner-friendly. Swapping pulls, adding under-cabinet lights, painting an island, lining shelves, or adding peel-and-stick wallpaper can make the room look more intentional almost instantly. Bigger projects, such as refacing doors or adding trim, take more patience but still avoid the cost and chaos of total replacement.
26 DIY Kitchen Cabinet Updates That Make a Big Difference
1. Paint the Cabinets for a Full Transformation
Painting is one of the most powerful kitchen cabinet makeover ideas because it changes the entire mood of the room. White cabinets brighten a small kitchen, navy adds polish, sage green feels calm and current, and warm beige or greige can make old wood tones feel softer. The secret is prep. Remove doors, label everything, clean off grease, sand lightly, prime properly, and use cabinet-grade paint. Skipping prep is how cabinets end up looking like a craft project that got tired halfway through.
2. Try a Two-Tone Cabinet Look
If painting every cabinet feels too bold, try two-tone cabinets. Paint lower cabinets a darker shade and keep upper cabinets light, or give only the island a new color. This creates depth without overwhelming the space. Two-tone designs work especially well when the kitchen has a lot of white walls, simple countertops, or stainless steel appliances that need a little warmth.
3. Replace Cabinet Hardware
New knobs and pulls are small pieces with big attitude. Matte black pulls can modernize oak cabinets, brushed brass can warm up white cabinets, and polished nickel can make traditional cabinets feel cleaner. Use a cabinet hardware jig to keep holes straight and spacing consistent. Otherwise, your handles may look like they were installed during a minor earthquake.
4. Switch Exposed Hinges
Old hinges can make even freshly painted cabinets look outdated. If your cabinet style allows it, replace worn or discolored hinges with updated finishes that match your new hardware. For a smoother daily experience, consider soft-close hinges. They reduce slamming, protect cabinet doors, and make the kitchen feel surprisingly high-end.
5. Add Crown Molding Above Cabinets
Crown molding gives basic cabinets a custom built-in appearance. It can visually close the gap between upper cabinets and the ceiling, draw the eye upward, and make the kitchen feel taller. Paint the molding the same color as the cabinets for a seamless look. This DIY cabinet update works best when measurements are careful and miter cuts are clean.
6. Install Trim on Flat Cabinet Doors
Flat slab doors can look plain, but decorative trim can create a Shaker-style or picture-frame effect. Use thin wood molding, wood glue, finishing nails, caulk, primer, and paint. This is a budget-friendly way to make inexpensive cabinets look more custom. The key is measuring each door carefully so the trim looks balanced, not like it wandered onto the cabinet by accident.
7. Add Beadboard Panels
Beadboard adds cottage charm, texture, and personality to cabinet fronts or cabinet end panels. It works beautifully in farmhouse, coastal, vintage, and traditional kitchens. You can install thin beadboard panels on the recessed center of doors or on exposed cabinet sides, then paint everything one color for a cohesive finish.
8. Reface Cabinet Doors
Cabinet refacing is a bigger DIY project, but it can completely change the appearance of your kitchen. Instead of removing the cabinet boxes, you replace the doors and drawer fronts, then cover exposed frames with veneer or matching material. Refacing is best for cabinets that are strong, square, and well-installed but visually dated.
9. Replace Only the Upper Cabinet Doors
You do not always need to reface the entire kitchen. Replacing only the upper cabinet doors can lighten the room and give the eye a fresh focal point. Choose glass, Shaker, or simple slab fronts depending on your style. This is a practical compromise when lower cabinets are in decent shape but the upper row feels heavy.
10. Convert Some Cabinets to Open Shelving
Removing a few upper cabinet doors can create open shelving without building new shelves from scratch. This works well for cabinets that hold attractive everyday dishes, glassware, cookbooks, or serving bowls. Paint the interior for a clean finish, and keep styling simple. Open shelving is charming, but it also tells the world whether you own 37 mismatched mugs.
11. Install Glass Inserts
Glass inserts can turn solid cabinet doors into display-worthy features. Clear glass feels classic, seeded glass adds texture, and reeded glass offers a modern look while hiding clutter better than transparent glass. This update is ideal for upper cabinets near a sink, beverage station, or dining area.
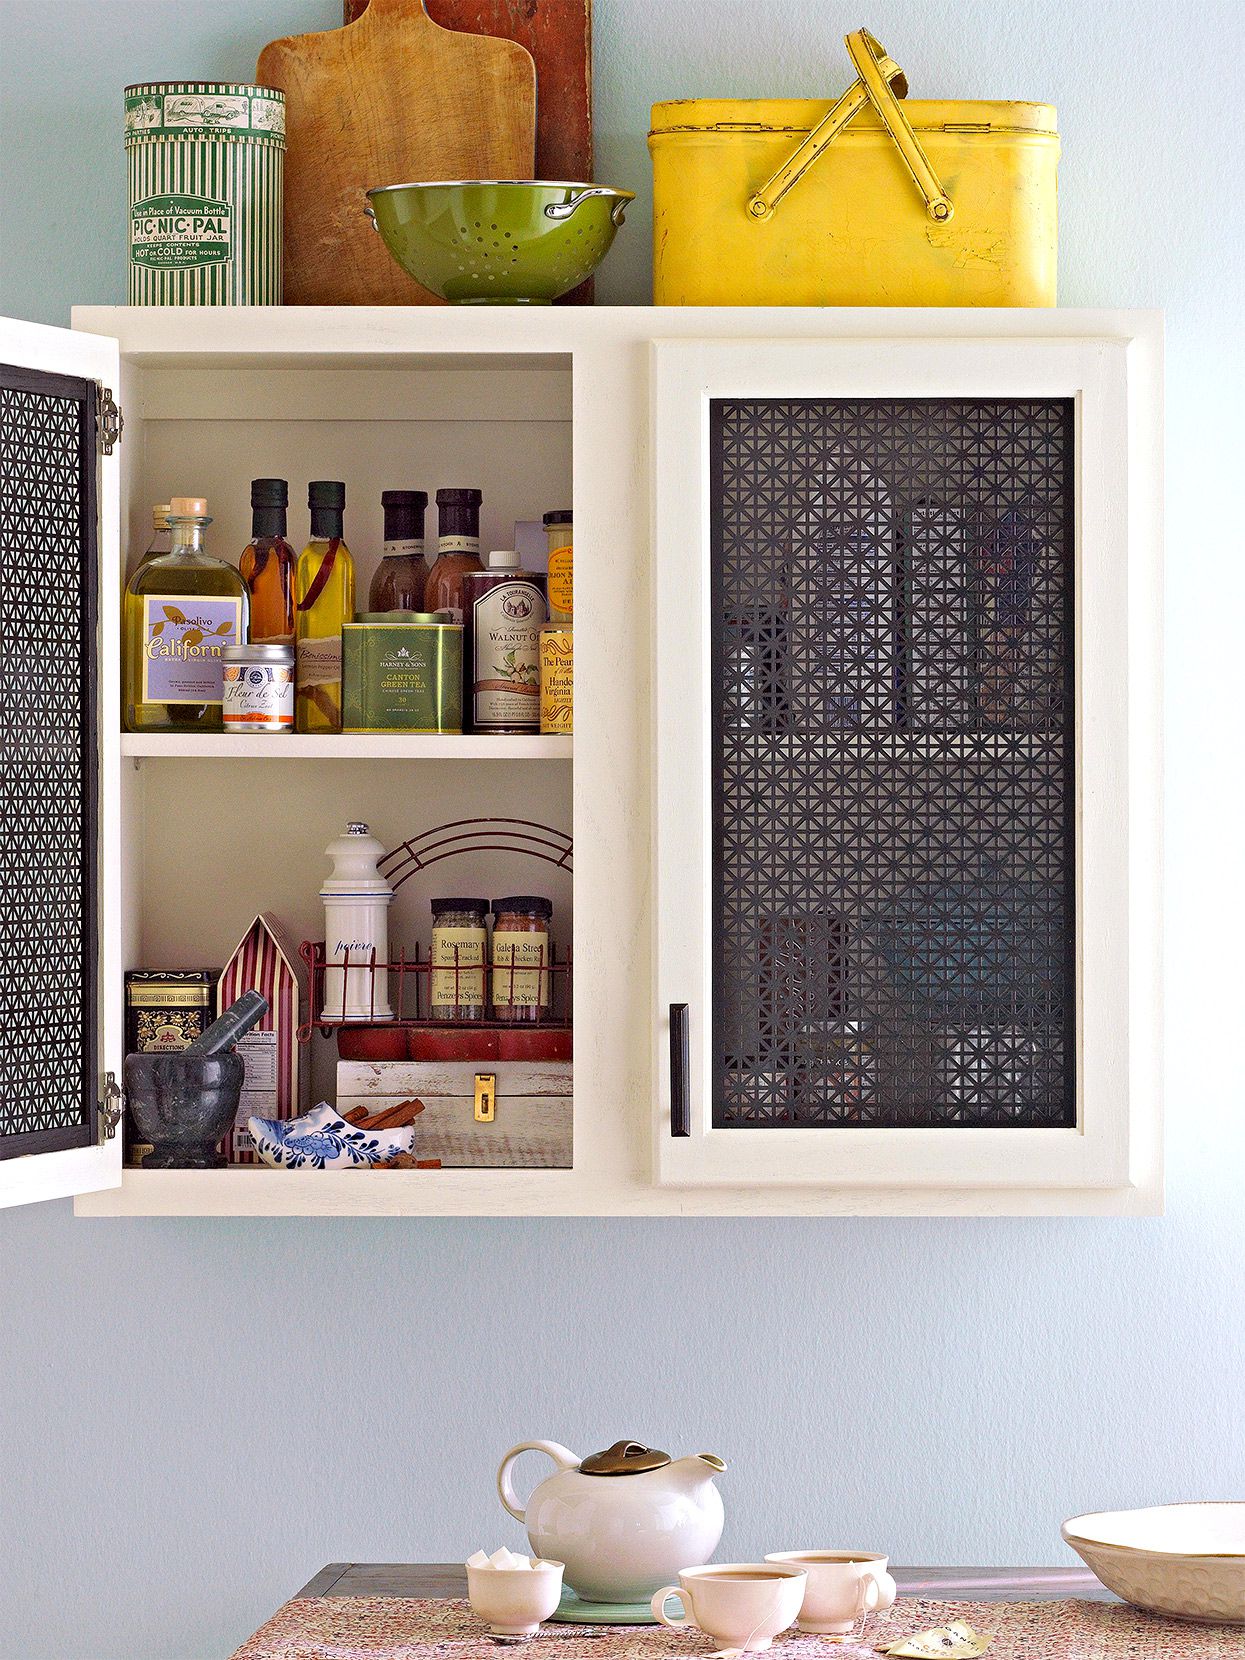
12. Use Cane or Mesh Panels
Cane webbing, metal mesh, or decorative screen inserts add texture and character. These materials work especially well in vintage, boho, cottage, and transitional kitchens. Remove the center panel of a cabinet door, attach the insert securely, and finish the frame with paint or stain. The result feels custom without requiring custom cabinet prices.
13. Add Under-Cabinet Lighting
Under-cabinet lighting improves both style and function. LED strips, puck lights, or plug-in light bars brighten countertops, make food prep easier, and create a warm evening glow. Choose a color temperature that complements your kitchen. Warm white feels cozy, while bright white is better for task lighting.
14. Paint the Cabinet Interiors
Painting the inside of glass-front or open cabinets is a small detail that feels thoughtful. Try soft blue, charcoal, sage, cream, or even a cheerful wallpaper-backed look. Interior color gives depth and makes dishes stand out. It is like giving your cabinets a secret personality.
15. Add Peel-and-Stick Wallpaper Inside Cabinets
Peel-and-stick wallpaper is a low-commitment way to add pattern inside cabinets, on drawer sides, or along the back panel of open shelving. It is especially useful for renters or anyone who changes design preferences as often as they reorganize the junk drawer. Choose washable wallpaper for kitchen use.
16. Line Shelves and Drawers
Fresh shelf liner protects cabinet interiors and makes them easier to clean. It also hides scratches, stains, and mystery marks from previous owners. Non-adhesive liners are easy to remove, while adhesive liners stay put better. Use neutral patterns for a clean look or bold prints for a little hidden fun.
17. Add Pull-Out Shelves
Pull-out shelves make lower cabinets far more functional. Instead of kneeling on the floor to retrieve a pan from the cabinet cave, you can slide the contents forward. These organizers are great for pots, pantry items, small appliances, and mixing bowls. Measure carefully before ordering to avoid drawer glides colliding with hinges.
18. Install Vertical Dividers
Vertical dividers are excellent for baking sheets, cutting boards, muffin tins, cooling racks, and serving trays. Install them inside a base cabinet or above the refrigerator. This update turns chaotic stacking into tidy filing, which feels oddly satisfying in the best possible way.
19. Add Drawer Organizers
Drawer organizers are not glamorous, but they can change your daily routine. Use expandable bamboo trays for utensils, dividers for cooking tools, and shallow bins for measuring spoons or clips. A cabinet makeover should not only look better; it should make the kitchen easier to use.
20. Add Toe-Kick Drawers
The toe-kick area beneath base cabinets is often wasted space. Toe-kick drawers can store baking sheets, placemats, pet bowls, or rarely used serving pieces. This project requires more carpentry skill, but it is a clever storage upgrade for small kitchens where every inch matters.
21. Refresh Cabinet End Panels
Exposed cabinet sides often look unfinished or plain. Add decorative panels, beadboard, trim, or paint to make end panels look intentional. This is especially useful on the side of an island, peninsula, or cabinet run that faces a dining area.
22. Add Decorative Feet or Furniture-Style Details
Decorative feet, base trim, and furniture-style legs can make cabinets look less boxy. This works particularly well on islands, sink bases, or built-in pantry cabinets. Paint the added pieces to match the cabinets so the design looks original rather than tacked on.
23. Stain or Refinish Wood Cabinets
If you like natural wood but dislike the current color, refinishing may be better than painting. Sanding and staining can tone down orange oak, deepen pale wood, or restore tired finishes. This project is messier than painting and requires good ventilation, but it preserves the beauty of real wood grain.
24. Degrease and Deep Clean Cabinets
Sometimes cabinets do not need a makeover; they need a rescue mission. Grease, dust, and cooking residue can dull finishes over time. A thorough cleaning with an appropriate degreaser can revive cabinet doors, especially around handles and above the stove. Test cleaners in a hidden area first to avoid damaging the finish.
25. Add a Small Cabinet Color Accent
If painting all cabinets feels intimidating, start small. Paint only the island, pantry cabinet, coffee bar, or lower cabinets near the sink. A controlled color accent gives the kitchen personality without requiring a full commitment. It is the design equivalent of dipping one toe into the pool instead of cannonballing in fully clothed.
26. Style the Space Around the Cabinets
Cabinet updates do not stop at the doors. A new backsplash, updated faucet, fresh wall paint, modern lighting, woven shades, or a runner rug can help older cabinets look intentional. Sometimes cabinets seem dated because everything around them is dated too. When surrounding elements improve, the cabinets often get a second chance.
How to Choose the Right Cabinet Update for Your Kitchen
Before picking a project, look at your cabinet structure, budget, skill level, and timeline. If your cabinets are sturdy but ugly, paint, refacing, trim, or new doors can work wonders. If storage is the problem, focus on pull-outs, dividers, organizers, and toe-kick drawers. If the kitchen feels dark, prioritize under-cabinet lighting, glass inserts, lighter paint, or open shelving.
Also consider your home’s style. A sleek modern kitchen may benefit from flat fronts, hidden hinges, and minimalist pulls. A cozy cottage kitchen may shine with beadboard, glass doors, and warm hardware. A traditional kitchen can look refreshed with crown molding, classic knobs, and a rich stain. The best DIY kitchen cabinet updates look like they belong to the house, not like they were copied from a showroom with no context.
Common Mistakes to Avoid During a Cabinet Makeover
The biggest mistake is rushing. Paint needs cleaning, sanding, priming, curing time, and patience. Hardware needs accurate measuring. Trim needs straight cuts. Lighting needs proper placement. Refacing needs careful alignment. Cabinets are used every day, so shortcuts show quickly.
Another common mistake is choosing beauty over function. Open shelves look wonderful when styled, but they may not suit a household with lots of plastic cups, snack containers, or tiny humans who treat dishes like percussion instruments. Glass doors are elegant, but they reveal clutter. Dark paint is dramatic, but it may make a small kitchen feel heavier unless balanced with good lighting.
Finally, do not ignore the rest of the kitchen. If new cabinet hardware clashes with the faucet, light fixtures, and appliances, the room can feel disconnected. Finishes do not have to match perfectly, but they should have a conversation instead of an argument.
DIY Experience Notes: What Real Cabinet Updates Teach You
Anyone who has tackled DIY kitchen cabinet updates learns one thing quickly: the project always looks easiest before the doors come off. At first, you imagine a relaxing weekend of painting, maybe with music playing and a cup of coffee nearby. Then you discover that every hinge has a different screw, one drawer sticks for mysterious reasons, and the previous homeowner apparently believed cabinet grease was a protective coating. This is normal. Do not panic. Cabinet makeovers are less about perfection and more about patience.
One helpful experience is to label everything before removing cabinet doors. Use painter’s tape or sticky notes to number each door, drawer front, hinge, and hardware bag. It may feel unnecessary in the beginning, but when you are staring at 18 nearly identical white cabinet doors, you will be glad you did not rely on memory. Memory is great for birthdays and song lyrics from 2009; it is terrible for hinge placement.
Another lesson is that cleaning takes longer than expected. Kitchen cabinets collect cooking oils, fingerprints, steam, dust, and the occasional splash of pasta sauce that somehow reaches Olympic distance. A proper degreasing step helps primer and paint adhere. If you skip it, paint may peel or feel sticky. For older cabinets, clean twice and let everything dry fully before sanding.
Testing colors is also worth the extra time. Cabinet paint looks different under kitchen lighting than it does on a tiny swatch at the store. Tape sample boards near countertops, flooring, backsplash, and appliances. A white that looks crisp in one kitchen may look icy in another. A green that looks sophisticated online may look like soup under warm bulbs. Live with samples for a day or two before committing.
Hardware is another area where small details matter. Measure the center-to-center distance on existing pulls before buying replacements. If new hardware does not match old holes, you may need to fill, sand, and repaint. That is not a disaster, but it adds time. For new holes, use a hardware jig. It keeps pulls straight and saves you from the emotional journey of realizing one handle is slightly crooked forever.
For storage updates, start with the cabinet that annoys you most. Maybe it is the pot cabinet where lids fall out like cymbals. Maybe it is the corner cabinet where appliances go to retire. Add pull-out shelves, dividers, bins, or lazy Susans where they solve a real problem. The best cabinet update is not always the prettiest one; sometimes it is the one that prevents you from wrestling a baking sheet at 7 a.m.
Most importantly, give yourself room to finish well. Let paint cure before reinstalling doors. Do not overload fresh shelves immediately. Tighten hardware after a week of use. Touch up tiny chips before they become bigger problems. DIY cabinet updates reward careful work, and the final result can feel surprisingly satisfying. You get a kitchen that looks better, works harder, and still leaves money in the budget for groceries, lighting, or celebratory takeout because yes, you earned it.
Conclusion
You do not have to replace kitchen cabinets to love your kitchen again. From fresh paint and new hardware to glass inserts, crown molding, under-cabinet lighting, pull-out shelves, and refacing, there are many ways to improve style and function without starting from scratch. The smartest approach is to work with what you already have, fix the details that bother you most, and choose updates that match your budget, skill level, and lifestyle.
A great cabinet makeover should make your kitchen look better and feel better to use. Start with one project, build confidence, and keep going. Your cabinets may be old, but with the right DIY updates, they do not have to act their age.

