
Hair Care
How to Put up a Trellis: 12 Steps
Jun
A trellis is one of those garden upgrades that looks fancy but secretly works like a dependable farmhand. It lifts climbing plants off the ground, saves space, improves airflow, makes harvesting easier, and turns a blank wall or boring garden bed into something that says, “Yes, I absolutely know what I’m doing out here.” The good news? Learning how to put up a trellis is very doable, even if your current toolbox contains one screwdriver, a mystery wrench, and optimism.
Whether you want to support cucumbers, peas, pole beans, clematis, climbing roses, grapes, jasmine, or a privacy vine that politely blocks the neighbor’s trash cans, the secret is choosing the right trellis, anchoring it well, and giving plants a clear path upward. A trellis that is too flimsy, too close to a wall, or poorly secured can wobble, trap moisture, damage siding, or collapse under a vine that decided to become a jungle. So let’s build this properly the first time.
This guide covers how to install a garden trellis in 12 practical steps, including site selection, materials, wall mounting, freestanding installation, planter trellises, plant training, and long-term maintenance.
Before You Start: Choose the Right Trellis for the Job
Not every trellis is built for every plant. Lightweight netting is fine for peas, but it is not the support system you want for mature grapevines, wisteria, or heavy squash. Think of it like choosing a chair: a folding chair is fine for a picnic, but you would not use it as scaffolding.
For annual vegetables such as beans, peas, cucumbers, and small melons, you can use bamboo poles, twine, cattle panels, wire mesh, A-frame trellises, or nylon garden netting. For perennial vines such as roses, clematis, grapes, honeysuckle, and kiwi, use weather-resistant wood, powder-coated steel, galvanized wire, or a sturdy arbor-style support. If the plant will live for years, the trellis should be ready for years of sun, rain, wind, pruning, and leafy enthusiasm.
Tools and Materials You May Need
- Garden trellis panel, lattice, cattle panel, arbor, obelisk, or wire trellis system
- Wood or metal posts, depending on the design
- Exterior screws, masonry screws, or lag bolts
- Wall spacers, standoff brackets, or blocks
- Drill and drill bits
- Level and measuring tape
- Post hole digger, shovel, or garden trowel
- Gravel or concrete for heavier freestanding supports
- Soft plant ties, jute twine, garden clips, or Velcro plant tape
- Gloves, safety glasses, and a pencil for marking
How to Put up a Trellis: 12 Steps
-
Step 1: Decide What You Want the Trellis to Do
Start with the purpose. Are you growing vegetables vertically to save space? Creating privacy? Covering a blank wall? Supporting a flowering vine near a patio? Framing a garden entrance? Your goal determines the size, strength, and placement of the trellis.
For a vegetable garden, the trellis should be easy to reach from both sides if possible. For a decorative wall trellis, proportion matters. A tiny trellis on a big wall looks like a postage stamp wearing a cape, while a huge trellis behind a small plant can feel awkward until the vine fills in. For privacy, choose a wider trellis, lattice screen, or several panels installed in a row.
-
Step 2: Match the Trellis to the Plant
Different climbing plants climb in different ways. Peas use tendrils. Pole beans twine. Cucumbers grab and curl. Climbing roses do not truly climb on their own; they need to be tied to the support. Clematis prefers thin stems, wire, or mesh it can wrap around. Grapes and kiwi need a strong framework because mature vines become heavy.
If you are unsure, choose a trellis with both vertical and horizontal support points. Lattice, welded wire, cattle panels, and slatted wood panels work well for many home garden plants. Heavy vines need posts, strong crosspieces, and hardware that will not rust out after one dramatic thunderstorm.
-
Step 3: Choose a Sunny, Practical Location
Most flowering and edible climbing plants need plenty of sunlight, often six or more hours per day. Before installing, watch how sun moves across the area. A trellis on the north side of a tall fence may look pretty, but your tomatoes may quietly file a complaint.
Also consider water access, foot traffic, wind exposure, and maintenance. You need room to prune, tie stems, harvest vegetables, and clean behind the structure. Avoid placing a trellis where it blocks gates, narrows pathways, or forces you to perform gymnastic side steps while carrying a watering can.
-
Step 4: Check for Utilities and Hidden Obstacles
If you are digging post holes, take a moment to be cautious. Contact your local utility marking service before digging deeply, especially near the house, driveway, sidewalk, or established utility lines. This is not the exciting part of garden design, but it is much more exciting than accidentally meeting an underground cable with a shovel.
For wall-mounted trellises, check what surface you are attaching to: wood siding, brick, concrete, stucco, vinyl siding, or a fence. Each surface needs the correct fastener. Masonry screws are for brick or concrete, exterior wood screws are for wood, and vinyl siding usually requires special care so you do not trap moisture or crack panels.
-
Step 5: Measure and Mark the Placement
Hold the trellis in position and mark the top, bottom, and attachment points with a pencil. Use a level so the trellis is straight. This step seems simple, but it saves you from installing a trellis that leans like it heard bad news.
For vegetable beds, mark where the support legs or posts will go. A trellis at the north side of a garden bed can keep tall vines from shading shorter crops. In very hot regions, a trellis can also provide afternoon shade for lettuce, herbs, or other plants that appreciate a little relief.
-
Step 6: Leave Space Behind Wall-Mounted Trellises
When attaching a trellis to a wall, do not press it flat against the surface. Leave a gap of about 4 to 6 inches between the trellis and the wall. This space improves airflow, reduces moisture buildup, gives vines room to wrap and grow, and makes future maintenance much easier.
You can create the gap with standoff brackets, wood blocks, spacers, or trellis mounting kits. This is especially important on wood siding, stucco, and painted surfaces. Plants hold moisture, and moisture pressed against a wall for months can encourage rot, mildew, staining, or peeling paint.
-
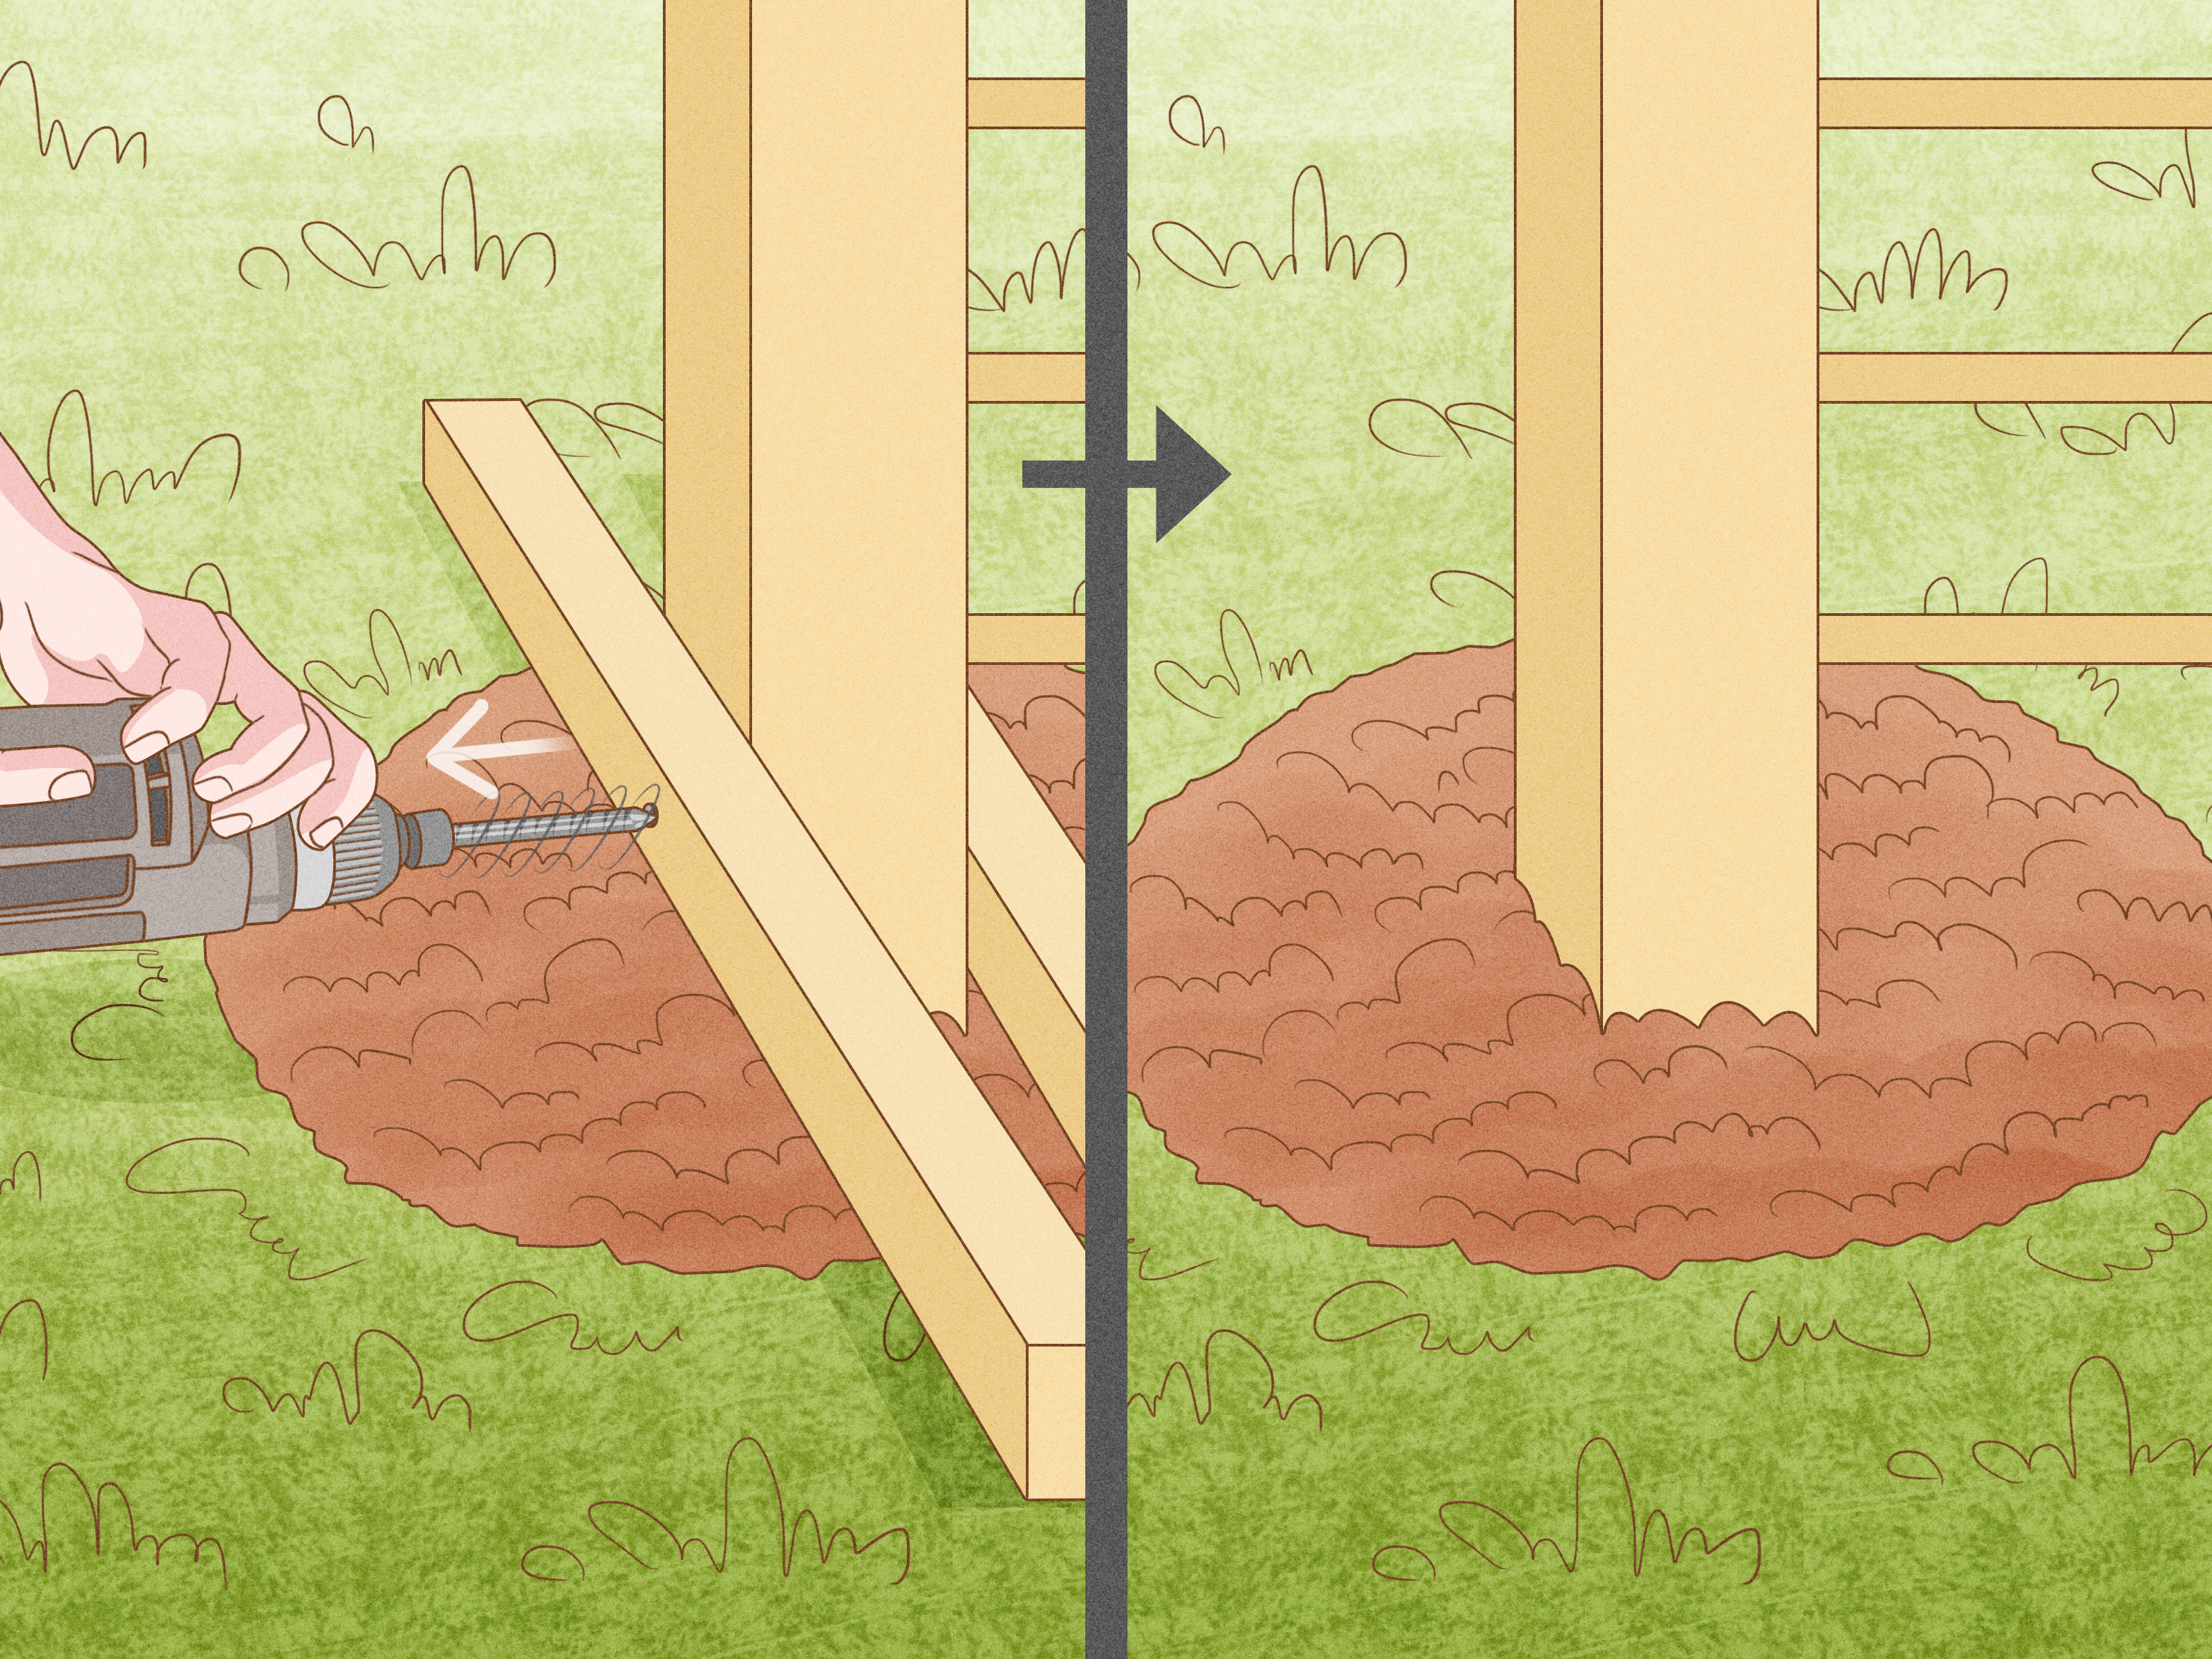
Step 7: Install Posts for a Freestanding Trellis
For a freestanding garden trellis, install the support posts first. Dig holes deep enough to keep the structure stable. A small lightweight trellis may only need ground spikes or short stakes, while a tall or heavy trellis may need posts set in gravel or concrete.
Place the posts in the holes, check that they are plumb, and brace them temporarily if needed. Add gravel for drainage at the bottom of each hole. For larger structures, pour concrete around the posts and allow it to cure according to the product instructions. If you are using metal T-posts with a cattle panel, drive the posts securely into firm soil and attach the panel with heavy-duty zip ties, wire, or approved clips.
-
Step 8: Attach the Trellis Panel Securely
Once the support system is ready, fasten the trellis panel. For wood posts, use exterior-rated screws or bolts. For metal posts, use wire, clips, U-bolts, or heavy-duty outdoor zip ties. For masonry walls, drill pilot holes with the correct masonry bit and use masonry screws or anchors. For fences, attach the trellis to rails or posts rather than thin pickets whenever possible.
Do not rely on one fastener at the top and a dream. Use multiple attachment points so the weight is distributed evenly. Plants become heavier after rain, and wind can turn leafy growth into a sail. A secure trellis should not wobble when gently pushed.
-
Step 9: Add Soil Improvements Before Planting
Before planting at the base of the trellis, improve the soil. Loosen compacted ground and mix in compost or well-rotted organic matter. Most climbing plants perform best in soil that drains well but still holds enough moisture for steady growth.
If the trellis is in a container, choose a pot large enough for both roots and top growth. Tall vines in tiny pots tip over easily, especially in wind. A wide, heavy container is usually more stable than a narrow, tall one. For planter trellises, add weight at the bottom with gravel if needed, but do not block drainage holes.
-
Step 10: Plant at the Right Distance
Plant vines close enough to reach the trellis but not so close that stems are jammed against the structure. For most small annual vines, planting a few inches from the base works well. For roses, grapes, or larger perennial vines, allow more room for roots and air movement.
Read the plant tag or seed packet for spacing. Crowding may look lush at first, but it can reduce airflow and invite disease. A trellis should help plants breathe, not turn them into a leafy subway at rush hour.
-
Step 11: Train the Plants Early
Young stems are flexible and easy to guide. As plants grow, gently weave them through the trellis or tie them with soft plant ties. Avoid tight knots, wire, or anything that cuts into stems. The goal is to guide, not strangle.
For cucumbers and peas, tendrils often do much of the work once they find the support. Pole beans may need a little encouragement at first, but then they usually spiral upward with impressive determination. Roses and many woody vines need regular tying. Train rose canes at a slight horizontal angle when possible, because this can encourage more flowering shoots along the cane.
-
Step 12: Inspect, Prune, and Maintain the Trellis
A trellis is not a “set it and forget it” project. Check fasteners during the growing season, especially after storms. Tighten loose screws, replace cracked ties, and prune growth that becomes too dense. Heavy vines may need additional support as they mature.
At the end of the season, remove annual vines, clean off plant debris, and inspect for rust, rot, or weakened joints. For perennial vines, prune according to the plant’s needs. A little maintenance keeps the trellis attractive and prevents your garden from turning into a botanical wrestling match.
Wall-Mounted vs. Freestanding Trellis: Which Is Better?
A wall-mounted trellis is excellent for small yards, patios, side gardens, and decorative vines. It turns unused vertical space into a living feature. The key is proper spacing and correct hardware. Avoid mounting vines directly onto siding without a support structure, because clinging roots and moisture can damage surfaces over time.
A freestanding trellis works best in vegetable gardens, raised beds, borders, and open lawn areas. It gives you more control over placement and airflow. You can use a simple A-frame for cucumbers, an arch made from cattle panels for beans, or a strong post-and-wire system for grapes and berries. If you expect heavy growth, build stronger than you think you need. Plants are quiet, but they are ambitious.
Best Plants to Grow on a Trellis
Great edible options include peas, pole beans, cucumbers, small melons, indeterminate tomatoes, Malabar spinach, gourds, grapes, and some squash varieties. For heavier fruiting crops, use slings made from fabric or mesh to support developing fruit.
For flowers and ornamental vines, consider clematis, climbing roses, morning glory, honeysuckle, jasmine, passionflower, black-eyed Susan vine, and climbing hydrangea. Always check whether a vine is invasive in your region before planting. A beautiful vine that takes over the neighborhood is less “garden charm” and more “green villain origin story.”
Common Mistakes to Avoid
The first mistake is choosing a trellis that is too weak. Lightweight decorative panels are fine for small annuals, but they will not support large woody vines. The second mistake is installing a trellis too close to a wall. Without airflow, moisture can linger and damage surfaces. The third mistake is waiting too long to train the plant. Once stems harden, bending them can cause breaks.
Another common problem is poor anchoring. A trellis may seem stable when it is empty, but add leaves, fruit, rainwater, and wind, and the load changes quickly. Finally, avoid using harsh ties. Thin wire or tight plastic ties can cut into stems as plants grow. Soft, flexible ties are safer and easier to adjust.
Extra Experience: What Home Gardeners Learn After Putting Up a Trellis
The first thing you learn after installing a trellis is that plants do not always read the instructions. You may carefully place a vine at the base of a beautiful support, only to watch it reach sideways for a tomato cage, a fence, or the nearest innocent shrub. This is normal. Training plants is part gardening, part negotiation. The earlier you guide new growth, the easier the process becomes.
One practical lesson is to install the trellis before the plant gets large. Many beginners plant first, wait until the vine starts sprawling, and then try to slide a trellis behind it. That usually ends with bent stems, muddy knees, and language not approved for family gardening blogs. Put the structure in place first, then plant. The roots will settle without disturbance, and the stems will have support from day one.
Another experience-based tip is to think about harvesting. A trellis full of cucumbers looks great until you realize half the fruit is hiding on the back side against a fence. If you are growing vegetables, leave enough room to reach both sides or choose a trellis design that keeps fruit visible. Arched cattle-panel trellises are popular because beans and cucumbers hang down inside the arch, making harvest feel like a treasure hunt without the pirates.
Wind is another teacher. In calm weather, almost any trellis looks sturdy. After the first storm, you discover whether the structure is truly anchored. Tall trellises, privacy screens, and leafy vines catch wind like sails. If your yard is breezy, use deeper posts, stronger brackets, wider bases, or guy wires for extra support. It is much easier to reinforce a trellis in spring than to rescue it from the neighbor’s lawn in July.
Gardeners also learn that airflow matters more than expected. Dense vines can trap humidity, especially near walls and fences. Proper spacing behind wall trellises, thoughtful pruning, and avoiding overcrowding all help reduce disease pressure. A healthy trellised plant should look full, not suffocated.
Finally, a trellis changes the personality of a garden. It adds height, rhythm, and structure even before plants cover it. In winter, a well-built wood or metal trellis can still look attractive. In summer, it becomes a living wall, a harvest station, a privacy screen, or a flower-covered backdrop for morning coffee. Done right, putting up a trellis is not just a weekend project. It is a small investment in a garden that grows upward instead of outwardand that is excellent news for anyone whose yard is more “cozy postage stamp” than “country estate.”
Conclusion
Learning how to put up a trellis is mostly about planning well, anchoring securely, and matching the structure to the plant. Choose a sunny location, use weather-resistant materials, leave airflow space behind wall-mounted trellises, and train plants while stems are young. Whether you are growing cucumbers in a raised bed, roses on a patio wall, or beans over an arched walkway, a sturdy trellis helps your garden grow cleaner, healthier, and more beautifully.
Note: This guide is intended for general home gardening projects. For tall structures, masonry mounting, heavy perennial vines, or any digging near utilities, follow local safety rules, manufacturer instructions, and proper building practices.
